
Today, we’re diving into the essential tools that help polish your mix to perfection: the best EQs for mastering.
Whether you’re aiming for transparent tonal shaping or adding subtle analog character, a good mastering EQ gives your track that final sheen it needs to compete professionally.
Mastering EQs are not your average mixing tools. They’re designed to be more precise, more transparent, and more musical, the kind of gear you reach for when every little detail counts. They often feature stepped controls, mid/side modes, and gentle filter curves that make nuanced changes easy and consistent.
Some mastering EQs emulate vintage hardware like the Pultec, GML 8200, or Massive Passive, while others go full modern with features like dynamic bands, transient separation, or visual feedback.
And while there’s no one-size-fits-all solution, the best ones are versatile. You’ll find plugins that can surgically notch a rogue frequency at 250Hz, or others that gently tilt your entire tonal balance with just one smooth gesture. The key is control and clarity, not heavy-handed tweaks.
Let’s check out the mastering EQ plugins that deliver clean curves, pro-grade results, and buttery workflows, whether you’re finishing a club banger or an ambient soundscape.
1. Pulsar 8200 EQ

My first pick, Pulsar 8200 shines with its ability to give you that GML 8200 transparency with a seriously modern, workflow-driven design.
Pulsar Audio 8200 EQ is more than a simple hardware emulation, it adds unique features that really speed up the mix and mastering process.
The interface is a breeze to use and I’m a fan of the resizable window, split between classic rack controls and a fully interactive curve display. Visual editing, band naming, and channel modes are all right where you’d hope. Even on heavy sessions, this plugin feels buttery-smooth and intuitive.
- Visual Curve Editing
The drag-and-drop curve editor comes in super handy, as I can quickly sculpt my EQ points and instantly see the effect. Naming filters in the editor is a small touch that saves me time when I revisit sessions.
- Built-In De-Esser
I find the onboard de-esser especially useful for vocals and overheads. Tuning the amount and frequency is simple, and the bell or shelf modes let me get detailed or broad as needed.
- Mid-Side and Left/Right Processing
Switching between mid/side or left/right modes is fast and easy. I love being able to solo the mids or sides and really hear what my EQ tweaks are doing in the stereo field.
- Auto-Gain Compensation
Auto-gain keeps level changes under control. I appreciate that it uses smart, C-weighted compensation so my EQ tweaks don’t fool my ears by just making things louder.
- Tilt Filter
The analog-style 6-pole tilt filter is a go-to for fast, global tonal adjustments. I often grab it to nudge a mix from too dark to bright without over-complicating.
- Sub & Air Bands
I always reach for the dedicated Sub and Air bands when I want musical low-end weight or a sweet, un-harsh top end. These are great for mix bus polishing.
I recommend using stepped mode for gain and frequency tweaks; it’s perfect when you need precise, recallable settings.
I reach for Pulsar 8200 on mixes and mastering chains whenever I want clear, flexible tone shaping and super quick results. If clarity, control, and a sweet mix workflow matter to you, you’ll love it too.
Pulsar 8200 comes in VST2.4, VST3, AU, and AAX formats for macOS and Windows users.
2. LANDR Mastering Plugin PRO
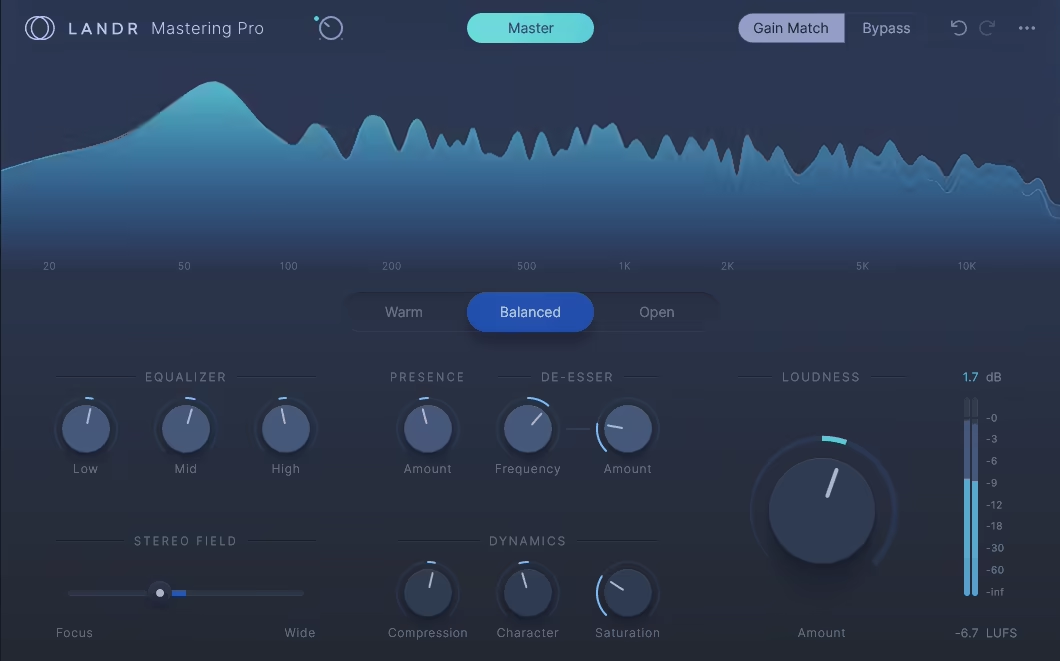
The most immediate win for me with LANDR Mastering Plugin PRO is having its AI mastering smarts right inside my DAW.
No more bouncing tracks or waiting for an online service, cause LANDR Mastering Plugin PRO delivers that signature LANDR polish instantly, which has seriously sped up my workflow.
It feels like having a dedicated mastering assistant ready to go, making the final stage of production much less of a guessing game.
The workflow is like a beginner’s dream; just drop the plugin on the master bus and get instant results. I really enjoy that the AI engine tailors a unique mastering chain for each track, but then I still get to make the final tweaks myself, ensuring it fits my vision.
- AI-Powered Mastering Engine
I find the AI engine genuinely impressive. It listens to my mix and crafts a custom set of adjustments for EQ, compression, and stereo width, feeling way more responsive than any generic preset I’ve tried.
- Instant Previews & Real-Time Adjustments
Being able to hear changes immediately with instant previews is crucial. I can adjust settings and know exactly how it’s shaping the sound without any frustrating rendering delays, which really helps maintain creative momentum.
- Customizable Sound Shaping
My favorite aspect is the choice between Warm, Balanced, or Open sound profiles. After the AI does its thing, I can easily fine-tune using straightforward controls for EQ, compression, stereo width, and loudness, giving me just the right amount of hands-on control.
- Seamless DAW Integration
The seamless DAW integration is a huge time-saver. If I need to tweak my mix, the master updates instantly within my session, making revisions incredibly quick and painless.
The only real downside for me is that if I’m after highly artistic or unconventional mastering, a specialized human engineer is still my go-to.
But for quickly getting demos, singles, or even many final releases sounding polished and competitive, this plugin is an absolute workhorse.
Honestly, even tough I don’t like AI in music production, LANDR Mastering Plugin PRO offers quite a bit of value for achieving that quick “final polish” without the usual fuss.
It’s like having an incredibly efficient assistant that makes my tracks sound release-ready, and I use it on nearly everything that needs a quick, high-quality master.
LANDR Mastering Plugin PRO is available in VST3, AU, and AAX formats for macOS and Windows.
3. Brainworx SPL PQ

The SPL PQ plugin is my secret weapon when I need surgical yet incredibly musical equalization, especially thanks to its unique ability to switch each band between Constant Q and Proportional Q.
This feature, faithfully emulating SPL’s groundbreaking 120V rail technology, brings a level of analog precision and flexibility into my DAW that I haven’t found elsewhere.
Working with SPL PQ feels like sitting in front of the revered hardware unit, complete with its 5 fully parametric bands per channel.
The interface is an exact replica, so it’s instantly intuitive, and the emulated detented (stepped) potentiometers make recalling precise settings an absolute fun.
- Constant Q / Proportional Q Switching (Per Band)
This is where the PQ truly shines for me, as I love being able to flip any of the 5 bands between Constant Q for those ultra-precise, corrective EQs, or Proportional Q when I need broader, more musical shaping. It’s like having two distinct high-end EQs in one.
- 1/4 Gain Switch
When I’m mastering, the “1/4 Gain Switch” is invaluable. It instantly changes the gain range from a substantial +/-20 dB down to a much finer +/-5 dB, which is perfect for making those subtle, critical adjustments without overdoing it.
- Brainworx “Extra Unit” with TMT & M/S Processing
The Brainworx “Extra Unit” is where this plugin takes a leap beyond the analog original. Their Tolerance Modeling Technology (TMT) adds that subtle channel-to-channel variation, giving multiple instances a genuinely analog console feel.
Plus, the built-in M/S Processing lets me EQ the mid and side signals independently without needing extra plugins or complicated routing.
- Mono-Maker & Stereo Width Controls
I frequently use the Mono-Maker to ensure my low-frequency content is focused and punchy by summing it to mono.
The Stereo Width control is also fantastic for either expanding the stereo image or tightening it up, all within the same interface.
The only downside I can think of is that its depth might be a bit much if you just need a quick, simple EQ, but for serious work, it’s unparalleled.
I’d recommend really to explore the difference between Constant and Proportional Q on various sources, cause it opens up so many tonal possibilities.
For me, the SPL PQ plugin is a non-negotiable tool for both demanding mixing tasks and detailed mastering sessions.
SPL PQ Mastering Equalizer plugin is available in VST, VST3, AU, and AAX formats for macOS and Windows users.
4. Brainworx TOMO Audiolabs LISA

The reason I like TOMO Audiolabs’ LISA is its approach to dynamic EQ with an independent opto-compressor cell for each of its 6 bands.
LISA EQ isn’t just another EQ; it’s a mastering-grade, all-analog concept brought meticulously into the box by Brainworx, offering a truly unique way to sculpt and control audio.
At first glance, the interface, modeled directly on the boutique hardware, can feel a bit dense, especially with its dual-channel layout reminiscent of classic Sontec or Massenburg EQs.
However, once I got familiar with its unique workflow, I found it relatively intuitive for an “ears-first” approach. The beauty is that your EQ cuts and boosts aren’t static; they breathe and react to the audio, making it incredibly musical.
- 6 Bands of Dynamic Opto-Compression/Expansion
I love that each of the 6 bands per channel has its own dedicated opto-compressor and expander.
You can choose between a smooth 3:1 or a more assertive 10:1 ratio, and tweak attack/release settings (slow, medium, fast). This allows for incredibly nuanced dynamic control within specific frequency ranges.
- Proportional Q Bandwidths
The proportional Q behavior is great. As I make deeper cuts, the bandwidth narrows for surgical precision. Conversely, larger boosts become tighter and more focused, almost note-like, preventing things from sounding overly broad or smeared.
- Parallel Circuit Design
LISA’s parallel circuit concept is another star here. Unlike traditional series EQs where all processing artifacts build up, here, each band is processed more like on a mixing console.
This means I can make more extreme EQ changes that sound surprisingly transparent and musical.
- Plugin-Only Additions: TX Drive & Brainworx Extras
The Brainworx additions are always welcome. I particularly appreciate the new TX Drive, which lets me dial in transformer saturation independently.
Staples like TMT (Tolerance Modeling Technology) for analog channel variance, Mono Maker, Stereo Width, and Auto Listen make it even more powerful in a digital workflow.
The main con here is that it can be heavy on CPU, so using multiple instances on individual tracks might tax some systems, and the GUI, while authentic, feels a bit cluttered, especially when working in linked stereo.
Also, there’s a bit of a learning curve to fully grasp its unique dynamic EQ approach, especially how expansion is used for dynamic cuts.
Although it’s not in my usual suspects, I think TOMO Audiolabs’ LISA can become an indispensable tool for the master bus and even select individual tracks like bass or vocals.
TOMO Audiolabs LISA plugin is available in VST, VST3, AU, and AAX formats for macOS and Windows users.
5. FabFilter Pro-Q 4
One of my all-time favorite EQ’s, FabFilter Pro-Q 4, is like the ultimate digital EQ precision tool that somehow keeps getting smarter.
What really sets Pro-Q 4 apart for me, beyond its pristine sound, are the workflow enhancements like EQ Sketch Mode and the incredibly powerful Instance View.
Using Pro-Q has always felt intuitive, and version 4 just refines that. The interface is familiar but even cleaner, packing a ton of features without ever feeling cluttered.
I love that I can just grab a band and start sculpting, or dive deep into its advanced features with a simple click.
- EQ Sketch Mode
I’ve found the EQ Sketch Mode surprisingly useful for quickly roughing out an EQ curve.
Instead of meticulously adding and adjusting multiple bands, I can just draw the general shape I’m after, and Pro-Q 4 intelligently creates the necessary bands. It’s great for fast, broad strokes, especially when I’m trying to quickly carve space in a busy mix.
- Spectral Dynamics Mode
The Spectral Dynamics Mode is a great for taming harshness or specific resonant frequencies without affecting the overall tone.
It’s like having a dynamic EQ built into every band. I use this a lot for de-essing vocals or controlling aggressive cymbals, and the added attack and release controls give me even more precision.
- Instance View
For me, the Instance View is one of the most significant workflow improvements. Being able to see and adjust every instance of Pro-Q 4 in my project from a single window is incredible for tasks like balancing kick and bass, or ensuring different guitar layers are gelling.
- Character Modes
The new Character Modes (Clean, Subtle, Warm) are a nice touch for adding a hint of analog-style color.
While they won’t replace dedicated saturation plugins for intense effects, I find the “Warm” mode can add a pleasant thickening to vocals or synths right within the EQ.
One thing to be mindful of is that the Character Modes are quite subtle; if you’re looking for heavy saturation, you’ll need other tools.
Also, while Spectral Dynamics is incredibly powerful, it’s easy to overdo it and suck the life out of a track if you’re not careful, especially in the high frequencies.
For me, Pro-Q 4 has become the EQ I reach for by default. Its combination of surgical precision, innovative workflow features, and transparent sound quality is almost unmatched.
FabFilter Pro-Q 4 comes in VST, VST3, AU, and AAX formats for macOS and Windows.
6. Sonnox Oxford EQ
The Sonnox Oxford EQ is a bit of a legend because of its incredibly clean sound and its ability to emulate the character of classic hardware console EQs.
Oxford EQ is one of those straightforward, no-fuss plugins that just delivers professional results, especially when I need surgical precision or that subtle, musical shaping reminiscent of high-end analog gear.
I find the design of the Oxford EQ (the static version) very easy to get my head around. The visual window clearly shows how I’m affecting the audio, and the layout is logical.
The 5 main frequency bands (Low, Low Mid, Mid, High-Mid, High) give me plenty of control, and the addition of low and high pass filters with variable slopes (6dB to 36dB/octave) is essential for cleaning up mixes.
- Selectable EQ Filter Types
For me, the standout feature of the static Oxford EQ is the ability to switch between 4 distinct EQ filter types.
Type 1 is my go-to for surgical, precise equalization. Type 2 is similar but with fixed Q values during attenuation, which can be useful.
Type 3 introduces a Gain-Q dependency that sounds very much like a classic Neve console, I love this for adding warmth and character.
Type 4 has an even more pronounced Gain-Q dependency with very subtle curves, making it perfect for mastering or gentle shaping on the mix bus.
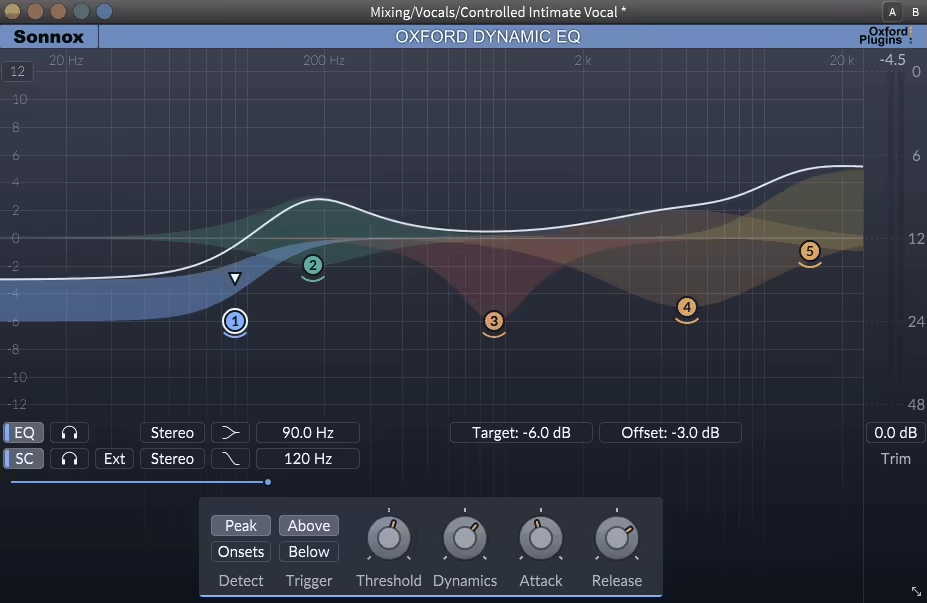
- Proportional Q (in Dynamic EQ & Type 3/4 Static EQ)
When discussing the Sonnox Oxford Dynamic EQ, its proportional Q response (based on the static EQ’s Type 3) is a huge part of why it sounds so natural.
As I apply more gain or attenuation, the bandwidth narrows, which often feels more musical than a fixed Q, especially when dealing with dynamic changes.
- Flexible Dynamic Control (Dynamic EQ)
The Dynamic EQ version offers fantastic control as I can set Thresholds, and choose whether the dynamic gain change happens Above or Below that threshold.
The Dynamics control acts like a ratio, and familiar Attack and Release controls let me dial in the timing. I also appreciate the Offset Gain (static EQ applied when dynamics aren’t active) and Target parameters (limiting the dynamic gain change).
- Advanced Side-Chain Options (Dynamic EQ)
The Dynamic EQ’s side-chain is very versatile. I can filter it with a high/low pass or a parametric EQ, listen to the side-chain signal, and even use an external side-chain source.
The ability to trigger the dynamics from the left, right, mid, or sides signal individually is incredibly powerful for problem-solving.
One thing to note with the static Oxford EQ is that its default gain scale can be quite wide; I often find myself switching it to the -6dB to +6dB setting for mastering, as that’s usually all the subtle adjustment needed.
For me, the Sonnox Oxford EQ (in both its static and dynamic forms) is a true workhorse. The static version is fantastic for clean, precise EQ work or for imparting classic console character.
The Dynamic EQ is simply one of the most transparent and natural-sounding dynamic equalizers I’ve used, perfect for taming harshness, controlling boomy bass, or subtly enhancing elements in a mix without making it sound “processed.”
Sonnox Oxford EQ and Dynamic EQ plugins are available in AU, VST3, AAX-Native, and AAX-DSP formats for macOS and Windows.
7. Kiive Audio M5133

What caught my attention about the Kiive Audio M5133 is how it takes the soul of the legendary Focusrite Blue 315 and enhances it for a modern workflow.
I like that M5133 has the three generations of mastering magic in one plugin, with 3 unique saturation modes that let me add anything from subtle warmth to aggressive harmonic excitement.
The workflow is quite intuitive for me as I love the solo band monitoring (that little headphone icon is genius) and the clean layout that puts all the powerful controls right where I need them.
Though fair warning: the saturation section is so much fun to tweak that I’ve definitely lost hours just playing with different harmonic combinations instead of actually finishing mixes!
- 3 Generations of Analog Magic
By blending the best characteristics from different Blue 315 revisions, this EQ delivers those great, musical curves that just work.
I constantly find myself reaching for it when I need to gently lift highs without harshness or tighten lows without mud.
- 3 Saturation Modes and Precise Harmonic Control
The independent 2nd & 3rd-order harmonic knobs are a game-changer.
My go-to move is using the “Vintage” mode on vocals for subtle glue, then switching to “Modern” mode when I need drums to punch through a dense mix.
- Mastering-Grade Flexibility
The switchable shelf/peak filters and high/low-pass options make it really versatile. I’ve saved countless mixes by using the low shelf to clean up boominess while the saturation keeps everything lively and present.
- Mid-Side & Oversampling
When I need surgical control, the M/S mode lets me widen the stereo image or tame harsh center frequencies, while oversampling keeps everything clean and artifact-free.
My only real complaint? I wish it had customizable presets, the included ones are great, but I’d love to save my own go-to settings for different genres.
Whether I’m putting final polish on a master or adding character to individual tracks, the M5133 has become my secret weapon for that perfect blend of analog vibe and modern precision.
Kiive Audio M5133 comes in VST3, AU, and AAX for macOS and Windows users.
8. AMEK EQ 200

Amek EQ200 deserved a spot in the list thanks to its ability to boost 20kHz without the mix turning brittle, it’s surgical without ever sounding sterile.
Unlike most “vintage-style” EQs that just chase the GML 8200 or Sontec glow, this one adds modern tools like Auto-Listen, Gain Scaling, and M/S processing that make precision mastering feel way faster and more musical.
The AMEK EQ 200 interface feels super clean and practical. I like that the lower section can collapse to keep things uncluttered, and the layout just makes sense, no hunting for controls, no guessing what’s active.
The Auto-Listen feature solos frequency bands as I adjust them, which feels like having x-ray hearing on command.
This isn’t a carbon copy, but it captures that ultra-transparent tone I crave for mix bus work. I boost air at 20kHz or tighten low-end around 40Hz without ever introducing harshness.
- TMT (Tolerance Modeling Technology)
I’ve used TMT across sessions to subtly randomize stereo behavior or emulate analog variance across multiple channels. Even on a stereo bus, it adds that unpredictable, “lived-in” feel that makes mixes breathe.
- Gain Scaling & Invert Function
One of my favorite mastering tricks is cranking a boost to find annoying frequencies, flipping the Invert button, and then scaling it back down cleanly. It’s fast and surgical, and I use it all the time on vocals and stereo groups.
- M/S Processing & Mono-Maker
The stereo width knob and Mono-Maker are lifesavers when I want to tighten up a boomy low-end or give more space to mids and highs. Perfect for fixing muddy wide mixes or taming phasey low end without touching the sides.
- Auto-Listen & Modifier Keys
Holding down a key solos the band I’m tweaking, which helps me zero in on issues without wasting time sweeping blindly. It’s a tiny detail that completely changes how I EQ.
- THD (Harmonic Distortion)
THD adds a subtle third harmonic sheen, but I do wish it had a bit more character when I want a grittier tone. Still, for transparent mastering, it keeps things classy and controlled.
No visual EQ curve might bug some users. I do sometimes miss having a spectrum display for fast fixes. And yeah, the THD saturation is super subtle, so if you’re expecting Neve-style drive, you won’t get it here.
Amek EQ200 is a handy tool when I need clean, detailed shaping that doesn’t smear the mix.
It’s pretty good on the master bus, vocals, acoustic instruments, basically anything where I want clarity without coldness. If you’re after high-end analog tone but want the perks of a modern DAW environment, this one seriously delivers.
AMEK EQ 200 comes in AAX, AU, and VST3 for macOS and Windows users.
9. Knif Soma EQ

Knif Soma is one of those rare EQs that actually pulls off being both silky and precise, a passive tube design that doesn’t fall into the usual mushy low-end trap.
I like how Soma brings the lush weight of a Massive Passive or Pultec, but with surgical control that makes it totally mastering-ready.
The first time I boosted 3.3kHz on a vocal without adding a hint of harshness, I knew this wasn’t just another “vintage vibe” plugin as it sounded like a refined beast that sounds expensive in the best way.
The interface is slick and to the point. Stepped controls make it perfect for recalls, and the Real Q Adjustment is a nice touch for passive EQs cause it keeps your gain stable while you tweak bandwidth.
I also dig the elliptical high-pass filter and M/S matrix, which give me serious low-end control without killing the stereo image.
- Passive Tube Design
This EQ adds weight and warmth without blurring detail, which is rare for a passive tube design.
I’ll boost a shelf at 22kHz or cut around 47Hz, and it stays tight; no wooliness, just smooth, analog richness that feels polished and intentional.
- Real Q Adjustment
Adjusting the bandwidth doesn’t shift the gain, which goes well for a passive EQ. It allows me to carve out low-end mud or tame honky mids without having to constantly rebalance the level to just focus on the tone.
- Stepped Controls
Each knob moves in 0.5dB increments, and the frequency selections are locked to musical intervals.
It’s ideal for mastering sessions where recall and consistency matter, and I never have to second-guess a setting during revisions.
- M/S Matrix + Elliptical HPF
The elliptical high-pass filter is one of my favorite tools for subtly cleaning up the side channel without thinning the overall mix. It’s especially powerful on muddy vocals or busy acoustic recordings where stereo clarity is key.
- TMT and Drive Controls
The Tolerance Modeling Technology introduces subtle channel-to-channel variation for an authentic analog feel. I’ll often crank the input drive to dial in a bit of tube saturation; smooth and musical, never overcooked.
No visual EQ curve can be a downside if you’re used to seeing everything, but I found myself mixing faster once I trusted my ears.
Well, don’t expect thick saturation, this plugin is more about finesse than grit. And yeah, it’s pricey, but way cheaper than the $15K hardware Soma it’s modeled on.
I liked working with the Knif Soma which gave me buttery highs, solid lows, and a clean midrange that doesn’t sound flat. It can be great on vocals, acoustic guitars, and full masters when you want everything to feel a little more expensive.
Knif Soma comes in AAX, AU, and VST3 for macOS and Windows users.
10. AVA Mastering EQ
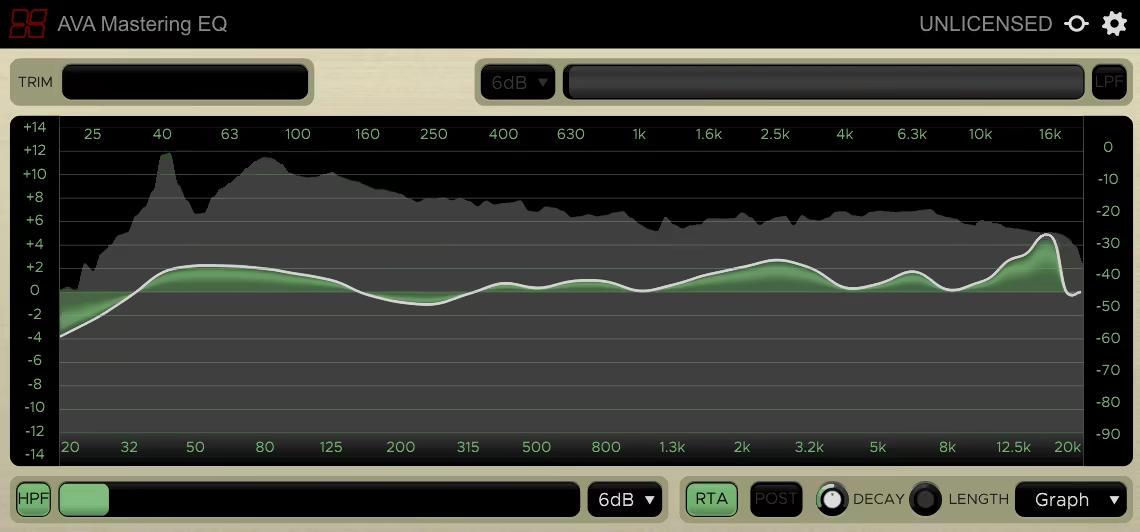
I love how Harrison AVA Mastering EQ turns EQ tweaking into a tactile, almost artistic process. Rather than fiddling with individual bands, I just drag across the frequency spectrum like I’m painting tone onto my mix.
What makes AVA stand out is how it automatically smooths adjacent bands, so I get musical, natural curves without the jagged peaks you usually get with graphic EQs.
The interface is clean and simple, with a resizable display that’s easy on the eyes and a handy momentary bypass (“ear” icon) for quick A/B comparisons.
Sure, there’s no built-in metering, so I keep an eye on my DAW’s output, but the Shift+drag smoothing feature stops me from going overboard, and the ±20dB trim helps me avoid accidental clipping.
- Paint-Style EQ
Need a wide high-shelf boost with a dip at 2.5kHz? I just swipe up across the highs, then drag down on the problem spot, this means no juggling multiple parametric bands or complicated setups. It feels super intuitive, like I’m literally painting the tone onto my mix.
- Auto-Smoothed Curves
Unlike classic graphic EQs that can create those nasty jagged bumps, the Harrison AVA smooths all boosts and cuts automatically.
I use this feature all the time to gently tame midrange frequencies without introducing any harsh resonances or weird artifacts.
- Gentle High/Low-Pass Filters
The high- and low-pass filters aren’t surgical razor blades, but that’s exactly what makes them so useful.
I often engage the 12dB low-cut at 30Hz to clean up sub rumble or unwanted low-end noise before dialing in broader tonal changes, giving mixes a tighter foundation without sucking out body or warmth.
The downside is that no built-in metering means I watch my DAW output closely, and it’s not the best for surgical notch cuts. I still reach for a parametric EQ for that.
But for broad tonal shaping, especially prepping mixes for streaming, this plugin is a total lifesaver. I’ve saved so many sessions by quickly tilting dull mixes with a low-cut plus high-shelf or smoothing harsh spots with a few mouse sweeps.
AVA comes in VST, AAX, and AU for macOS and Windows users.
11. iZotope Ozone EQ (FREE)

I honestly didn’t expect iZotope, oops, I mean Native Instruments now, to drop a standalone Ozone EQ for free, but here we are.
The Ozone 11 Equalizer isn’t just a stripped-down teaser; it’s a fully capable, pro-grade EQ that adds serious value to any mastering chain.
I really enjoy how refined and responsive it feels. The interface is straightforward as it can be, and the controls are dialed in so well that I can make surgical moves or broad tonal sweeps without second-guessing anything.
- Transient/Sustain Mode
This is where the magic happens as I can shape the transients and sustain portions of a signal separately, like boosting the crack of a snare without muddying its tail or tightening up a kick’s punch while leaving the body intact.
- Delta Listening Function
You know that moment when you boost 1.5dB and think, “Did I even do anything?” The Delta button solves that by soloing the difference between dry and processed signal, letting me hear exactly what’s changing.
- Mid/Side & Analog/Digital Modes
Whether I’m going for surgical digital tweaks or a smoother analog-style curve, this EQ delivers both. Plus, with Mid/Side support, I can widen the stereo image or clean up the sides without touching the mono core.
There’s no iLok required (praise be), but you do need to install it through Native Access. If you’re not into Native Instruments’ ecosystem, that’s a small hoop to jump through.
Still, for a free plugin with mastering-grade precision and Ozone’s pedigree? The Ozone 11 Equalizer is a total no-brainer.
Ozone 11 Equalizer is available in VST3, AU, and AAX formats for Windows and macOS.
Final Words
Mastering EQs are the secrets that turn a good mix into a polished, professional track. Whether you’re sculpting with the warmth of analog emulations or fine-tuning with clinical digital precision, the right EQ gives you total control over your sound.
From free ones to premium choices, there’s something here for every budget and workflow. Just remember, great mastering starts with great ears (and maybe a really nice pair of headphones)!
