
In this article, we visit the realms of “ Best Plugins For EDM Music Producers.”
Finding the right EDM plugins in 2026 feels a bit like scrolling through an endless festival lineup, everything looks exciting, everything claims to be “the one,” and somehow you still end up loading the same two synths you’ve used since forever.
I’ve built entire tracks around a single preset, chased new plugins for inspiration, and blown way too many late nights tweaking a drop that just refused to hit.
This list isn’t about hype; it’s about the tools that actually make a difference when you’re crafting builds, designing huge leads, or squeezing every ounce of energy into a drop.
Let’s dive into the essentials shaping EDM production this year, the heavy-hitters, the clever problem-solvers, and a few free gems that hit way harder than you’d expect.
1. XFer Serum 2

With Serum 2, you can create just about anything you can imagine for EDM music and beyond.
The thing that grabbed me instantly is how it’s no longer “just a wavetable synth”, the new engines, extra oscillator, and deeper modulation turn it into a true hybrid monster. I opened Serum 2 expecting a familiar upgrade and ended up losing an hour just designing sounds for fun… which doesn’t happen often anymore.
The interface is wider and cleaner, still totally Serum, but with more room to breathe. And the fact that every Serum 1 preset works flawlessly means there’s zero reason not to switch.
- New Oscillator Engines
The granular, spectral, and multisample modes are where Serum 2 really flexes. I’m obsessed with the spectral engine, it gives pads, supersaws, and basses this smooth, blurry harmonic richness that slots right into modern EDM. Add in the third oscillator and dual warp modes, and suddenly you’re building movement with way more depth.
- Dual Filters
One filter was always a limitation. Two filters feel like freedom. I can now shape tone and automate movement at the same time, which is a game changer for drops, future bass chords, and bass patches that need evolving expression. The Diffuser filter is wild for disperser-style attacks.
- FX System Upgrade
Three FX busses, multiple instances of every effect, mid-side paths, and a new convolution reverb, this is massive. Stacking distortions, building parallel chains, or sculpting inside the synth makes Serum 2 feel closer to a modular FX rack than a typical soft synth.
- Modulation Power
Up to 10 LFOs, plus chaos modes, Path LFOs, and mod remaps (finally!) give Serum 2 the movement modern EDM needs. This is where bass design really comes alive.
- Arp & Clip Launcher
I didn’t expect to love these as much as I do. Storing riffs, rhythms, and macro automation inside presets speeds up drop writing instantly. It turns Serum 2 into a quick idea machine.
Serum 2 instantly feels like the new EDM standard, more engines, more depth, more movement, all while keeping everything I loved about the original.
You can also check out Serum 2 EDM presets, these are in abundance.
Serum 2 comes in VST, AU, and AAX formats for macOS and Windows users.
2. UJAM Beatmaker EDEN
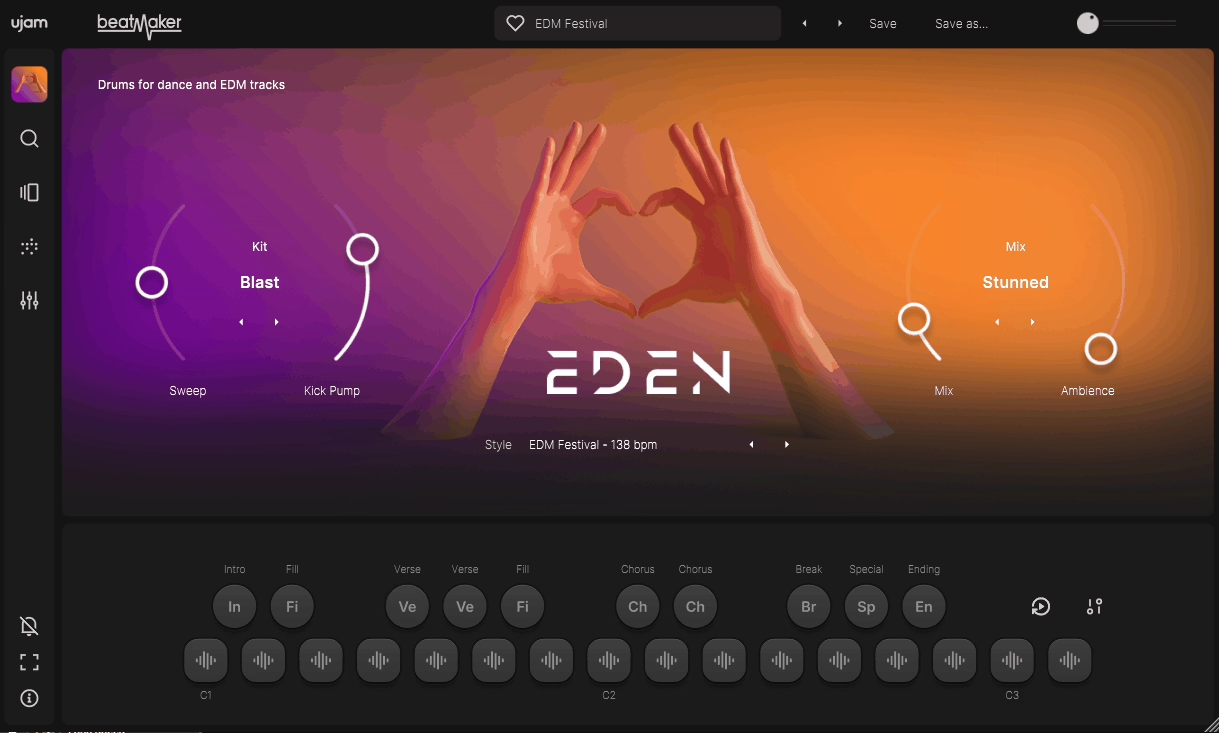
Ujam’s Beatmaker 2 stood out to me right away because it solves one of the biggest EDM workflow killers: slow drum building.
I love tools that help me move fast, and EDEN drops fully arranged grooves into my project before I’ve even touched a synth. It’s simple, colorful, and finally flexible enough to use in full productions, not just quick sketches.
The interface feels effortless, but once you start swapping kits, dragging phrases, and stacking patterns, it opens up in a way I didn’t expect. For EDM, it’s the kind of plugin that keeps ideas flowing instead of trapping you in sound hunting.
- Phrase Drag and Drop
The moment I grabbed patterns straight from the plugin into my DAW, I started treating Beatmaker 2 like an actual songwriting partner. Intros, fills, drops, done in seconds. I use it constantly when I need a full drum structure fast so I can build synth layers on top without losing momentum.
- Kit Building and Genre Engines
Being able to swap individual drums, blend kits, and use genre sliders like Eden’s Kick Pump feels like having instant style presets for EDM rhythms. I’ve dropped Eden patterns into house and big-room projects and they just fit, no fighting the groove.
- Multiple Outputs and Mix Section
This is the game-changer: each drum can be routed to its own DAW channel. Once I split the kick, snare, hats, and percussion, Beatmaker 2 turns into a full-on drum workstation. For EDM mixing, that’s huge, parallel compression, saturation chains, OTT on percussion… all fair game now.
Beatmaker 2 has a quick, inspiring feel but still holds up when you push it in a real mix. I reach for it when I want instant drum momentum without programming from scratch.
Beatmaker 2 comes in VST, AU, and AAX formats for macOS and Windows users.
3. UJAM Beatmaker HYPE

Without any setup, HYPE drops you straight into that festival-ready EDM energy.
Whenever I want instant bounce or need a groove that already feels mixed, HYPE is the one I reach for. I love how it turns a blank project into something that actually feels like a track, thumping kicks, bright claps, and that polished house attitude all baked in.
The workflow is exactly why it keeps earning a spot in my sessions. Everything is visible, responsive, and fast, so I never get distracted tweaking menus. It’s the ideal “just play and go” drum plugin, especially when I’m trying to build momentum on an EDM idea.
- Riser Control
What pulls me in with the Riser is how one knob handles the full build-up chain , sweep, lift, tension , all in a way that reacts musically. I use it constantly before drops because it saves me from stacking automation lanes and still feels expressive.
- Kit and Mix Sliders
These sliders do so much heavy lifting. They reshape the drums behind the scenes, giving me punchier kicks, tighter snares, or brighter transients with barely any effort. I love how fast I can turn a preset groove into something that fits the vibe of the track without having to micromanage anything.
- Drum and Master Controls
Being able to repitch kicks, adjust clap/snare balance, sweep the filter for breakdowns, and add global saturation makes HYPE surprisingly deep. It’s the perfect middle ground between instant gratification and real control, and I use these tools all the time to glue the kit into the mix without extra plugins.
If I’m stuck or just want to spark an idea, HYPE is one of my quickest ways out of a creative slowdown. It’s fun, flexible, and delivers that EDM punch immediately.
Beatmaker HYPE comes in VST, AU, and AAX formats for macOS and Windows users
4. PluginBoutique Scaler 3

Scaler 3 earns its place on this list because it isn’t just a chord helper, it feels like a full songwriting partner.
I love how Scaler 3 bridges real music theory with hands-on creativity. Whenever I’m searching for a vibe or trying to break out of the same four progressions I always reach for, Scaler gives me ideas I would’ve never found on my own.
The interface feels more like a small composition studio than a plugin. I can browse scales, sketch chords, reshape voicings, build basslines, add melodies, and even load my own synths right inside its mixer. It keeps me in a creative flow without bouncing around my DAW.
- Advanced Scale & Chord Browsing
The first thing that hooked me is how quickly Scaler finds inspiration. I just tap a few notes on its keyboard and it immediately pulls up matching scales, often ones I’ve never worked in.
Discovering Dorian b5 or Altered progressions by accident feels like cheating in the best possible way. It’s my favorite place to go when I want harmony that feels fresh without being “random.”
- Suggestion Engine & Creative Tools
Scaler’s suggestion tools feel like having a theory-trained producer sitting over my shoulder. When I’m searching for a more colorful third chord, the Suggest window offers tensions, substitutions, turnarounds, and other moves that make my progression feel intentional.
Then there’s the Create tab, the Circle of Fifths builder, the voicing variations, the Motions library, all of it pushes me toward progressions with actual movement. I’ve stumbled into some of my best chord changes just clicking around in these tabs.
- MIDI Arrangement & Plugin Hosting
My favorite surprise in Scaler 3 is the built-in MIDI arranger. I can shape chord lines, bass patterns, and even melodic runs inside the plugin before I ever touch my DAW timeline. Pair that with the ability to load my own synths and effects directly into Scaler, and it becomes a legit mini-writing environment. It’s perfect for quick ideas or exploring harmonic options before locking anything down.
Scaler 3 is one of those tools that keeps teaching you something every time you open it. I reach for it when I want richer chords, unusual moods, or just a spark to get out of a creative rut, especially in EDM, pop, R&B, and cinematic tracks where harmony sets the tone.
Scaler 3 comes in AU, VST, AAX, and standalone formats for macOS and Windows users.
5. Sonic Academy Kick 3

As it lets me design a kick the same way I’d shape a synth patch, Kick 3 deserves the spot on the list.
When I’m building an EDM drop and the low end needs to lock perfectly with the bass, having full visual control over the transient, tail, and pitch curve is a huge advantage. It feels more like sculpting than editing, and that’s why I keep coming back to it.
The Kick 3 layout is familiar but cleaner, and everything updates in real time, so I can experiment without breaking the flow. Even with multiple layers stacked, the workflow stays quick enough to keep me in creative mode.
- Layering and Envelope Shaping
Kick 3 gives me 5 layers to combine subs and samples any way I want, which makes tailoring the “feel” of a kick ridiculously precise.
The phase-lock option is a life-saver because I can tweak the attack without messing up the tail’s alignment. And when I need tuned 808-style hits, selective pitch tracking keeps the thump steady while the low end follows the key.
- Expanded Effects Engine
The new effects section is where Kick 3 really grows up. Two FX buses plus a master chain, each with 15 effects, let me finish a kick entirely inside the plugin. The distortions add everything from warmth to aggressive festival punch, and the Complex Waveshaper and Brassify effects open the door to wild EDM bass textures.
- AI Kick Import
The AI import is easily one of my favorite additions. Drag in any kick you like, and Kick 3 rebuilds it as an editable preset with a synthesized sub and a separate click layer. If a sample is short, off-key, or just not cutting through the mix, I fix it in seconds without losing its character.
- Triggering and Workflow Tools
Kick 3 can also act as a drum replacer using the Trigger tab, which is great for reinforcing breaks or adding weight to live kicks. With the built-in limiter, EQ, and waveform export, it feels like a small kick-design studio inside one window.
Kick 3 comes in VST3, AU, and AAX formats for macOS and Windows users.
6. Minimal Audio Current 2

If you want a smart synth that knows exactly what it’s doing, Current 2 can be your best bet.
Every time I open Current 2, I’m reminded how wild the engine combo is , dual spectral wavetables, granular, sampling, and a clean sub all sitting under one roof. It’s one of those synths that just invites you to push things further.
The new Play View makes shaping presets faster, especially when I’m sketching EDM ideas and don’t want to dive into parameters. And even though it looks simple, it keeps me in a creative flow instead of getting lost in menus.
- Engines and Sound Design
What I love here is how quickly I can stack motion-heavy layers. Current lets me blend engines without ever feeling cramped, and the new Wave Shifter effect is the real standout, it’s this intense mix of spectral bending and distortion that instantly adds attitude to basses, risers, and leads.
- Modulation and Workflow
The updated modulation matrix is a big quality-of-life win. Being able to see everything at once makes complex patches way less intimidating. The new mixer panel also helps when I’m balancing the different engines inside a big EDM patch.
- Effects and Creative Play
Minimal Audio’s effects still carry a huge part of the vibe. Having the full suite inside the synth , Ripple Phase, Morph EQ, Cluster Delay, and more, means I rarely need to reach for external FX. It feels like a full sound-design environment, not just a synth.
Current 2.0 doesn’t reinvent anything, it just sharpens what was already one of the most powerful synths around. The update is free, the new features land well, and if you produce EDM with any sound-design focus, it’s easily one of the strongest picks right now.
Current 2.0 comes in VST2, VST3, AU, and AAX formats for macOS and Windows users.
7. Polyverse Comet

Comet instantly stands out because it doesn’t chase realism at all, and that’s why I reach for it when I want reverb that feels otherworldly instead of natural.
I really like how Comet takes even simple sounds and turns them into bright, glossy atmospheres. Nothing about it resembles a hall or a plate… it’s truly its own thing, and that makes it a secret weapon in electronic, pop, and experimental tracks.
Using it is almost too easy. The interface gives you Size, Decay, Color, Damp controls, and a couple of sliders that shape the vibe fast. What surprised me most is how quickly I can dial in a sound; it’s one of those reverbs where I rarely get stuck scrolling or tweaking tiny parameters.
- Reverb Tone and Character
What I enjoy most is how bright and expressive Comet can get without turning harsh. When I push Color high and leave Hi Damp low, it adds this shimmering “air” effect that feels half-reverb, half-enhancer. I’ve used it to lift vocals, widen synths, and give snares an exaggerated, modern shimmer.
- Detune Control
This is the feature that defines Comet for me. At zero, it leans metallic, but once I start turning it up, the tail transforms into a rich, dense, almost chorus-like cloud. That thickness makes it perfect for pads, transitions, and dreamy FX.
- Preset Morphing
I love storing five presets and gliding between them with the Glide knob. It turns reverb into motion, great for risers, vocal throws, and synth swells that need something more dramatic than a static “set and forget” tail.
- Creative FX Potential
When I need something ambient, infinite, or sound-design-heavy, Comet can create huge evolving tails, snappy short bursts, or washed-out pads you can sample. It’s not your everyday “realistic room” tool, it’s something you grab when you want reverb to be part of the hook.
Comet comes in VST, AU, and AAX formats for macOS and Windows users.
8. FabFilter Pro-Q 4

What immediately makes Pro-Q 4 stand out for me is how it takes the refinement of Q3 and folds in tools I normally need separate plugins for.
I’ve used Pro-Q for years, but I never treated it as the “all-in-one EQ.” With Q4, that line gets a little blurry, the Spectral Cleanup, Character modes, and Instance View genuinely change how I move through a mix, even when I try not to get swept up in the hype.
I’ve always appreciated how FabFilter keeps the interface clean even when it’s stacked with features, and Q4 keeps that tradition alive. The GUI feels flatter and more modern, and everything is tucked in logically so you can work fast without digging through menus.
- EQ Sketch
I like using EQ Sketch when I’m in rapid-fire idea mode. It’s basically freehand EQing, I can draw rough curves that get me in the ballpark instantly. For quick tonal shaping or experimenting inside Instance View, it’s handy even if I personally don’t rely on it for precise work.
- Spectral Cleanup
This is the big one. Pro-Q 4 now lets you “soothe” harshness directly inside the EQ. When I’m dealing with low-mid mud or pokey resonances, it’s incredible to have this built into the same window.
The attack, release and selectivity parameters let you shape the response with more intention. I do think it can over-polish the high end if you push broad bands too far, but used on specific problems it’s extremely effective.
- Instance View
Instance View feels like a completely different workflow. I love seeing every Q4 across the session in one window, copying settings, and comparing decisions without clicking around the DAW. It’s amazing for locking in kick-bass relationships or sorting out clashing synths. Some people will live in this window; others won’t touch it , I land somewhere in between.
- Character Modes
Adding Clean, Subtle, and Warm gives Pro-Q something I didn’t expect from FabFilter: actual tone shaping instead of strict transparency. Subtle adds tiny fingerprints of color, while Warm pushes even harmonics that thicken vocals, guitars, and synths in a really musical way.
Sound-wise, Q4 isn’t dramatically different from Q3, and honestly, that’s good. FabFilter has always been about precision and clarity. The upgrade is mostly about speed, control, and replacing extra plugins. The added attack & release controls for dynamics are huge, even though I still wish they showed actual milliseconds.
The only challenge is that having this many features in one place can tempt you to over-process. Spectral Cleanup especially can become a “why not?” button if your discipline slips. But used intentionally, Q4 keeps your workflow focused instead of scattered across five plugins.
FabFilter Pro-Q 4 comes in VST, VST3, AU, and AAX formats for macOS and Windows users.
9. FabFilter Pro-C 2

Pro-C2 shines with how predictable, clean, and musical it feels even when I’m smashing EDM elements harder than I should.
I love colorful compressors, but when I need precision for tight drops or fast transient work, Pro C-2 is the one that never fights me. It’s the compressor I load when I want control without sacrificing punch.
- Big Visual Display
I love how the gain curve, envelope, and knee display move in real time, because it helps me dial attack and release with zero guesswork. When I’m shaping kicks or bass, seeing the envelope react instantly keeps my workflow fast and intuitive.
- 8 Compression Styles
Punch snaps drums into place, Modern gives synths a clean edge, and Vocal smooths harsh toplines better than most dedicated vocal compressors. Each style feels like FabFilter purposely designed the envelope for a specific job, which makes the plugin feel smarter and more intentional than most.
- Knee-Hold-Lookahead Controls
A soft Knee and a bit of Hold let me shape pumping effects without flattening transients, and Lookahead adds polish when I need transparent leveling. These three controls alone give me more groove and timing flexibility than most compressors offer.
- Sidechain EQ with Mid/Side
I often cut sub lows from the detector so the compressor doesn’t choke during heavy drops, and M/S mode lets me compress wide pads without collapsing the stereo image. It’s one of the few compressors where the sidechain feels like a full mini-EQ.
- Mix, Range, and Oversampling
The Mix knob makes parallel punch effortless, and Range helps prevent over-compression when stacked EDM layers hit at once. Oversampling keeps highs clean when I’m aggressively shaping transient-heavy material.
Pro-C2 isn’t the compressor I pull for color, but when I want clean, modern, EDM-ready control, it’s honestly unmatched in both speed and consistency.
FabFilter Pro-C2 comes in VST, VST3, AU, and AAX formats for macOS and Windows users.
10. LennarDigital Sylenth1

I love that Sylenth1 delivers that big, warm, instantly-usable analogue sound faster than almost any soft synth I’ve ever touched.
When I’m building EDM leads, plucks, or basses and just want something that sounds right immediately, Sylenth1 is the synth that never slows me down. It’s the definition of “simple done perfectly.”
- Huge, Lush Unison Sound
The unison engine is the reason I fell in love with this synth, stacking up to 8 voices per oscillator with Detune and Stereo Spread creates those massive EDM supersaws with almost no effort. Every time I twist the detune knob, it feels like the sound just inflates in the best way possible.
- Usable Presets
The presets are still some of my favourites for quick inspiration. I love grabbing the classic EDM plucks, stabs, and rolling basses, because they already sit in the mix without me having to fix anything. When I’m sketching ideas, Sylenth1 is often the first synth I open simply because it starts me in the right direction.
- Effective Modulation
The two envelopes, two LFOs, and four mod slots might look basic, but I enjoy how quickly I can dial movement into leads or pads. It keeps me focused on the music instead of patching complexity, and sometimes that simplicity leads to faster, better results.
- Dual Filters with Analog-Style Character
The filters sound smooth, warm, and pleasantly powerful, especially with Drive and Warm Drive pushed a bit. They don’t have dozens of modes, but the tone they produce is exactly the kind of rounded, musical filter movement I want on EDM plucks and basses.
- Light CPU
Another thing that I really appreciate is that Sylenth1 stays unbelievably CPU-friendly, even with heavy unison stacks and detuning. I can layer huge chords, leads, and basses without freezing tracks or worrying about performance.
Sylenth1 might look simple next to today’s modern wavetable monsters, but when I want instant EDM-ready tone with zero friction, it remains one of the most reliable synths in my toolbox.
Sylenth1 comes in VST, AU, and AAX formats for macOS and Windows users.
11. Black Box Analog Design HG-2MS

I’ve always liked saturation tools, but HG-2MS gives me a mix of weight, movement, and harmonic control that fits EDM production really naturally.
When a sound feels a bit too clean or a drop needs extra size, HG-2MS is one of the easiest ways to add analog-style thickness without losing clarity.
- Tube Stages
The combination of 6U8A pentode/triode and 12AX7 tubes lets me blend subtle warmth with heavier drive. I use Density constantly since it pushes the tubes harder without changing output level, which keeps loud EDM buses stable.
- Parallel Saturation Filters
The LPF, HPF, Bandpass, and Bandstop modes make it easy to hit only the frequency ranges I actually want to saturate. I like warming mid plucks or adding low-end heft without exaggerating cymbal harshness.
- Mid/Side Processing
Being able to drive the Mid and Sides independently helps me widen pads or lift the edges of a drop without affecting punch down the middle. It’s especially useful when I want detail on the sides and power in the center.
- Tolerance Modeling Technology (TMT)
The tiny variations between modeled components add a natural sense of width and movement. I often flip through different TMT settings until the mid and side channels feel balanced in a musical way.
- Stereo Tools
I use Mono Maker, Stereo Width, and the improved Input/Output controls to keep the low end clean and the stereo field controlled. Width especially helps me shape how the added harmonics spread in the mix.
HG-2MS ends up on my synth buses, drum buses, and even my master chain whenever I want analogue-style color with precision control, especially in EDM where balance and weight matter so much.
Black Box Analog Design HG-2MS comes in VST2, VST3, AU, AAX DSP, and AAX Native formats for macOS and Windows users.
12. AIR Music Technology The Riser

I reach for The Riser whenever I want fast, dramatic uplifts or transitions without building a sound from scratch.
The Riser is designed specifically for EDM-style movement, and once you get used to the envelope workflow, it becomes one of the quickest ways to generate tension, sweeps, noise lifts, and chord risers that actually sound polished.
- Sound Generators
The three engines, Sweep, Noise, and Chord, cover most of the movement effects I need. I like using Sweep for pitch-driven uplifts, Noise for digital shimmer or cymbal-style transitions, and Chord when I want a harmonic lift that follows my MIDI.
- Envelope System
Every generator uses simple Start/End curve envelopes that you shape by dragging, which makes crafting rises ridiculously fast. I often tweak just two or three curves and end up with something usable in seconds.
- LFO Modulation
Assigning any envelope to one of the two LFOs adds subtle wobble or rhythmic motion to the rise. The synced LFO is great for timed pulsing effects, especially when I want the riser to match my project tempo.
- Filter Modes
The 23 multimode filters help shape brightness and tone without complicating the workflow. I mainly use low-pass and band-pass modes to smooth out harshness or make noise risers feel more controlled.
- Built-In Effects
The Distortion, Reverb, Delay, and Pumper effects are simple but very effective. Pumper especially helps the riser feel like it belongs rhythmically with the rest of the track, which saves me a lot of sidechain setup.
The Riser isn’t meant to compete with a full synthesizer, but it gives me fast, reliable EDM risers and transitional FX without any fuss, perfect when I need something quick and dramatic.
AIR Music Technology The Riser comes in VST, AU, and AAX formats for macOS and Windows users.
Freebies
1. Vital Audio Vital

Whenever you want aggressive, futuristic wavetable tones without feeling boxed in by presets, Vital is the way to go.
The spectral-warping tools make Vital ridiculously easy to twist harmonics into something totally new, and having all of this in a free plugin still feels unreal. It’s become one of my favourite synths for edgy EDM leads, basses, and evolving textures.
- Wavetable Oscillators
The oscillators sound extremely clean and can be pushed hard thanks to spectral warping, which lets me stretch, smear, or skew harmonics in ways most synths don’t offer. I also love turning my own samples into wavetables when I want something unique.
- Unison Engine
The efficient unison mode lets me stack voices without destroying my CPU. I use it all the time for wide supersaws or gritty basses that stay clean even when heavily detuned.
- Filter Section
The two routable voice filters cover analog and digital models with smooth blending modes. I tend to use the digital options for sharp, metallic tones and the analog-style ones for warmer EDM plucks.
- Audio-Rate Modulation
Being able to modulate things at audio rate gives Vital a punchy, aggressive edge. It’s great for making tight transients, FM-style growls, and energetic movement in bass patches.
- LFOs And Envelopes
The stereo-split LFOs and fully editable shapes are some of my favourites. I often keytrack them for rhythmic motion across the keyboard, and the custom envelope curves help dial in precise attack shapes for leads.
- Modulation Tools
The modulation remapping system lets me shape each mod curve individually. Combined with random sources like Perlin noise or Lorenz attractor, I get tons of organic variation in pads and effects.
- Effects Section
The 8 effects, especially the multiband compressor, phaser, and chorus, give me everything I need for final polish. The 16-voice chorus is perfect for widening pads or adding shimmer to sound-design-heavy leads.
Vital feels like a full-featured, modern wavetable powerhouse, and I love how quickly it goes from clean to chaotic without losing clarity.
Vital comes in VST, AU, and LV2 formats for macOS, Windows, and Linux users.
2. u-he Triple Cheese

Triple Cheese has this quirky charm that always pulls me in when I want textures that feel different from the usual EDM synth stack.
Since Tripple Cheese doesn’t use traditional oscillators or filters, it pushes me into a more experimental mindset, great for airy pads, plucky sequences, and retro-digital weirdness that stands out in a busy arrangement.
- Comb Filters
The three comb-filter modules act like tiny tuned delays, and chaining them lets me create tones you’d never get from normal oscillators. Sometimes I dial in soft 80s-style digital pads; other times I push the resonance for metallic, futuristic textures.
- Module Modes
Each module has multiple processing modes, which changes how the comb filter behaves. Switching between them can take a sound from cheesy and nostalgic to unexpectedly lush, and I often stumble upon great patches just by cycling through modes.
- Polyphony Options
With poly, duo, mono, and legato modes, I can shape it for pads, leads, or quirky arps. I like using mono with retriggering for plucky sequences that feel both digital and slightly unstable in a musical way.
- Modulation System
Many parameters can be modulated using performance controls, envelopes, LFO, or the Vibrator. I usually map modwheel or aftertouch to one of the comb parameters to get evolving, shimmering movement without much setup.
- Built-In Effects
The delay-based effects, chorus, flanger, phaser, delay, and reverb, fit the synth’s digital personality perfectly. A bit of chorus and reverb can turn even a simple comb patch into something atmospheric and surprisingly spacious.
Triple Cheese might look odd on paper, but it’s one of those synths that rewards curiosity, and I love pulling it up when I want sounds that feel intentionally offbeat or textural.
u-he Triple Cheese comes in VST2, VST3, AU, and CLAP formats for macOS, Windows, and Linux users.
3. ESW Vinyl Guitar 2
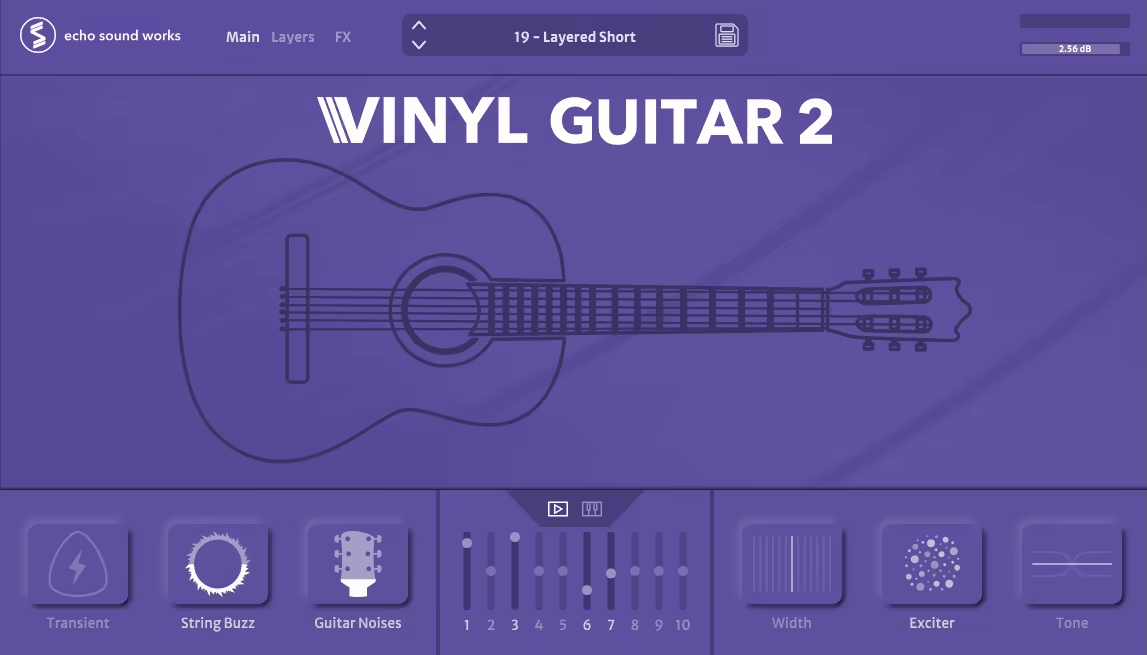
I like using Vinyl Guitar 2 whenever I want that warm, dusty LoFi vibe without spending ages processing a clean guitar.
Vinyl Guitar 2 has a naturally soft character that fits perfectly under chill beats, dreamy pads, or melodic textures, and the layering system makes it super flexible for quick inspiration.
- Hand Crafted Presets
The 25 presets give me instant ideas, especially when I just want a mellow guitar line to sit under a beat. They’re great starting points that already feel textured and musical.
- Macros
The 6 Play-page macros make shaping the tone really fast. I can quickly add warmth, grit, or movement without diving deep into menus, which keeps the creative flow going.
- Layers
Mixing and matching the 10 sample layers lets me build anything from soft, muted plucks to slightly broken-sounding LoFi chords. I often blend two or three layers to get the exact texture I want.
- Pro FX
The 11 effects, especially the Speaker and Background Noise, help me push the guitar deeper into a chill or dusty atmosphere. I like using them subtly so the guitar feels recorded-through-vintage-gear instead of overly processed.
Vinyl Guitar 2 is one of those quick-inspiration instruments that helps me land a mood fast, especially when I’m building mellow, textured modern beats.
Vinyl Guitar 2 comes in AU, VST, and AAX formats for macOS and Windows users.
4. Surge XT

This plugin is one of those synths to use when you want powerful sound design options without paying a cent.
Surge XT is open-source, constantly evolving, and packed with features you usually only see in premium synths. The new XT update made everything smoother, faster, and way more intuitive, especially for modulation-heavy EDM patches.
- Oscillators
Surge XT gives me a huge collection of oscillator types, from classic analog-style shapes to wavetable, window, FM, and more experimental modes. I love how easy it is to dial in complex tones that still feel clean and musical.
- Modulation System
The modulation workflow is one of my favorite parts, especially with the Vector and Formula Modulators. Seeing modulation targets directly in one view makes routing quicker, and the blue modulation sliders help me shape movement precisely.
- Routing Bar
The Routing Mode is super intuitive. I just pick a modulation source and click the parameter, it’s one of the fastest systems I’ve used for building evolving patches, rhythmic pulses, or expressive leads.
- Filters
The updated filters, including the new Tri-Pole model, give me a lot of tone-shaping power. I like the Tri-Pole when I want a sharp, modern bite on basses or aggressive EDM leads.
- Effects Section
The expanded FX rack lets me load two racks’ worth of effects per patch. The new Spring Reverb and Airwindows tools add color, and I often use multiple FX chains to create big atmospheric pads or heavily processed bass textures.
- Waveshapers
With 43 waveshapers now available, it’s a dream for gritty, distorted, or harmonically rich sounds. I tend to stack a couple when I want a growly bass or a textured digital lead.
- Tuning Editor
The deep tuning editor is great for microtonal experiments or when I want slightly detuned, unstable vibes for ambient or cinematic sections.
Surge XT feels like a fully-loaded sound design playground, free, flexible, and capable of everything from classic synth tones to wild experimental textures.
Surge XT comes in VST3, AU, CLAP, and LV2 formats for macOS, Windows, and Linux users.
5. Xfer OTT

When I want instant aggression, loudness, and forward energy, especially in EDM, OTT is a great plugin to reach for.
OTT is not subtle, and that’s exactly why it works; it squeezes the dynamics hard and brings hidden details right to the surface. Even with more modern multiband tools around, I still find myself coming back to OTT for fast, punchy results.
- Multiband Compression
OTT splits the signal into low, mid, and high bands and applies upward and downward compression at the same time. I love how this dual compression pulls quiet details up while pushing peaks down, giving synths and basses that signature “inflated” sound.
- Threshold And Output Controls
Each band has its own upper/lower thresholds and level control, which lets me push certain ranges harder. I often boost the high band a bit to get more shine on leads or squeeze the lows to add weight to bass patches.
- Depth Control
The Depth (dry/wet) knob is handy when I want a slightly more controlled version of the OTT sound. But honestly, I usually keep it high because the whole point of OTT is that it goes big and bold.
- Time Controls
The Attack/Release section lets me make the compression more aggressive or more relaxed. When I want drums to smack harder, I set the time faster; for pads or atmospheres, I slow it down to get a smoother swell.
- Band Display
The visual display shows the compressed and uncompressed signal, which makes setting thresholds easier. I like using it to fine-tune how much I’m crushing each band, especially when I want a controlled but still in-your-face sound.
OTT may not be pretty or natural, but when I’m shaping EDM basses, leads, or FX and I want something to hit harder immediately, it’s still one of the quickest tools to reach for.
OTT comes in AU, VST, VST3, and AAX formats for macOS and Windows users.
6. Matt Tytel Helm

Helm has a very specific attitude to its sound, sharp, digital, and a little unruly, and that’s exactly why I keep it around.
The HELM interface is easy to read, the modulation setup is quick to work with, and it delivers tones that feel intentionally rough in a way that fits glitchy EDM, chiptune textures, and metallic leads.
- Oscillators
The two oscillators come with 10 wave shapes and a distinctive cross-modulation system that bends harmonics into bright, aggressive territories. When I want something biting and unapologetically digital, this is usually where I start.
- Feedback System
The built-in feedback adds an extra layer of character without needing external effects. A touch of it brings out gritty overtones; cranking it turns the sound into chaotic, high-energy noise.
- Filter Section
The multimode filter responds well to fast modulation and has a nicely driven tone. It’s great for sculpting sharp plucks or smoothing the harsher edges while keeping the synth’s digital personality intact.
- Effects
Helm includes distortion, delay, reverb, a formant filter, and a quirky stutter effect that’s perfect for glitch moments. I often use the stutter when I want rhythmic flickers or unexpected cuts in the sound.
- Modulation System
With 3 envelopes, 3 LFOs, and a 32-step sequencer, there’s room for a lot of movement. Assigning modulation through the helmet icon is quick, and the sequencer can produce surprisingly musical patterns when pushed.
- Arpeggiator
The arpeggiator offers up to four octaves and integrates nicely with the modulation system. It’s easy to create energetic rhythmic lines or evolving melodic ideas with just a few adjustments.
Helm doesn’t aim for analog warmth or silky smooth textures, it leans proudly into a dry, sharp, and sometimes squelchy sound, which can be exactly what a track needs when you’re chasing a more unconventional digital flavor.
Helm comes in VST, VST3, AU, LV2, and standalone formats for macOS, Windows, and Linux users.
7. Analog Obsession BusterSE

This compressor gives me that familiar SSL-style glue but with a few extra controls that make it more flexible for EDM drums, synth buses, and even light master compression.
BusterSE has a punchy, forward character, and the added modes help push it into more modern territory without losing the classic VCA feel.
- Compression Controls
The standard attack, release, ratio, threshold, and makeup gain layout behaves exactly the way I expect from this style of bus compressor. It’s quick to dial in punch on a drum bus or glue on stacked chords.
- Dry/Wet Mix
The built-in mix knob is great when I want parallel-style snap without overcompressing. I often blend in just enough to tighten things while keeping the original transients alive.
- Sidechain Options
The sidechain input with a high-pass filter helps keep the kick from over-triggering the compression. I use this all the time on EDM buses where low-end energy would otherwise clamp the mix too hard.
- Turbo Mode
Turbo makes the compressor act across the full frequency spectrum, which feels more like hardware behavior. It tightens the whole signal and gives a more aggressive push, great for energetic drums or dense synth layers.
- Xformer Mode
The transformer emulation adds a subtle change in impedance and tone. Sometimes it brings a slight low-mid weight that helps glue everything together a bit more musically.
- Transient Controls
The additional transient shaping gives me extra control when I want to sharpen or soften the attack going into the compressor. It’s a handy tweak when I need a little more bite or a smoother response.
BUSTERse captures the familiar SSL-style punch but adds enough bonus features to feel fresh and flexible, especially if you want a free option that still delivers real mix glue.
BUSTERse comes in VST2, VST3, AU, and AAX formats for macOS and Windows users.
Last Words
After spending years bouncing between new releases, forgotten freebies, and the occasional obsession-level favorite, these plugins are the ones I keep coming back to when I need fast inspiration and reliable results.
Some are clean, some are chaotic, some are beautifully weird, but each one solves a real problem in modern EDM production.
If even one of them helps you shape a better drop, build a smoother transition, or spark a new track out of nowhere, then this list has done its job. Now load up a fresh session and have fun, your next idea is already waiting.
