

Here we share the 17 best plugins for FL Studio users in 2026, including 10 amazing free tools that I personally love, trust me, these are the plugins I keep going back to in every project.
If there’s one thing I’ve learned through my experience with FL Studio, it’s that the right plugin can completely transform a session. I’ve spent hours scrolling through menus, hunting for that perfect synth, drum machine, or effect, and honestly, some days it felt like finding a needle in a haystack. But over time, I’ve built a toolbox of plugins that I constantly reach for, the ones that just click with FL Studio’s workflow and make my tracks come alive.
Some of these plugins really impressed me the first time I loaded them; others took a bit of experimentation to reveal their magic. I’m talking about tools that turn a dull bassline into a growling monster, or a simple hi-hat pattern into a dynamic, moving rhythm. And yes, a few of them are completely free and still some of the most powerful plugins I’ve ever used in any DAW.
In this article, I’m going to show you some of my favorite plugins for FL Studio, the ones I personally rely on in almost every project. Whether you’re looking to craft massive synth leads, punchy drums, or weird experimental textures, there’s something here that’ll push your sound further and I guarantee a few of these will make you say, “Why didn’t I know about this sooner?” Let’s go!
1. Xfer Serum 2 (Dream Synth)
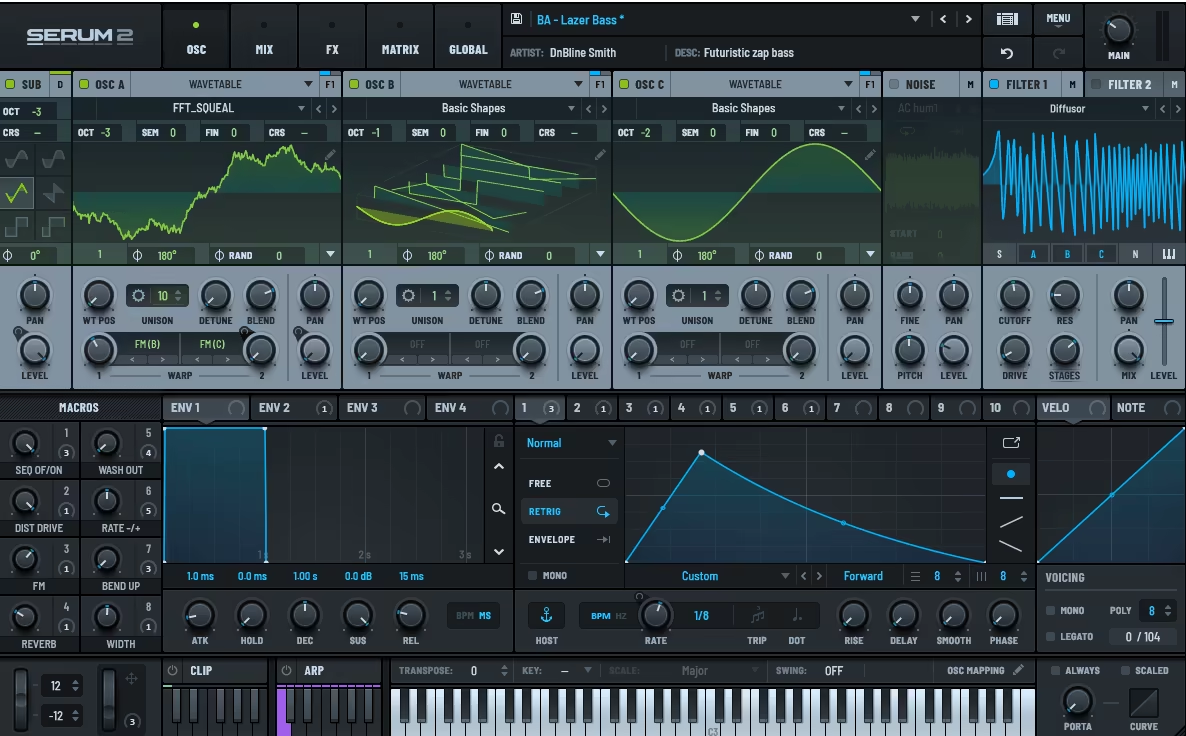
My first pick is Serum 2, as I really love how it takes everything I adored about the original and expands it in ways I didn’t even know I needed.
The addition of new oscillator types, multi-sample engines, and spectral synthesis gives me a playground for sound design that feels limitless. I’ve used it to create everything from gritty basses to lush atmospheric pads, and the new clip launcher makes experimenting with rhythms and melodies ridiculously fun.
- Oscillators & Warp Modes
Serum 2 gives me a third oscillator and two simultaneous warp modes per oscillator, plus granular and spectral engines. I love layering these for hybrid textures, the spectral engine alone allows me to generate harmonic density and unique atmospheres that were impossible in the first Serum. The granular engine also shines when I need glitchy textures or evolving pads.
- Filters & Effects
The addition of a second filter per layer and new modeled filters makes tone shaping so much more expressive. I especially enjoy the input-sensitive low-pass filter for giving sounds extra life. On the effects side, I can now chain multiple instances, run multi-band paths, and even use the Bode frequency shifter and convolution reverb creatively. I’ve used these effects to polish presets that sound like they were produced in a high-end studio.
- Modulation & Clip Launcher
With up to 10 LFOs, chaos modes, and the Path LFO, modulation feels virtually unlimited. Modulation remapping allows me to create complex evolving shapes, and the clip launcher is a total game-changer, I can store melodies, rhythms, and automation in a single preset. I’ve been able to quickly test different rhythmic ideas without needing extra DAW tracks, which speeds up my workflow massively.
If you want one synth that can handle almost any style while keeping your workflow smooth, this is it.
Serum 2 comes in VST, VST3, AU, and AAX formats for macOS and Windows users.
2. Native Instruments Reaktor 6 (Modular Synth)

What excites me most about Reaktor 6 is how it finally brings modular synthesis within reach without compromising depth.
I love experimenting with the new Blocks system, it feels like building a Eurorack setup in my computer. I’ve spent hours patching oscillators, filters, and sequencers, and it never gets old; it’s modular synthesis the way I’ve always dreamed.
- Blocks Modular System
Blocks is a game-changer, as it turns Reaktor into a Eurorack-style modular environment. I love combining oscillators, sequencers, and utility modules to craft unique synths from scratch. The system is tidy and flexible, letting me experiment without the mess of traditional modular hardware.
- Oscillators & Sound Quality
Reaktor 6 delivers some of the best-sounding oscillators and filters NI has ever made.
Whether I’m using Monark-emulating modules or Buchla-style FM synths, the sound is rich and inspiring. I’ve used these modules to create everything from analog-style basses to evolving soundscapes, and they never fail to impress.
- Structure & Modulation
The Structure view makes patching simple yet powerful, with virtually unlimited routing options.
I enjoy scaling modulation sources across multiple destinations, creating intricate sounds that would take ages in other synths. The Core Cells and bundles system make signal management easy, and drag-and-drop sample import adds another layer of creative possibilities.
Overall, it’s a modular playground that inspires experimentation, perfect for synth enthusiasts and producers who love building unique sounds from the ground up.
Native Instruments Reaktor 6 comes in VST, VST3, AU, and standalone formats for macOS and Windows users.
3. Audio Damage Quanta 2 (Granular Synth)
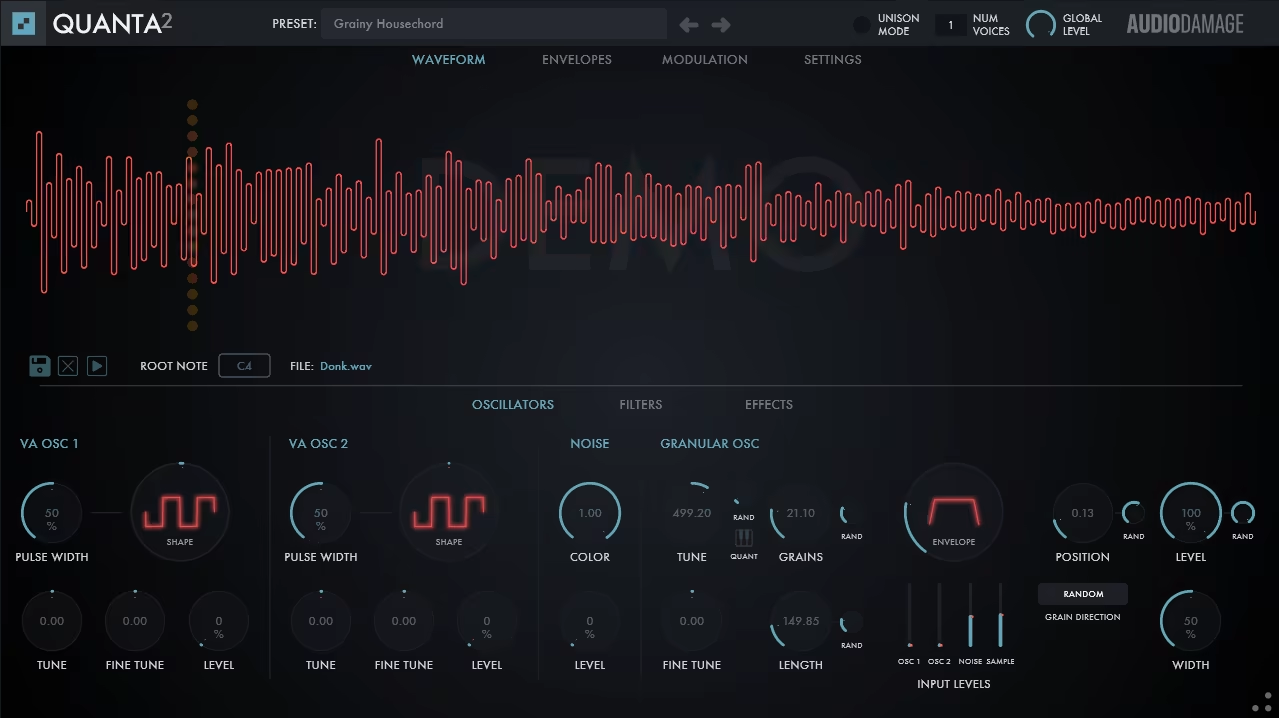
Quanta 2 caught my attention with its mix of granular synthesis and virtual analog oscillators.
I like throwing in random audio, drum loops, voice clips, even field recordings, and reshaping them into shimmering pads or chaotic textures. The flexibility with source material gives me full control over how far I want to push a sound.
- Granular Oscillator
I usually start with the grain controls, like length, density, position, and tuning, then add randomization to break the sound open. Layering in analog oscillators, noise, or even another sample gives me hybrid tones that feel alive without sounding overly synthetic.
- Oscillators & Filters
I treat the two analog-style oscillators as a way to thicken the sound or add something more tonal beneath the grains. The dual multimode filters (lowpass, highpass, bandpass, notch) do exactly what I need: tighten, shape, or carve space without clutter.
- Modulation & Effects
Between the two LFOs, sample-and-hold, and four multisegment envelopes, I rarely hit a wall. I use macro controls for quick adjustments mid-session, especially when I’m building something reactive or expressive. The onboard chorus, delay, and reverb aren’t flashy, but they’re solid enough to finish a sound without reaching for external plugins.
Quanta 2 fits best into my process when I want evolving, playable textures that don’t come from typical synths. It works well with MPE, handles custom samples without any friction, and gives me modulation depth without dragging me into a menu maze.
Audio Damage Quanta 2 is available in VST3, AAX, and AU formats for macOS and Windows.
4. Native Instruments Kontakt 8 (Sampler)
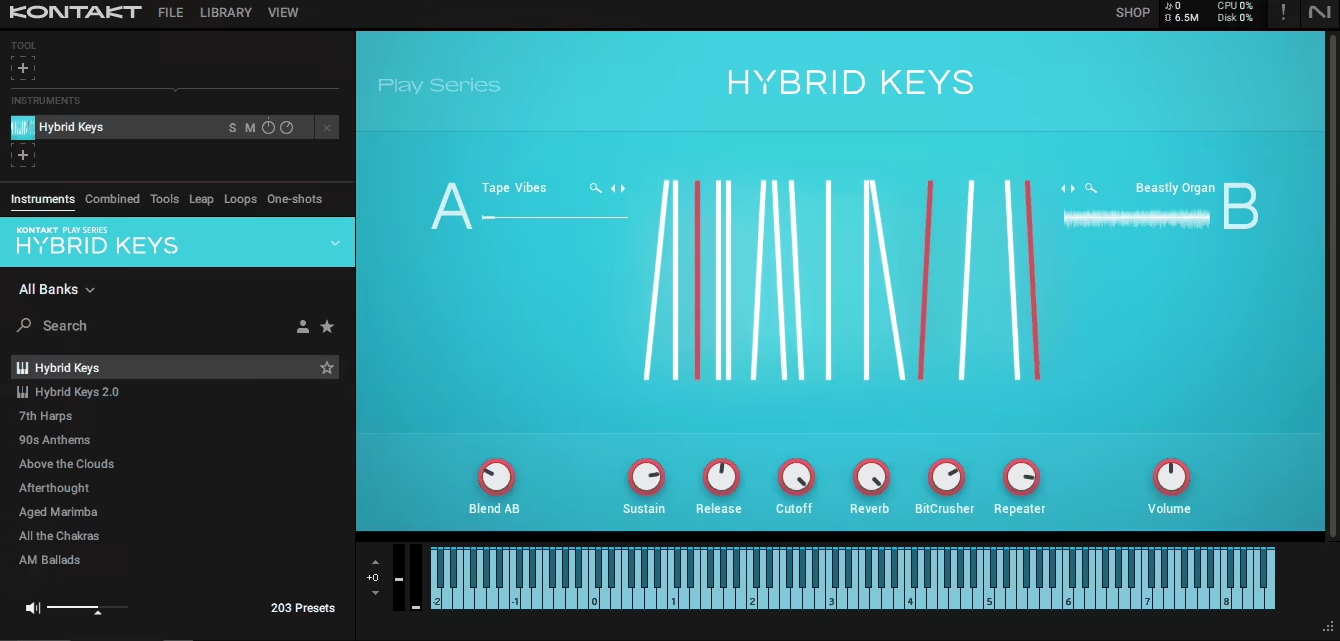
Kontakt has been my go-to sampler for years, and version 8 feels like a serious step forward.
The standout feature of Kontakt 8 for me is how Native Instruments managed to refresh the interface without breaking the workflow I already knew. Add in new tools like Chords, Phrases, and Leap, plus the Conflux hybrid instrument, and suddenly Kontakt isn’t just a sampler anymore, it’s a creative playground.
- Conflux Hybrid Engine
Conflux is the crown jewel of Kontakt 8, cause it mixes samples with an upgraded wavetable synth engine that includes FM, phase modulation, and ring modulation.
I’ve used it to create evolving textures and atmospheric pads, and it feels like NI finally gave Kontakt a proper sound-design synth inside the sampler.
- Chords & Phrases Tools
These new tools are way more inspiring than I expected. I’ve dropped Chords on simple piano libraries and instantly had complex harmonies, while Phrases has given me quick melodic sketches when I was stuck.
- Leap Sampler-Within-a-Sampler
Leap is ridiculously fun, as it takes loops and one-shots and turns them into playable instruments with real-time FX like stutters, pitch shifts, and filters mapped to keys.
I love dragging in my own samples and mangling them, suddenly Kontakt feels like it can compete with arcade-style loop engines, but with more depth.
Kontakt 8 comes in VST3, AU, and AAX formats for macOS and Windows users.
5. Devicemeister Stepic (Sequencer)

Most sequencers I’ve tried either feel too basic or way too complex, but Stepic by Devicemeister sits perfectly in between.
What instantly hooked me was how it merges classic step sequencing with deep modulation tools, I’ve used plenty of step sequencers, but few let me build polyrhythmic chord patterns while also randomizing parameters on the fly.
I like that it’s packed with features but doesn’t bury them in menus; I can drag sliders, flip randomizers, or switch patterns without breaking creative flow. Honestly, I’ve used it both for live jamming and sketching ideas in the studio, and the workflow just adapts.
- Step Sequencing
Stepic’s lanes for pitch, octave, and duration feel like the backbone of the plugin. Having scales built-in means I can experiment without worrying about hitting wrong notes, and the way each lane can run at its own step length makes polyrhythms come alive.
I’ve built some evolving melodic loops this way that sound more like live improvisations than rigid grids.
- Chord & Polyphony Tools
Instead of being stuck with single-note sequences, I can stack chords directly into the steps. That opened up a new way of writing harmonic textures for me, I even sequenced rich pad progressions that evolved over time. Throw polyrhythms into the mix and suddenly a 16-step sequence feels limitless.
- Randomization Options
The dice buttons are absolute lifesavers for breaking out of ruts. Sometimes I just roll the pitch randomizer and get a brand new riff that still stays in key.
Other times, I’ll use it subtly to add variation so my patterns don’t sound robotic. It’s like having a co-producer who throws in fresh ideas when I’m stuck.
Stepic comes in VST3 and AU formats for macOS and Windows users.
6. Wave Alchemy Triaz (Drum Machine)
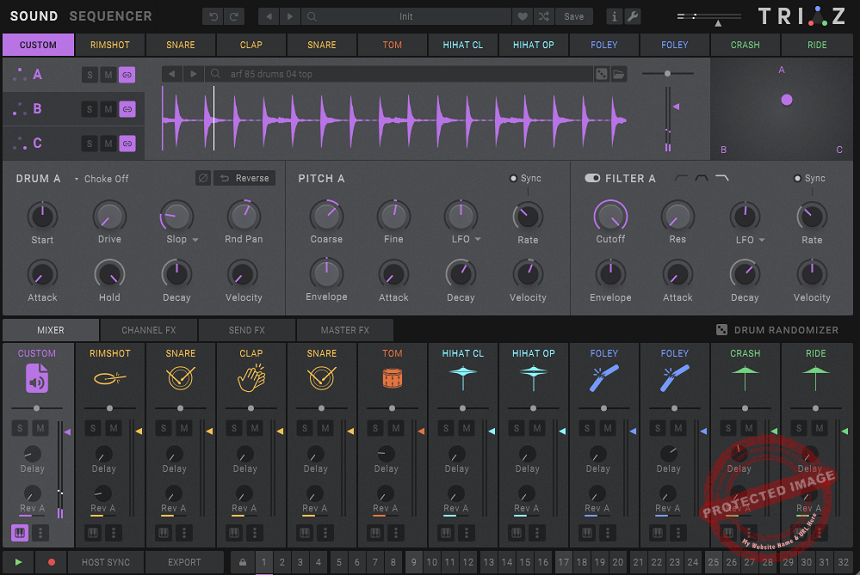
The first time I loaded TRIAZ by Wave Alchemy, I immediately noticed how different it felt from the usual drum samplers.
Instead of hunting for the “perfect” kick or snare, I found myself layering 3 sounds together and sculpting them into something new. That triple-layer system with the X/Y blending pad is the kind of feature that instantly makes TRIAZ stand out, it’s like having a drum design playground right inside Kontakt.
I especially like the browser: despite the 10,000 samples packed in here, I can get to the right sound in seconds. It feels fast, modern, and built for producers who don’t want inspiration killed by menus.
- 3-Layer Drum Engine
The ABC layering system is the heart of TRIAZ. Each drum voice can stack three samples, and the X/Y pad makes blending them intuitive. I’ll often start with a tight 808 kick, add a dusty foley hit for texture, then blend in a modern punchy layer.
- Step Sequencer with Depth
TRIAZ isn’t just about sounds; the sequencer is a serious tool in itself. You’ve got 32 steps per lane, probability, repeats, pitch sequencing, and even chromatic playback.
I’ve used it to write full drum grooves without ever touching my DAW’s piano roll. Switching between up to 12 stored patterns on the fly also makes it a great live tool.
- Effects & Modulation
Each channel has its own EQ, dynamics, and shaping tools, plus filter envelopes and LFOs at the layer level. I love how much control this gives me, especially the transient shaping, which adds punch in a way that feels very “mix-ready.”
Add the global FX like tape saturation and convolution reverb, and it’s easy to take raw samples into polished beats without leaving the plugin.
Wave Alchemy TRIAZ runs in Kontakt or the free Kontakt Player for macOS and Windows users.
7. The Him DSP Kick Ninja (Kick Designer)
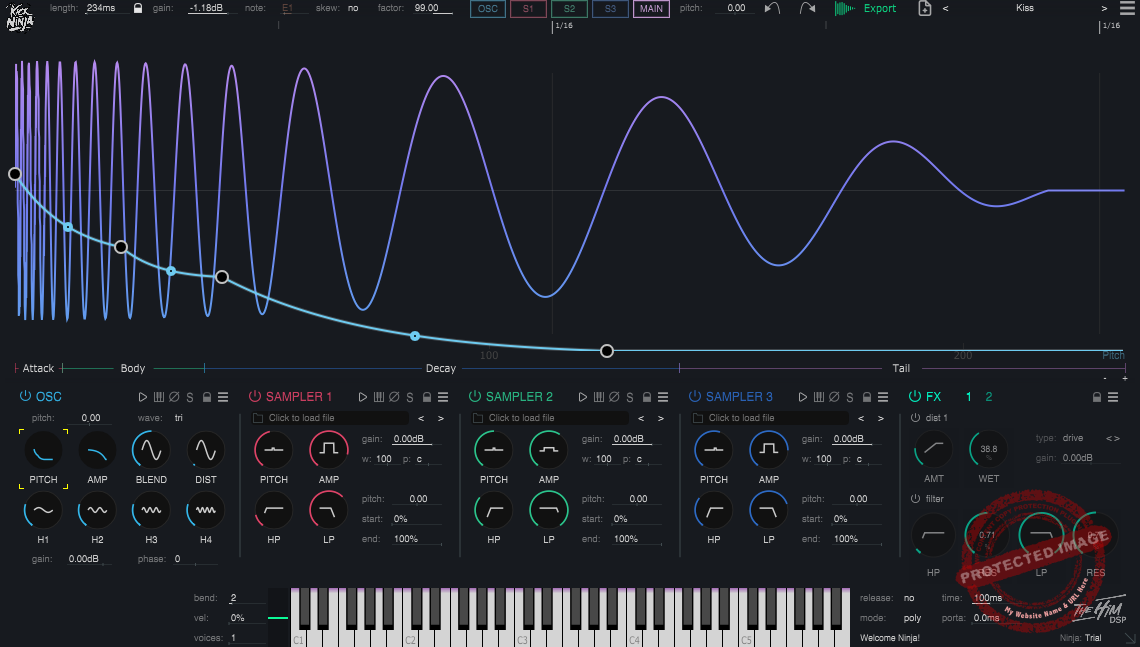
Kick Ninja immediately caught my attention because it doesn’t just let you hear your kick, it lets you see it.
The visual editing workflow makes designing low-end feel less like guesswork and more like sculpting. Instead of endlessly layering samples and EQing for hours, I can literally draw the shape of the kick I want and hear it react in real time.
- Visual Kick Shaping
The graphic line is genius, it shows both the pitch envelope and amplitude in high resolution. Double-clicking to add points feels natural, and I’ve been able to nail down kicks that actually sit in key with my track instead of fighting the bass.
- Morphable Oscillator Engine
The main oscillator isn’t just a sine wave machine. I can morph between sine, triangle, square, and saw to build a kick with real character. Adding 4th-order harmonics gives me even more tone shaping, something I’ve never had this much control over in a dedicated kick plugin.
- 4-Layer Kick System
This is where Kick Ninja goes beast mode. Beyond the synth oscillator, I can load up to 3 additional samples, tune them visually, and blend everything together.
I’ve stacked my own kick recordings with the included library to create huge, textured kicks that would normally take multiple plugins and a ton of routing.
I’ve used a lot of drum synths, but this one stands out by combining visual design, layering, and deep tone control in one streamlined package.
Kick Ninja is available in AU, VST3, and AAX for macOS and Windows users.
8. Arturia Piano V3 (Piano)
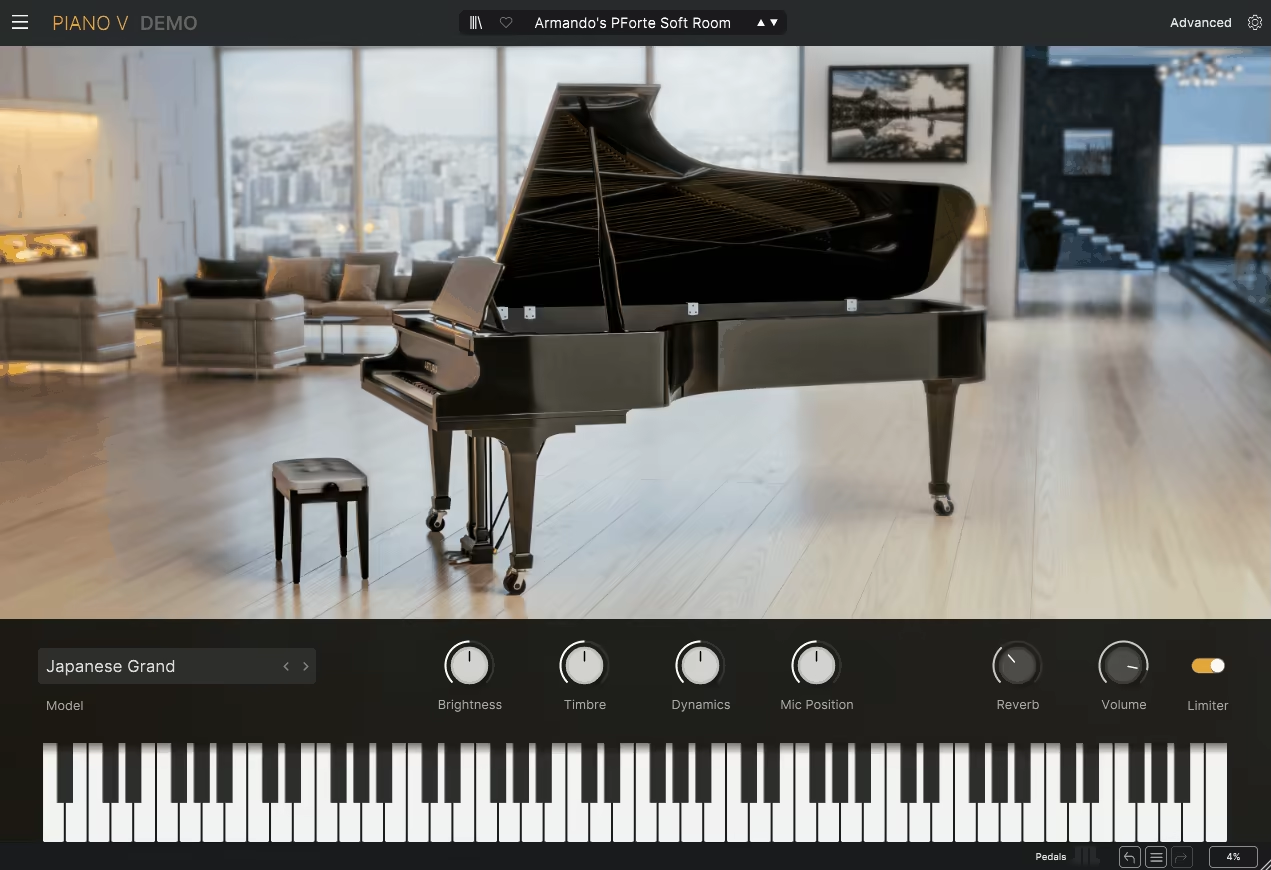
Arturia’s Piano V has been one of the rare digital tools I actually enjoy using, especially in today’s world of laptop-based production.
I’ll be honest, I’m super picky about pianos, cause, for me, nothing truly beats the sound and feel of a real instrument, so I usually go out of my way to record an actual piano instead of settling for a sampled one.
- Modeled Piano Engine
Instead of relying on static samples, Piano V uses physical modeling, which means it feels alive. I’ve noticed the dynamics respond far more naturally than most sampled libraries, giving me control that feels closer to the real thing.
- 12 Piano Models
I love the variety here, you can choose from 12 different models, each with its own personality. Whether I want something bright and modern or darker and more classical, there’s always a model that fits the mood of the track.
- Detailed Tone Shaping
This is where I get hooked. With parameters like String Tension, Stretch Tuning, Hammer Hardness, and even mechanical noises (pedal, key, hammer), I can sculpt the piano to sit perfectly in a mix.
- Velocity Curve Editor
Sometimes MIDI performances feel flat, especially if they were recorded on a plastic controller. The velocity curve editor lets me reshape the dynamics after the fact, which can turn a lifeless part into something expressive.
- Resonance and Mic Control
Adjusting Lid Position, Soundboard Resonance, and mic placement really takes things over the top. It’s these details that make Piano V feel so much more organic than your average plugin.
Arturia Piano V comes in VST, AU, and AAX formats for macOS and Windows users, and is also included in the Arturia V Collection.
9. Ample Guitar TC (Electric Guitar)

AmpleSound’s Ample Guitar TC II takes one of the most iconic electric guitars ever built, the Fender Telecaster, and drops it right into your DAW.
I’ve played my fair share of Teles over the years, and this virtual version nails the bright, twangy, and percussive character that makes the instrument so legendary. It’s not pretending to be “all guitars at once.” Instead, it leans fully into being unapologetically Tele, and I love that focus.
From keyboard mode and MIDI-channel-per-string setups to the Guitar Pro tab player, it’s clear the engine is designed for flexibility. What I enjoy most is how quickly I can go from a simple line to a realistic performance without hours of MIDI micromanagement.
- Authentic Telecaster Sound
Only the bridge pickup is sampled and honestly, that’s all you really need for a Tele. The sound is bright, snappy, and detailed, with expressive noise layers and release samples. I’ve found it sits perfectly in country, funk, indie rock, and even light metal when paired with palm muting and distortion.
- Extensive Articulations & Modes
From legato slides and position shifts to keyswitch articulations, AGTC II gives me a lot of control over realism. I especially like the option to split strings across MIDI channels or import Guitar Pro tabs, it makes sequencing detailed guitar lines surprisingly painless.
- Powerful Strumming Engine
The strum engine is flexible and fun, with hundreds of patterns across multiple genres. I’ve used it to quickly build convincing rhythm parts, dialing in string ringing control for everything from jangly indie to funky muted chops. My only gripe is that I sometimes wish it had a few more basic strumming patterns for quick rhythm sketches.
Ample Guitar TC II comes in VST, AU, AAX, and RTAS formats for macOS and Windows users.
10. Guitar Rig 7 Pro (Amp sims, effects and pedals)
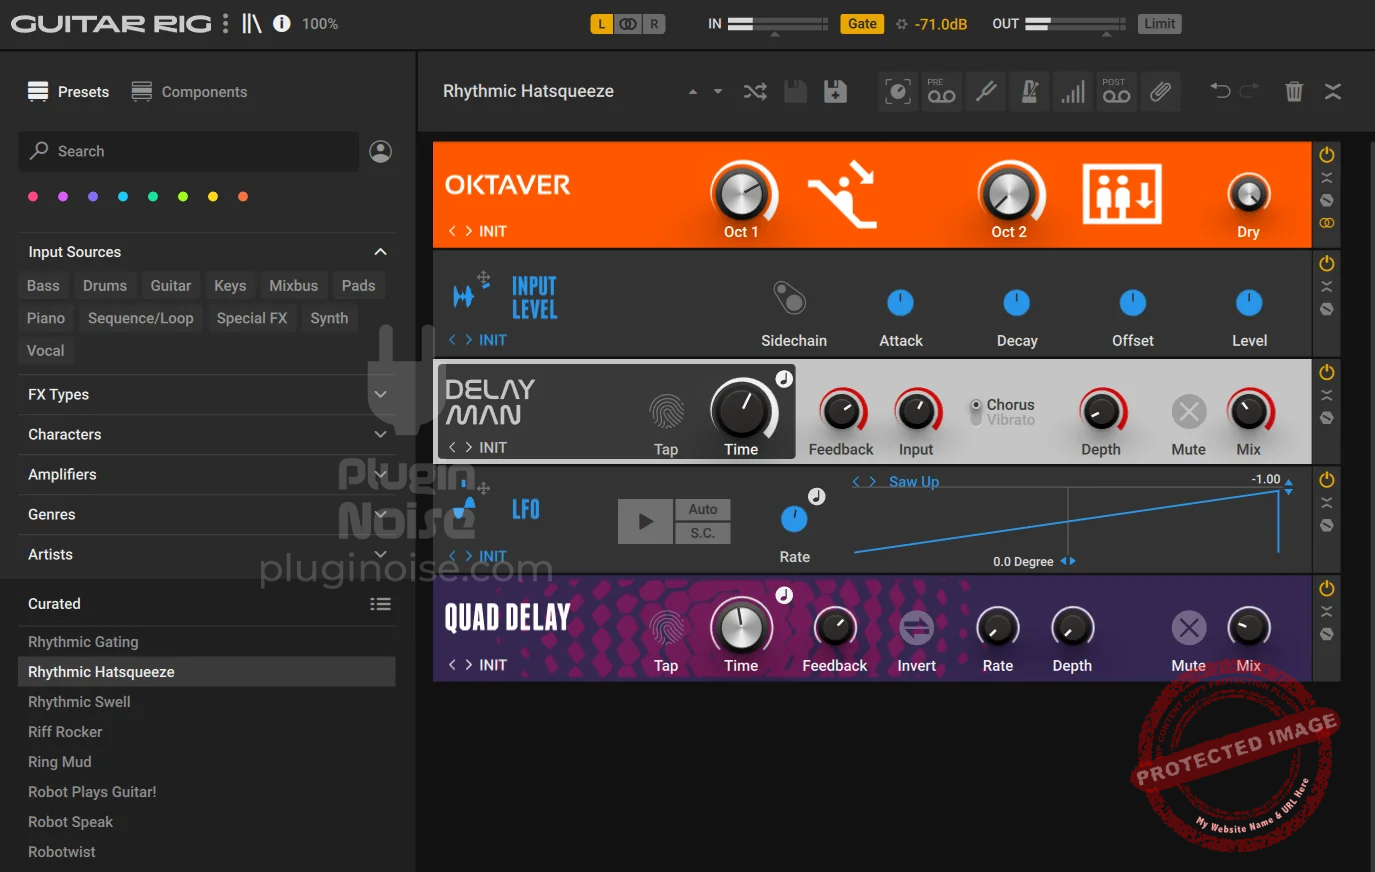
What makes Guitar Rig Pro 7 stand out is how much ground it covers. While a lot of amp sims zero in on one sound or one style, this one feels like a whole music store packed inside your DAW.
I’ve used it for crunchy guitar stacks, smooth bass tones, and even weird sound-design on synths, and every time I’m reminded that it’s not just for guitarists, it’s for anyone chasing big, customizable tones.
I find myself dragging components around without losing flow, and it’s one of those updates that you don’t realize you needed until it’s there. You are probably familiar with the Guitar Rig line, so let’s check what’s new.
- New Amp Models
4 brand-new amps (and cabs) were added, built with NI’s ICM technology for more realistic dynamics. The Super Fast 100 instantly became a favorite for tight rock tones, while the Bass Rage surprised me by handling not just heavy bass growl but also smoother, controlled low-end. They just feel alive under your fingers compared to older versions.
- Stompbox Additions
The updated Skreamer Deluxe is a beast. With three modes, like Chainsaw, Seattle Fuzz, and IVP Stomp, it’s like having three pedals in one. I’ve dialed in grunge fuzz, metal grind, and clean boost tones all from a single box, and it’s crazy versatile.
- Cabinet IR Loader
Finally, Guitar Rig gets a proper IR loader, and it’s a gem. You can blend up to four IRs, adjust pan and levels, and load third-party impulses. I’ve swapped in some of my favorite Bogren Digital IRs, and the mix flexibility is on another level.
- Loop Machine Pro
The looper is back, and it’s way better. You can overdub, sync to tempo, or export loops layer by layer, which makes it feel like a scratchpad for song ideas. I’ve been using a MIDI foot controller with it, and it’s dangerously close to replacing a physical pedalboard looper.
- Creative FX & Ozone Maximizer
New toys like Tape Wobble, Noise Machine, and Kolor open up lo-fi, saturated sound design that’s fun even without a guitar. And yes, there’s a compact version of Ozone’s Maximizer baked in, which saves me from pulling in another plugin when I need extra polish.
Native Instruments Guitar Rig Pro 7 runs on macOS and Windows in VST3, AU, and AAX formats.
11. FabFilter Pro-Q 4 (M/S, Linear & Dynamic Equalizer)

Well, FabFilter didn’t just update an EQ with Pro-Q 4, they redefined how we think about one. For me the unique part here is how it merges precision, speed, and creativity into a single tool.
I’ve leaned on Pro-Q for years, and the new version feels like having a scalpel, a paintbrush, and a mastering-grade powerhouse all in one.
The new Scaling option is a godsend when I’m working on high-DPI screens, and the redesigned UI feels darker, cleaner, and more focused.
Adding bands is still instant, but with EQ Sketch Mode I can literally draw my curve across the spectrum. It’s fluid, modern, and still one of the fastest workflows in any EQ I’ve touched.
- Spectral EQ Bands
Inspired by tools like Soothe, spectral bands dynamically tame resonances without killing the life of your audio.
I’ve used it as a natural-sounding de-esser, on gritty drums, and even to smooth synth highs, and every time it feels effortless. Once you’ve used it, going back to standard EQs feels limiting.
- Instance List
Instead of jumping between windows, every Pro-Q 4 instance now talks to each other in a scrolling sidebar. I can see all my spectrograms, make changes from one place, and basically EQ my whole mix from a single view. It’s insanely efficient, especially on big sessions.
- Dynamic EQ Upgrades
Per-band attack and release controls add surgical control over dynamic moves. Now I can make a kick drum EQ move breathe with the groove or smooth out vocal peaks without touching a compressor. It feels like multiband compression but with Pro-Q’s speed and clarity.
- EQ Sketch Mode
Click the paintbrush, drag across the spectrum, and Pro-Q translates your motion into a curve.
It’s not always faster than clicking nodes, but on a trackpad or touchscreen it’s surprisingly intuitive. I’ve caught myself sketching quick boosts on hi-hats and snares just for the flow of it.
- Character Modes
For the first time, Pro-Q introduces Subtle and Warm saturation flavors. They’re not heavy-handed, but on vocals or guitars, Warm mode adds a pleasant hair that feels more alive. I wouldn’t replace a dedicated saturator with it, but it’s nice to have that extra color built in.
FabFilter Pro-Q 4 comes in VST, AU, and AAX formats for macOS and Windows.
12. LANDR Mastering Plugin PRO (All in one Mastering)
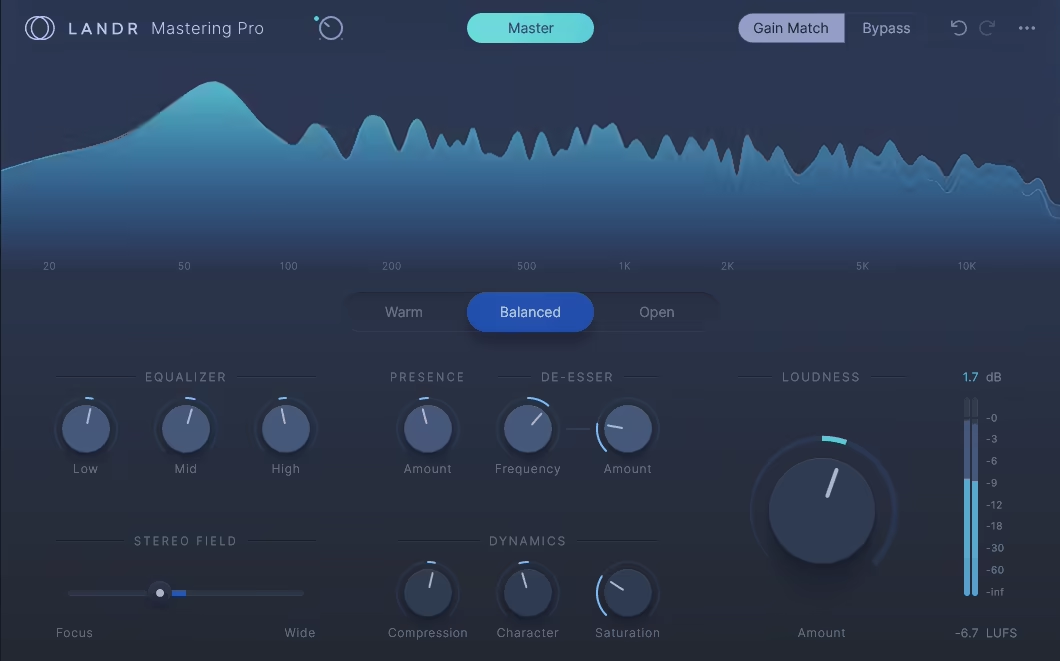
I’ve been testing the LANDR Mastering Plugin, and what immediately struck me is how it brings LANDR’s AI-powered mastering straight into the DAW.
I like that it analyzes the stereo signal locally, checking frequency balance, dynamics, and stereo width, then applies a processing chain based on its huge reference library.
When I insert it on my master bus and hit play, it starts analyzing automatically. I really appreciate having the Master button to re-run the analysis and the Gain Match control to compare the processed signal with the original, it makes listening to changes so much easier.
- Warm, Balanced, and Open targets
These tonal presets let me quickly adjust the character of my track. I often switch between them to find the vibe that best suits my mix without over-processing anything.
- Dynamics, Compression, and Saturation controls
The plugin combines these controls into intuitive sections that let me add punch or warmth quickly. I love that I can get professional-sounding tweaks without diving into multiple plug-ins.
- 3-band EQ and Presence control
These make it easy for me to shape the tone and bring out vocals or lead instruments. I usually tweak them lightly, which keeps the mastering process fast and efficient.
LANDR Mastering Plugin supports macOS and Windows, and works in AAX, VST3, and AU formats.
13. Baby Audio Transit 2 (Multi Effect)

I’ve been diving into Transit 2, and I have to admit, it’s surprisingly addictive. From the moment I loaded it up, I was tweaking slots, motion modes, and effects, and quickly felt like I was playing a DJ set right inside my DAW.
The tempo-synced modulation and the Macro knob make it so easy to animate tracks in ways I wouldn’t have attempted with separate plugins.
It’s incredible how versatile it is: I can dial in subtle transitions or go completely psychedelic, layering Reverser, Warp, and Loop effects all at once. I especially enjoy Follower and Gate modes, which make the effects respond to signal intensity or punch in and out with perfect timing.
- Motion Modes
The 6 motion modes, now expanded with LFO, Follower, Sidechain, and Gate in version 2, let me feed different types of movement into my effects.
I love that I can make effects react dynamically to the audio or sync perfectly to tempo, which brings life to every track.
- Configurable Effects Slots
With 28 effects across 8 slots, I can rearrange chains, tweak slopes, and set custom ranges for each parameter. Personally, this makes experimenting intuitive and fast, and I often find myself trying combinations I wouldn’t have thought to layer manually.
- Macro and Performance Controls
The Macro knob is a game-changer for me, giving me instant control over multiple linked effects. I also rely on MIDI learn for live tweaks, and the global limiter reassures me when pushing the plugin to extremes.
Transit 2 is a joy to use whether I want subtle movement or full-on sound mangling, and it supports VST, VST3, AU, and AAX formats on both macOS and Windows.
14. SPL Vitalizer Mk3-T (Enhancer)
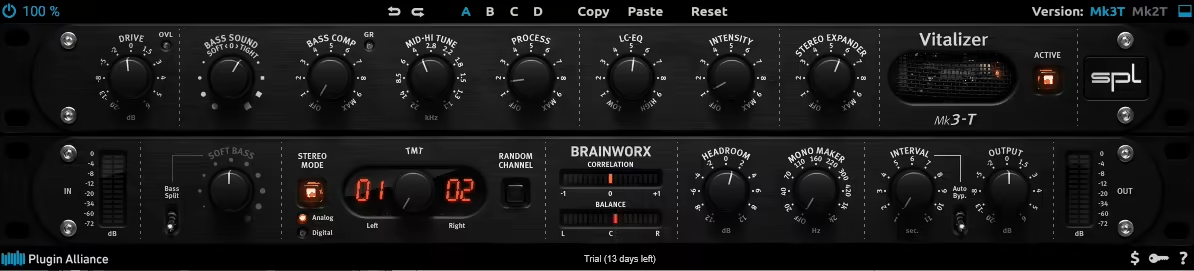
I’ve spent some time with the Vitalizer Mk3-T, and it’s remarkable how much character this plugin can add without ever sounding harsh or over-processed.
From the moment I engaged the Drive and Bass controls, I felt like I was dialing in both power and finesse, shaping the low end in a way that’s both punchy and musical.
The interface is well thought out too, I love that I can scale the UI or toggle the lower panel to see more precise meters and settings when I want them.
- Drive and Low-end Controls
The variable Drive dial gives me precise control over signal saturation, with a clear LED warning before overload, while the Bass Sound and Bass Comp sections let me shape and compress the low end independently. I find this invaluable for adding punch to a kick or bass without muddying the mix.
- Mid-frequency and Tonal Shaping
Mid-Hi Tune and the LC-EQ with Intensity control let me gently sculpt mids and highs, creating presence and clarity without harshness. I often use the Process control to blend the processed signal with the original, which keeps things musical and natural-sounding.
- Stere Width Adjustments
The plugin also makes stereo width adjustments feel effortless. I often find myself nudging the Stereo Expander while listening in headphones or on monitors, and the effect is immediate and engaging without feeling exaggerated.
Stereo Expander, Brainworx TMT technology, and features like Headroom, Mono Maker, and flexible metering make this plugin incredibly versatile. I especially appreciate the auto-bypass and toolbar options, which make A/B testing and fine-tuning a breeze.
The Vitalizer Mk3-T supports both macOS and Windows in VST, VST3, AU, and AAX formats.
15. FabFilter Saturn 2 (Saturation)
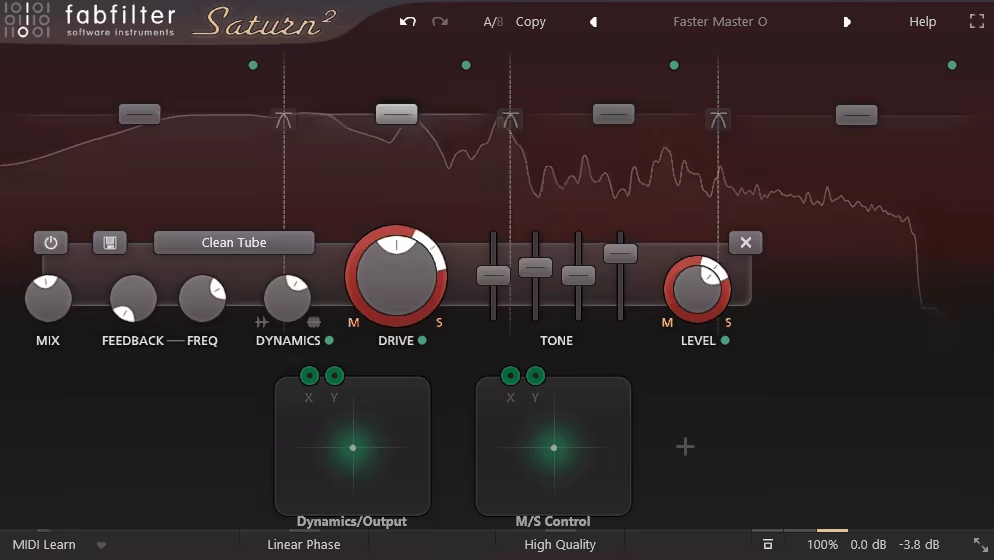
I’ve spent some time with Saturn 2, and it’s immediately clear how much FabFilter has focused on usability without losing the flexibility that made the original so powerful.
Dragging modulators onto controls and seeing the effect visually makes experimentation way less intimidating, and the expanded 6-band architecture with linear-phase crossover options gives me precise control over tone and saturation.
I’ve had a lot of fun exploring the 28 saturation styles, from subtle warmth on a mix bus to wild, modulated fuzz on individual instruments.
- Multiband Saturation and Tone Shaping
Saturn 2 allows me to split audio into up to 6 frequency bands, each with independent saturation type and tone controls. I can subtly enhance mids, push highs, or thicken bass without muddying the mix, which is great for both individual tracks and full mixes.
- Modulation Made Visual
I love how the envelope followers, LFOs, and macro controls now show offsets and animations directly on the interface. This makes it much easier to experiment dynamically, whether I’m shaping drum transients or adding movement to synths.
- Presets and Extreme Versatility
The plugin comes with a massive range of presets, from subtle “Magic Mastering” settings to extreme guitar amp emulations and chaotic fuzz. I’ve been surprised at how creative I can get in seconds, while still having full control to tweak things to taste.
Saturn 2 works on macOS and Windows and is available in VST, VST3, AU, and AAX formats.
16. Excite Audio VISION 4X (Spectrum Analyzer)
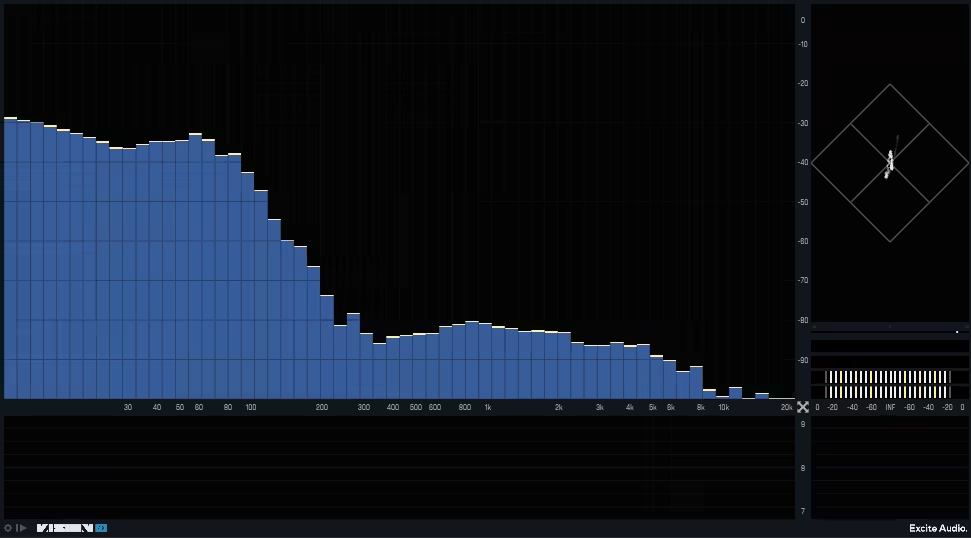
For those who want to really see what’s happening in their mix, Vision 4X is a gold plugin.
The 4 resizable panes let me view spectrograms, bar graphs, waveforms, and VU/RMS meters all at once, and I love being able to focus on specific frequency or level ranges.
It’s visually engaging, and the colour maps are more than just eye candy, they make intensity and frequency content instantly readable.
- Colour Map and Display Options
Vision 4X gives me 10 colour schemes, plus Map Bias and Map Curve controls, so I can emphasise high, mid, or low frequencies and instantly spot problem areas in my mix.
- Frequency-focused Analysis
With FFT size choices, peak hold, and adjustable bars or line plots, I can zoom in on details and really understand how my mix compares to reference curves, from DnB to classical. The cross-hair and scroll wheel zoom make precision work easy.
- Reference Curves and Dynamic Range Insight
I particularly appreciate the 17 included reference curves for different genres. They show dynamic range and frequency balance at a glance, helping me objectively check my mixes against professional masters.
Vision 4X works on macOS and Windows in VST, VST3, AU, AAX, and also as a standalone application.
17. Eventide H910 Harmonizer (Harmonizer / Pitch Shifter)

The original hardware from 1974 was revolutionary, and this re-imagined VST version captures that classic vibe beautifully. Using it feels like opening a little time capsule of studio history.
In Eventide H910 Harmonizer, the feature that really grabbed me was the “dual harmonizer” mode, cause it’s like running two H910 units in parallel.
I loved experimenting with opposite pitch ratios, and when I engaged the cross-unit option, the continuous pitch feedback created some wild, evolving sounds.
- Pitch Shifting and Harmonies
The pitch shifting feels authentic, bringing that classic H910 character straight into my mixes. I found it especially effective on vocals, giving them a fat, analogue warmth. Even subtle adjustments add a nostalgic character that’s hard to describe but very pleasing.
- Accurate Representation of the Classic Hardware
This plugin nails the original unit’s quirks. The analogue-style saturation and slight pitch warble give tracks more body, and I noticed even simple leads or synth lines became richer and more engaging. Using the Strat Thickener preset, for example, made a synth bell line instantly sound fatter and more alive.
- Presets and MIDI Integration
There’s a healthy set of presets to get you started, and building off them is easy. I particularly enjoyed the keyboard mapping, letting me shift pitch with MIDI or automate changes directly in the DAW. This makes it easy to experiment without manually tweaking every parameter.
It supports macOS and Windows, and works in AAX, VST2, VST3, and AU formats.
Extra plugin 1: BEATSURFING RANDOM Metal (Randomizer)

If there’s one plugin that made me feel like a kid discovering sound design all over again, it’s RANDOM Metal.
Instead of just triggering samples, RANDOM Metal generates infinite, unpredictable drums every time you hit that magical button. I can’t overstate how much fun that is in practice.
The centerpiece is the “matter” visualization with gorgeous 3D shapes that feel like they’ve been ripped from some alien lab. They’re not just eye candy either; each matter behaves like a different drum family, with its own quirks.
- Randomization Engine
The RANDOM button and Deviance knob are the soul of the plugin. Every click reshapes the sound, and the amount of change is totally up to you.
- Drum Pads and Per-sound Editing
Each matter gives you 12 pads, and each pad can be tweaked individually.
The sense of discovery here is addictive, and I can honestly see myself using RANDOM Metal to have the utmost fun.
It supports macOS and Windows, and works in VST3 and AU formats.
Extra plugin 2: FabFilter Pro-DS (De-esser)
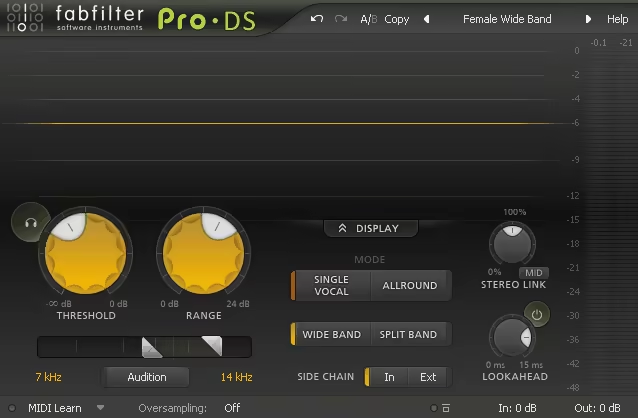
Normally, de-essing feels like a necessary evil, not something I get excited about. But when I loaded up FabFilter Pro-DS, it changed how I thought about this process.
Instead of feeling like another fiddly corrective tool, Pro-DS makes de-essing simple, fast, and, well, kind of fun.
- Simple Setup with Smart Detection
I loved how quickly I could get results. Turn the Threshold until the sibilants are highlighted in green on the waveform, dial in the Range, and you’re done.
The real-time spectrum display on the side-chain filter made it so easy to pinpoint problem frequencies. Add the Audition button, and suddenly I was able to hear exactly what the plugin was reacting to.
- Two Different Processing Styles
There’s the Single Vocal algorithm, designed to lock onto one voice with precision, and the Allround mode, which is more forgiving and works well on full mixes or background vocals.
Pair that with Wide or Split-band processing, and I always felt like I had the right tool for whatever source I was tackling.
In practice, this plugin feels like a “set and forget” tool on light sibilance, but it also scales up when things get trickier.. For me, that’s exactly what you want, transparent control that doesn’t call attention to itself.
It supports macOS and Windows, and works in AAX, VST3, and AU formats.
10 Best Free Plugins For FL Studio Users
1. ZAK Sound Orange Dreams 2 Lite (Synth)
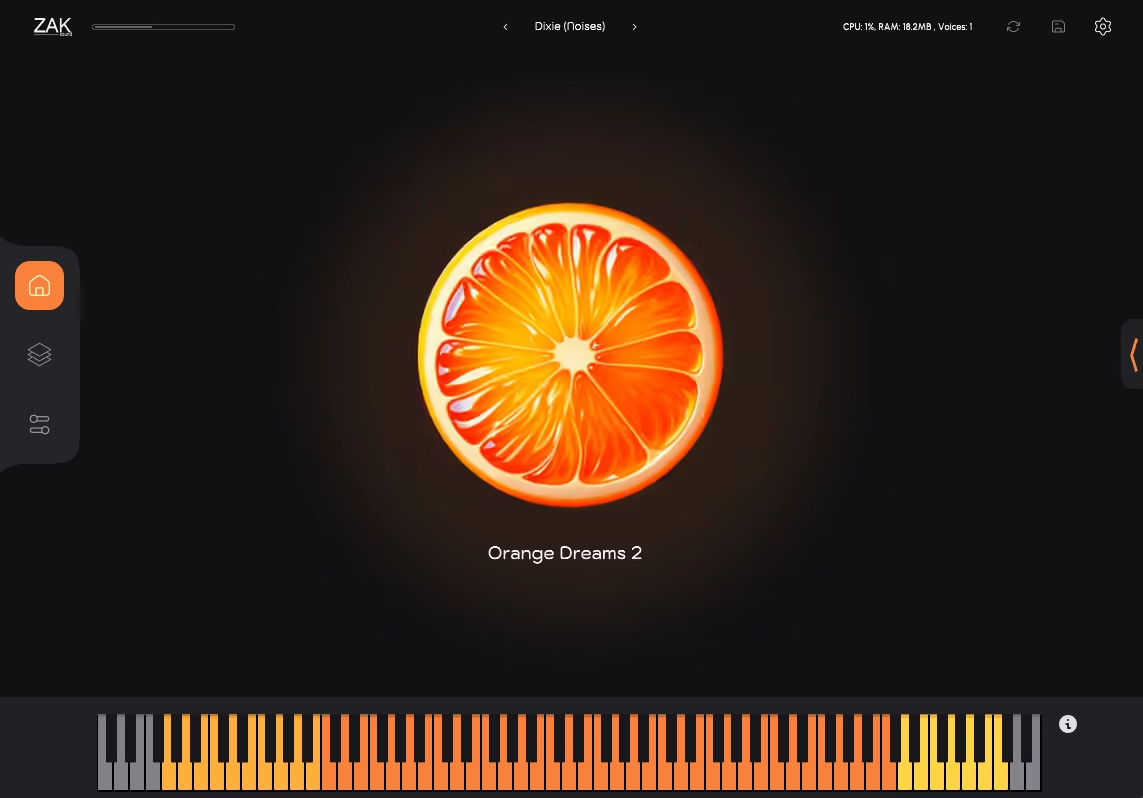
Orange Dreams 2 is one of those plugins that instantly puts me in a chill headspace, with its mix of samplers, synths, and dusty effects that feel tailor-made for lofi.
I enjoyed layering the 93 built-in instruments with my own samples, then running them through the saturator, chorus, and bit crusher to get that perfect retro haze.
With 140 presets, filters, EQ, and an arpeggiator for movement, it gives me endless ways to shape warm, nostalgic textures.
2. Arturia Analog Lab Play (Synth)
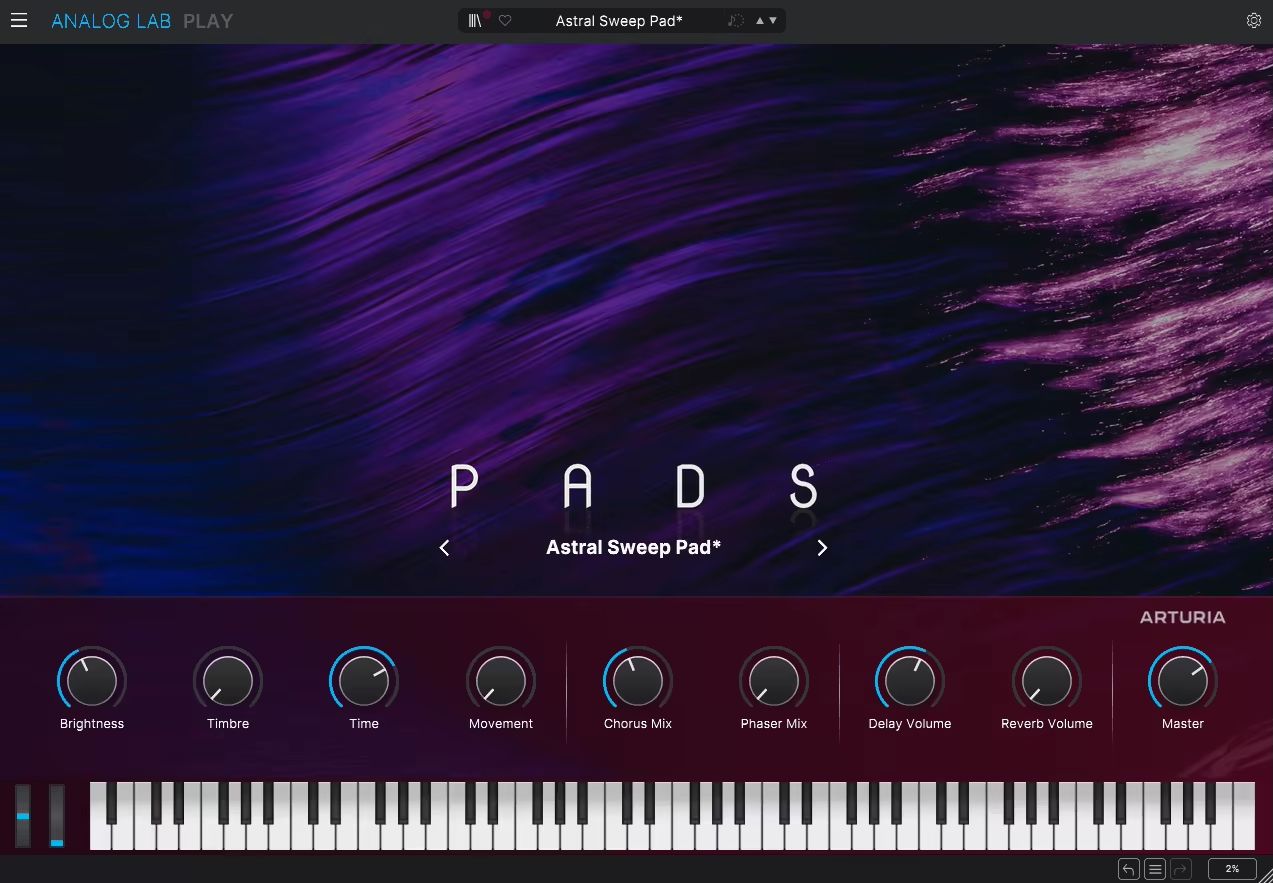
I’ve been having a blast with Analog Lab Play, a free Arturia plugin that gives me tons of presets from the V Collection and Pigments in a super simple interface.
I can tweak sounds instantly using the macro controls for Brightness, Timbre, Time, and Movement, and shape them further with the built-in modulation, delay, and reverb effects.
It’s great for quickly finding inspiring sounds, and I can save my favorites to jump back into them anytime.
3. Dawesome Zyklop (Synth)

Zyklop feels like a free mini-version of Dawesome’s Myth, and I love how it keeps the core Iris oscillator with all its wild modes intact.
I found the stripped-down design with fewer modules, fewer LFOs, actually helps me focus on sound design without getting lost.
For me, it’s both a solid standalone synth and a sneaky free expansion for Myth users.
4. Lunacy Audio Haze (Chorus)
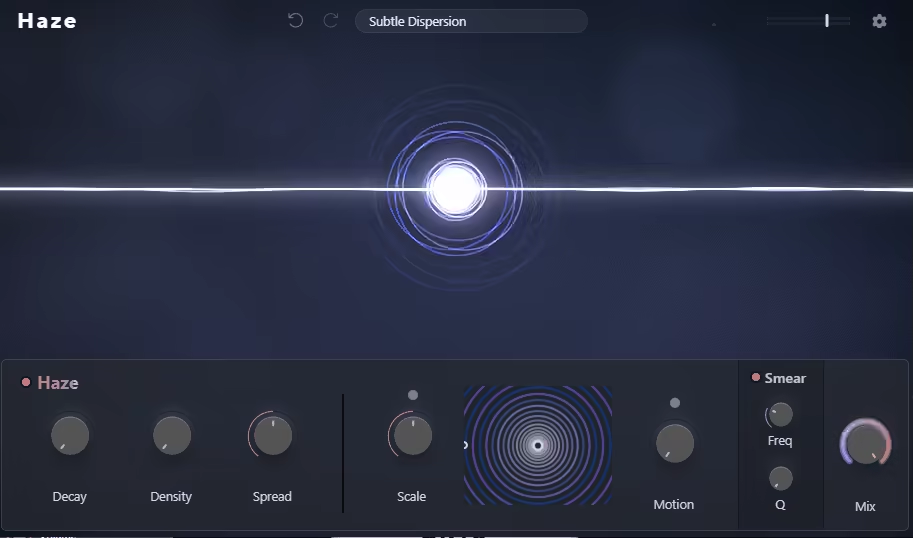
Haze instantly gave me that “lost in a dream” vibe the first time I slapped it on a synth pad.
I love how the chorus, phaser, and reverb blend into one silky wash, and the spectral dispersion adds this sparkling blur that makes sounds feel alive.
Whenever I need width and movement without clutter, this plugin has become my secret weapon.
5. Vital Synth (Synth)

Vital really impressed me the first time I tried it, as free synths rarely feel this powerful.
The spectral warping is my favorite as it lets me bend and smear harmonics into totally new shapes, and being able to make wavetables from my own samples or even text feels ridiculously creative.
On top of that, the slick 60fps interface and drag-and-drop modulation make it one of the most fun synths I’ve used in years.
6. Klevgrand Syndtsphere (Unique Synth)
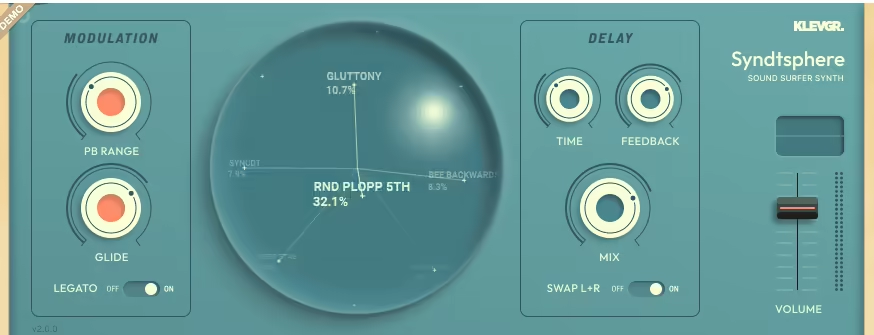
SyndtSphere v2 instantly grabbed me with its playful Sound Surfer design, instead of tweaking endless knobs, you literally “surf” between over 70 professionally crafted presets on a globe-like display.
As it can morph between sounds and blend multiple parameters at once, it gives me lush, hybrid tones I wouldn’t have dialed in myself.
Add in the new resizable GUI, volume slider, a ping-pong delay, and light modulation controls, and you’ve got one of the most fun free synths I’ve played with in a while.
7. Newfangled Audio Pendulate (Synth)

I’ve been diving into Newfangled Audio Pendulate, a free chaotic monosynth that’s equal parts fun and unpredictable.
Experimenting with its double pendulum oscillator, wavefolder, and low pass gate, tweaking the Chaos, Animate, and Interval controls to sculpt wild, evolving sounds is the heart of the workflow.
The modulation system is surprisingly flexible, letting me patch envelopes, LFOs, and MPE sources to almost any parameter, which makes creating unique basses, leads, and textures a total joy.
8. Diginoiz TrapDrive (Distortion)

I’ve been messing around with Trap Drive, a distortion VST built specifically for the aggressive edge of trap music.
This VST can completely crush 808s, add grit to vocals, or make synths and guitars sound wild, and dialing up the Amount knob instantly gives tracks that chaotic, in-your-face vibe.
With 8 distortion types from hard clipping to bit crushing, it’s brutal but fun, and I’ve even experimented with it on full buses for a total sonic meltdown.
9. Wavesfactory SK10 (Enhancer)

I used SK10 once to give my kicks more punch and low-end presence, and it really nailed that sub-kick vibe.
It simulates a sub-kick mic, letting me capture deep lows that a regular kick mic can’t pick up. I love layering it with my main kick mic, it instantly adds thump and body without muddying the mix.
10. Hvoya Audio Ribs (Granulizer)

Ribs is a granular FX/synth that lets me completely warp and reconstruct sounds with glitching, scratching, filtering, and more.
When I gave it a try, I liked feeding audio into its buffers and experimenting with the FX mode to create unexpected textures and rhythmic chaos. Even though it can’t load WAVs or save buffers yet, it’s incredibly fun for live sound mangling and experimental sound design.
Last Words
Whether you’re looking to expand your sonic palette or experiment with new workflows, these plugins offer something for every FL Studio user. From essential paid tools to standout free options, there’s plenty here to inspire your next track and take your productions to the next level!
