
Let’s discuss the best resonance suppressor plugins, updated with the latest tools from established brands.
Resonance suppressors are tools that automatically find the problematic areas/frequencies in your mix or sounds and filter them. Do you know what I mean by those nasty, piercing frequencies that pop out of nowhere and make your track feel harsh and unbalanced?
If you ask me, dealing with resonance is like pulling weeds from a garden. It’s not glamorous, but the payoff is huge when everything sounds clean and cohesive. S0, hear me out. No room, speakers, or headphones are perfect. There are always areas that your space or setup will make you overlook. So, having a resonance suppression plugin can be a huge help when your room, monitoring systems, and ears fall short. In this situation, you can rely on a machine.
I have had mixes that traveled so far away because I used these resonance suppressors in the right way, and I couldn’t even claim the credit for those clean mixes because they were all because of these plugins.
However, I must say that not all resonance suppressor plugins are developed in the same way. Some are great at pinpointing problematic frequencies but lack flexibility, while others come packed with features that can feel overwhelming at first.
Finding the right one for your workflow is like finding a tool that speaks your language. Over the years, I’ve tested plenty of these plugins, and the ones I’ll share with you stand out for their precision, ease of use, and effectiveness.
A good resonance suppressor doesn’t just solve problems; it helps you create space for your mix to breathe. And guess what? The plugins on this list do just that. Whether you’re tackling muddy vocals, harsh cymbals, or a bassline that’s hogging the low end, these tools are here to make your life easier.
1. Waves Curves Equator
Do you know that feeling when a plugin just seems to “get” your mix? That’s exactly how I felt the first time I used Curves Equator.
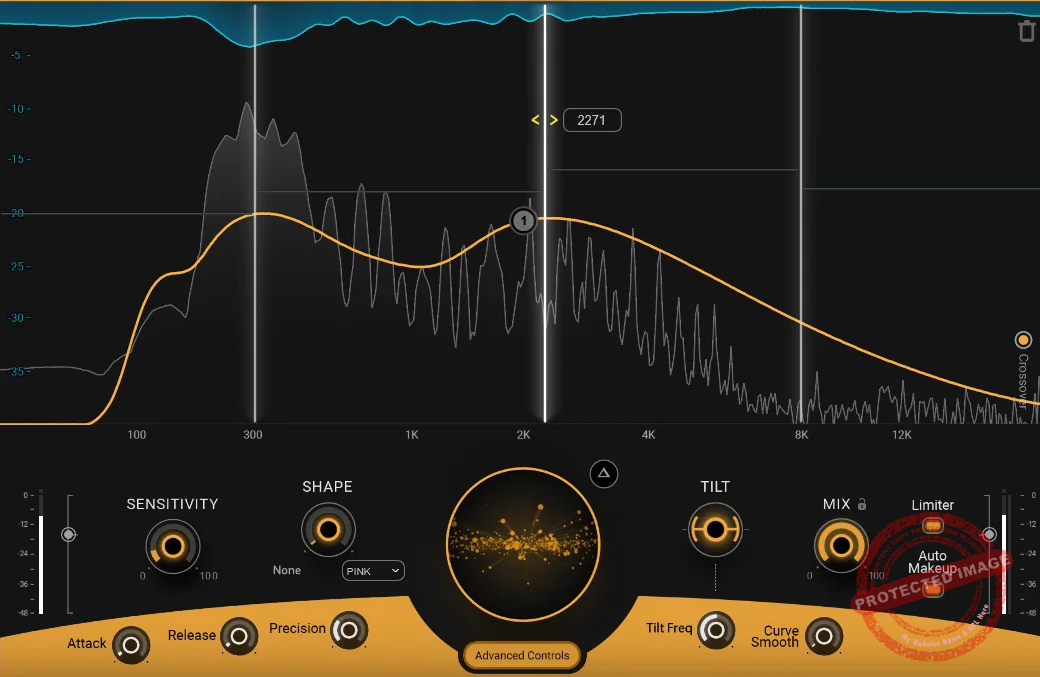
What’s cool about Curves Equator resonance suppressor plugin is the way it actively learns your audio, analyzing its unique characteristics to create a custom suppression curve.
I can see that this isn’t just about reducing resonances, as it’s more about creating clarity and balance without sucking the life out of your track. Plus, it’s also loaded with advanced features like a multiband workflow and an output limiter.
- Intuitive Controls for Automated Workflow
For example, it has a dynamic auto-makeup gain that feels like having a safety net on your levels, ensuring your mix doesn’t lose energy while taming harsh frequencies. Also, sidechain mode opens up some creative possibilities for unmasking clashing elements. You could carve out space for a vocal to sit beautifully in a dense mix, all without endless tweaking.
- Frequency Isolation
By the way, something I didn’t mention earlier is the frequency isolation feature, which allows you to hone in on specific problematic areas without impacting the rest of the spectrum.
It’s perfect when you’re dealing with complex mixes where certain elements, like harsh cymbals or muddy vocals, are sticking out. Plus, the ability to adjust suppression in a broad or narrow bandwidth allows you to address subtle or extreme issues without breaking a sweat.
Overall, you get 4 bands that are completely customizable, along with 8 nodes. However, here’s the catch: it’s not a “set it and forget it” tool. Sure, it’s intuitive, but you’ll get the best results when you take the time to adjust the tilt and shape controls to suit your sound. I’ve found it especially effective on vocals and acoustic instruments, giving them space to breathe.
Waves Curves Equator comes in VST3, AU, and AAX formats for macOS and Windows platforms.
2. Techivation M-Clarity 2
You’ve got to hand it to the designers of M-Clarity 2! They’ve made resonance suppression feel effortless.
What caught my attention right away was its adaptive processing range, which adjusts itself dynamically to the audio. It’s like having a plugin that listens along with you and knows exactly where to step in without overdoing it.
- Simple Workflow
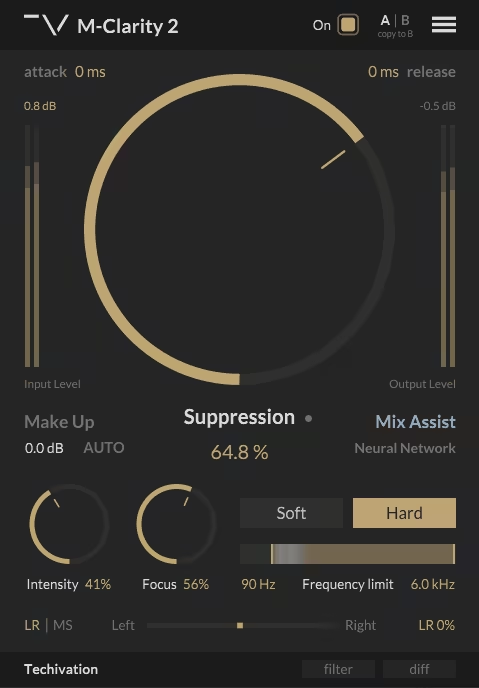
M-Clarity 2; has 2 modes: soft and hard, along with frequency limit sliders that let you select the range of frequencies in which you want the plugin to act. You can set those anywhere between 20Hz and 20kHz and pair them with different values of intensity and focus, both between 0 and 100.
- AI-Powered Functionality
The intelligent mix assistant (which is AI-based) surprised me in a good way as it’s not the type of feature I usually rely on, but I gave it a shot and found that it nailed the right settings faster than I could. And let’s face it, anything that saves time without cutting corners is a win in my book.
One little tip? Play around with the frequency limit slider cause it’s super effective when you want to zero in on just the problem areas without touching the rest of your sound.
- Spectral Shaping
Another feature I liked is that M-Clarity 2 also includes an enhanced spectral shaping engine, which minimizes artifacts while maintaining the natural character of your audio. Another bonus is its low-latency mode, making it an excellent choice for live performances or real-time applications.
- Easy Visual Monitoring
I also love that it has a visualization panel showing exactly where the plugin is working, giving you a clear sense of what’s being adjusted at any given time.
If I’m being real, this plugin shines on vocals and muddy low-end instruments. I used it on a bass guitar track that felt like it was fighting the kick drum, and in minutes, the mix just locked together. Long story short, it’s a straightforward yet powerful tool that works with you instead of against you.
Techivation M-Clarity 2 comes in VST3, AU, and AAX formats for macOS and Windows platforms.
3. DJ Swivel Knocktonal

Let me tell you, Knocktonal was way ahead of its time when it came out, and finally, we are talking about it! It stands out because it lets you add or remove specific resonances in real time.
Seriously, how often do you come across a plugin that can both fix and enhance tonal content precisely?
- Pitch-based detection
I loved the pitch detection engine in Knocktonal , which automatically locks onto the fundamental frequency. No kidding, it makes the whole process of targeting resonances so much easier. The harmonics section is an absolute gem. I used it on a snare drum that lacked body, and adding a subtle harmonic boost brought it to life without overhyping the track.
- MIDI and Filter Controls
One of the features I haven’t mentioned yet is the midi control integration, which allows you to tune resonances dynamically during playback. It’s an incredible tool if you’re working with pitched instruments or creating sound design elements that need to evolve.
The plugin also features fine-tuned high-pass and low-pass filters, letting you carve out the exact frequency range you want to target without affecting the rest of the audio
That said, it’s not rocket science to get the best out of it. You just need to go easy on the harmonic enhancements. Overdoing it can make things sound artificial. This resonance suppressor VST is ideal for creative sound design, too. Whether it’s drums, bass, or even synths, Knocktonal has the kind of flexibility that feels fun to experiment with.
DJ Swivel Knocktonal comes in VST3, AU, and AAX formats for macOS and Windows platforms.
4. Mastering The Mix RESO
RESO is a no-nonsense plugin for cleaning up resonances by one of the best developers in this field, Mastering The Mix.
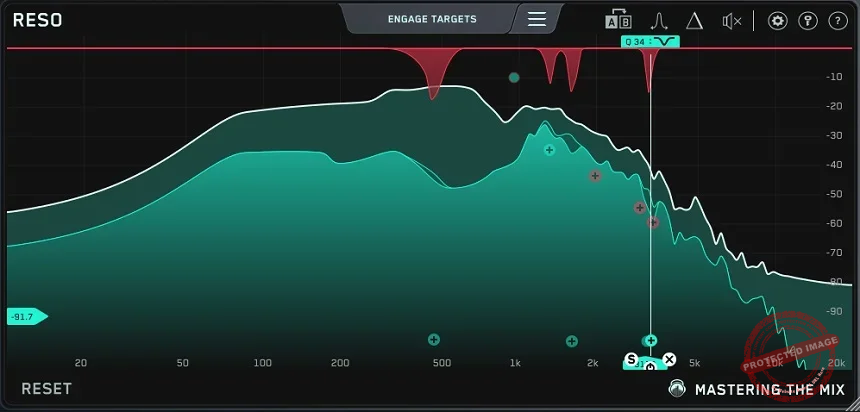
It’s got this way of highlighting exactly where the problem frequencies are, making me feel like it saves me hours of guessing.
- Easy to setup and operate
I love how minimal, fast, and efficient its workflow is. I think the secret behind the magic is the adaptive thresholding feature. It applies suppression dynamically, so you’re not overprocessing quieter moments in the mix. Overall, you just need to slap the plugin and it takes care of the rest with only minimal tweaks.
- Delta Monitoring Mode
RESO has a delta monitoring mode, which I’ve found to be incredibly handy. You can actually listen to what’s being cut out, making it much easier to know if you’re overdoing it. Honestly speaking, that’s the kind of feedback I wish every plugin offered. I tried it on a dense mix with clashing guitars and vocals, and it was like someone opened a window, and everything felt lighter and clearer.
- Automated Workflow
The VST also includes automatic resonance detection with adjustable sensitivity, meaning you can tailor the detection process to suit different kinds of audio. It’s especially useful when working with tracks that have varying dynamics.
On top of that, the plugin provides multiple display modes, giving you a more detailed visual breakdown of the frequency spectrum, which can be a lifesaver during complex mixes.
I must admit that it is not always the fastest tool to set up, as you’ll need to take a few minutes to dial it in, but once you do, the results are worth it. At the end of the day, it’s one of those plugins that doesn’t just clean up your mix, it makes the entire thing feel more polished.
Mastering The Mix RESO comes in VST3, AU, and AAX formats for macOS and Windows platforms.
5. Oeksound Soothe 2
When I first encountered Soothe 2, I was intrigued by its promise to dynamically suppress resonances in real-time.
This is the first resonance suppressor plugin I came across, and I remember being stunned by how beautifully it worked cleaning the audio input fed into. I was quite surprised by how this plugin automatically identifies and reduces problematic frequencies, making the mixing process more efficient.
- Adaptive Algorithm
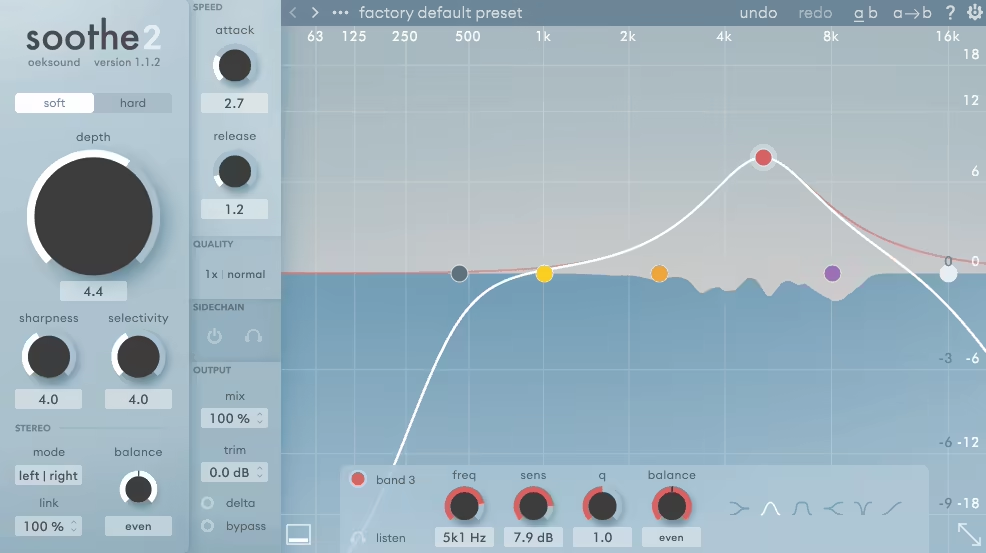
One feature of Soothe 2 that stands out is the adaptive algorithm, which continuously analyzes the audio signal and applies precise attenuation where needed. This ensures that the plugin addresses resonances without affecting the overall tonal balance, which we at Mixing Advice found to be a great feature.
- Processing Options
Additionally, it offers mid/side processing, allowing for targeted adjustments in the stereo field. The plugin also includes a delta monitoring mode, enabling users to hear only the affected frequencies and providing greater insight into the processing.
I’ve found that, in practice, the unit is particularly effective on vocals and acoustic instruments, where unwanted resonances can be more pronounced. Its ability to transparently reduce harshness without introducing artifacts makes it a valuable tool in any mixing scenario. However, it’s important to use the depth control judiciously to avoid overprocessing.
A practical tip is to utilize the sidechain input to trigger resonance suppression based on an external signal, allowing for dynamic interaction between different elements of the mix. This can be especially useful in complex arrangements where certain instruments may mask others.
The only downside for me is the price, as this unit sits on the pricey side of the plugin world. Overall, Soothe 2 offers a comprehensive solution for resonance suppression, enhancing clarity and balance in your mixes if you have the budget.
Oeksound Soothe 2 comes in VST3, AU, and AAX formats for macOS and Windows platforms.
6. W.A. Production Deres
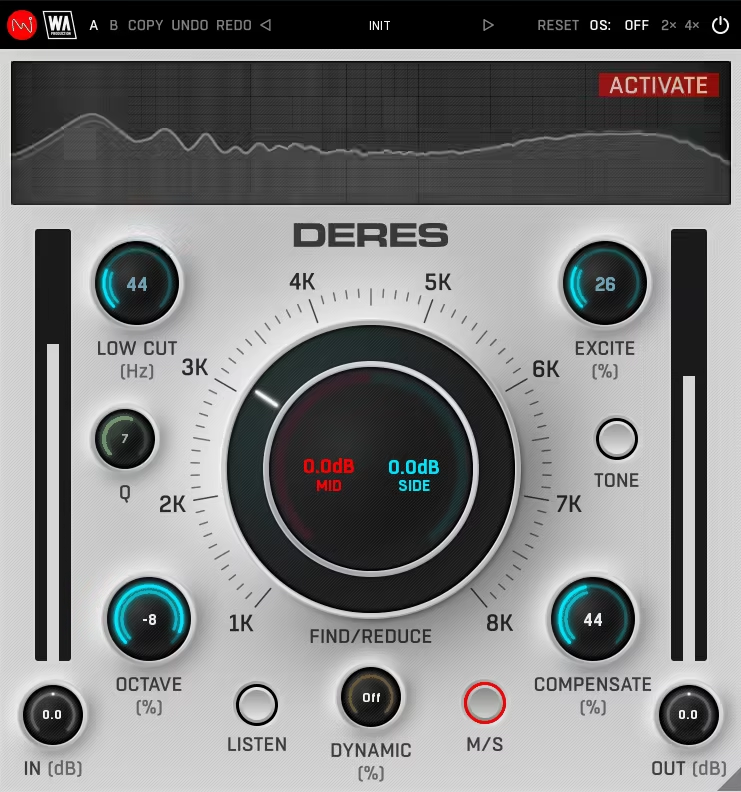
You know that moment when something clicks, and you realize a tool is solving a problem you didn’t even know had a solution? That’s exactly how I felt when I started using Deres.
What makes Deres stand out is how it tackles resonant frequencies in a way that feels almost effortless. Instead of fighting your mix, it feels like the plugin works with you to uncover its potential.
- Dynamic EQ band
One of the things I love is its dynamic mode, which adjusts in real-time to the intensity of the sound. It’s like having a second set of ears that knows exactly when to step in and when to back off.
- Compressor within EQ
The compensation feature is another gem cause it subtly boosts the areas around the suppressed frequencies to keep your mix alive. Honestly speaking, I was skeptical about this at first, but after a few tries, I realized how much smoother everything sounded without losing energy.
I’ve used this on a muddy acoustic guitar recording, and it was like peeling back layers to find the clarity underneath. The interface is straightforward, with a spectrum display that makes it easy to see what’s happening. It even has an AB comparison mode so you can instantly hear what’s working and what’s not.
I would recommend not overdoing it, as it’s tempting to crank up the reduction, but subtlety is key. Start with gentle settings, use your ears to guide you, and remember this isn’t about perfection; it’s about making your mix breathe.
W.A. Production Deres comes in VST3, AU, and AAX formats for macOS and Windows platforms.
7. HoRNet Sleek
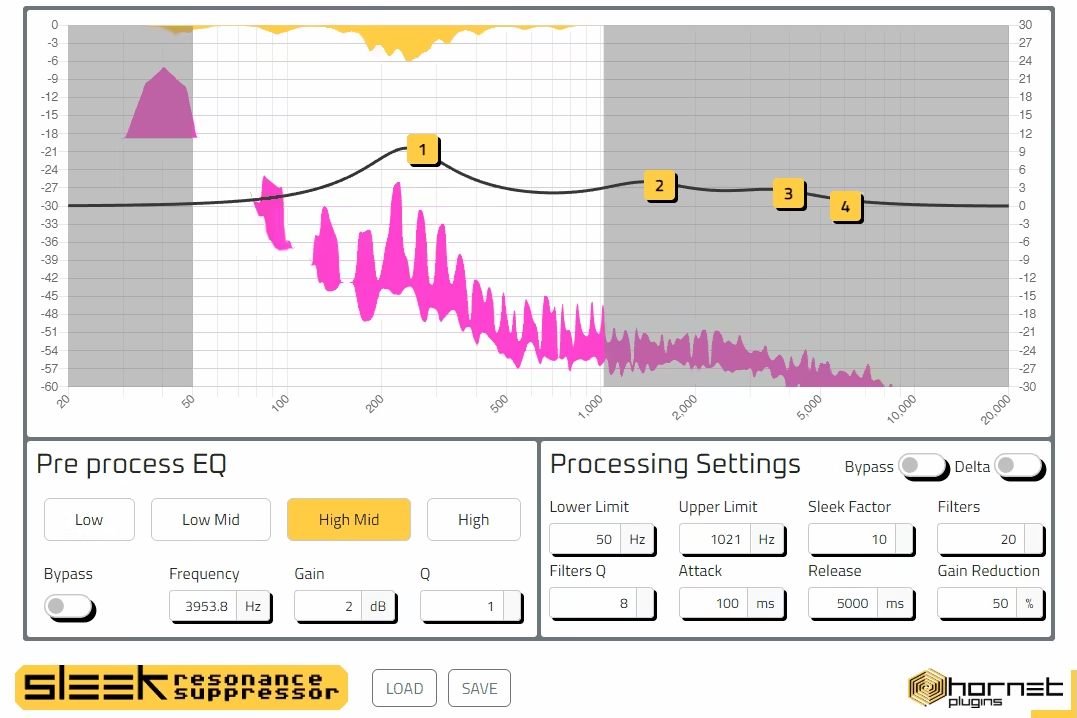
When I first gave Sleek a try, I wasn’t sure what to expect. But you know how sometimes a plugin feels like it’s been designed to take the stress out of your workflow… That’s exactly what hit me with this one.
This is not just about suppressing resonances as it’s about doing it quickly and naturally without overthinking every step. What I really enjoy about Sleek is how it combines simplicity with control.
- Intuitive Workflow
The preprocess EQ bands let you shape your audio even before resonance suppression kicks in, which is a smart way to avoid unnecessary processing. And the Sleek Factor knob feels like a cheat code. It dynamically adapts the suppression to your audio’s behavior, making adjustments seamless. It’s like the plugin knows when to back off and when to lean in.
It has 4 bands, for each of which you can set the upper and lower ranges, Q values, and attack/release/other parameters to customize how each band works on each frequency range.
- Designed for Practical Processing
I remember using it on a piano track with sharp, cutting resonances that cluttered my mix sound. With Sleek’s spectral window control, I could narrow down the exact problem areas and clean them up without losing the instrument’s richness. And the fact that you can visually monitor what’s happening in real time is a massive help when you’re trying to keep your mix balanced.
I have to say: Don’t just set it and forget it. I’ve found that small tweaks to the spectral window can make a huge difference, especially on instruments with complex overtones like strings or brass.
In my opinion, this is one of those resonance suppressor plugins that rewards a bit of patience, but once you dial it in, the results are worth every second. Sleek isn’t flashy, but it’s reliable, and sometimes that’s exactly what you need.
HoRNet Sleek comes in VST2, VST3, AU, and AAX formats for macOS and Windows platforms.
8. Baby Audio Smooth Operator
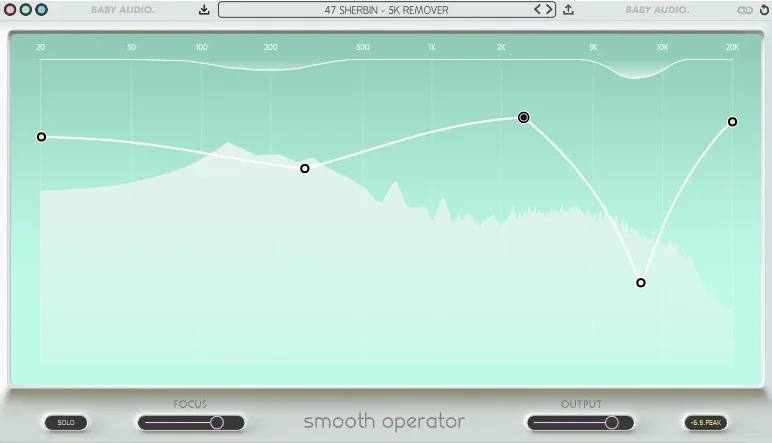
You might not believe this, but the first time I used Smooth Operator, I felt like it had been tailor-made for my workflow.
It’s like Smooth Operator (now Pro) understands your audio on a deeper level and responds in a way that feels almost musical. The way it balances clarity and control with its Focus knob is what sets it apart. You can dial it in to pinpoint harsh frequencies or broaden the range to gently smooth out an entire mix. I’ve tried it on vocals, guitars, and even drum overheads, and every time, it felt like the plugin gave me exactly what I wanted.
The visual feedback isn’t just pretty; it’s also practical. Seeing how it dynamically adapts to your signal makes it so much easier to trust your ears and your adjustments.
Another plus for me is that everything feels natural to use, from how you shape frequencies to how you can use the sidechain input to carve out space for other instruments.
- Dual Algorithm & EQ Customizations
You get 2 algorithms to work with: High Res and Classic, which you can select by tapping its “M” icon to toggle between both. The “Classic” mode provides lower latency, making it ideal for tracking and production tasks, while the “High-Res” mode delivers a smoother, more refined sound, perfect for mixing and mastering.
You can also adjust the 4 nodes on the frequency curve to shape the tone you want. You get a ‘Lift the nodes’ function to emphasize certain frequencies or pull them down to cut them more aggressively.
For what it’s worth, my favorite trick is to use it subtly in mastering, as it’s like giving your track one last polish, taming any leftover resonances without stripping away its character. Overall, you can use it on individual instruments, mix buses, instrument buses, and masters.
I remember using it on a vocal track with nasty sibilance and boxy tones competing for attention. Within seconds, Smooth Operator cleaned things up without making the vocal sound lifeless or overly processed.
Long story short, this plugin doesn’t just fix problems; it elevates your mix, giving it room to breathe and shine. It’s one of those plugins that earns its spot in every project.
Baby Audio Smooth Operator comes in VST, VST3, AU, and AAX formats for macOS and Windows platforms.

Shaurya discovered his passion at the intersection of writing and music. Starting his career as a songwriter and rapper, he gradually picked up FL Studio and soon delved deep into the world of audio engineering and music production. Based in Delhi, India, he has worked with top studios, been featured on Red FM, garnered millions of streams on Spotify, and released music with major labels like Sony and Hitz.