
Baby Audio has a unique take on audio plugin development, and I will showcase some of their best tools to display that.
I came across Baby Audio plugins when I encountered Space Out in a review on YouTube. Intrigued by the praise it received, I decided to give it a shot and quickly realized why it stood out. Baby Audio’s approach to crafting effects feels refreshingly modern, unconventional, and intuitive.
I discovered a rather innovative and more “programming” approach towards time-based effects in Spaced Out. I have observed that that’s the approach it takes toward all its plugins. For example, it released a compression plugin called IHNY-2 that gives you an unorthodox XY pad for adjusting dynamics in a sound.
Similarly, there’s another plugin called Crystalline that takes an algorithmic approach toward reverb and gives you the most unique set of controls that you’d encounter in a reverb plugin. They are one of those developers who are finally approaching audio processing from a distinctive lens, and this philosophy seems to run through the veins of everything they produce.
This Pasadena, California-based company is only five years old and has introduced many sound design tools, from synthesizers to effects to drum machines and more, since 2019. I got an opportunity to use some of these and decided to list some of my favorite ones. So, let’s start right away.
All Baby Audio plugins included in the list are available in VST/VST3, AU, and AAX (64-bit) plugin formats and are compatible with Mac OS 10.11 and up (including Native Apple Silicon M1/M2 Compatibility) and Windows 10 and newer operating systems.
1. Transit 2
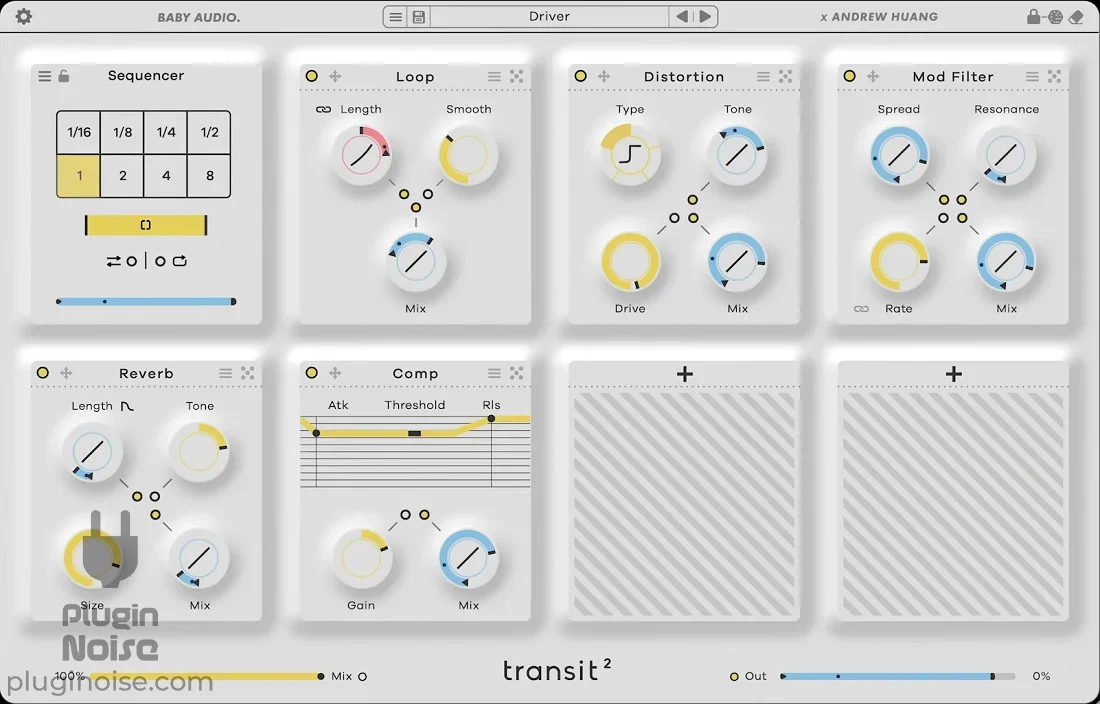
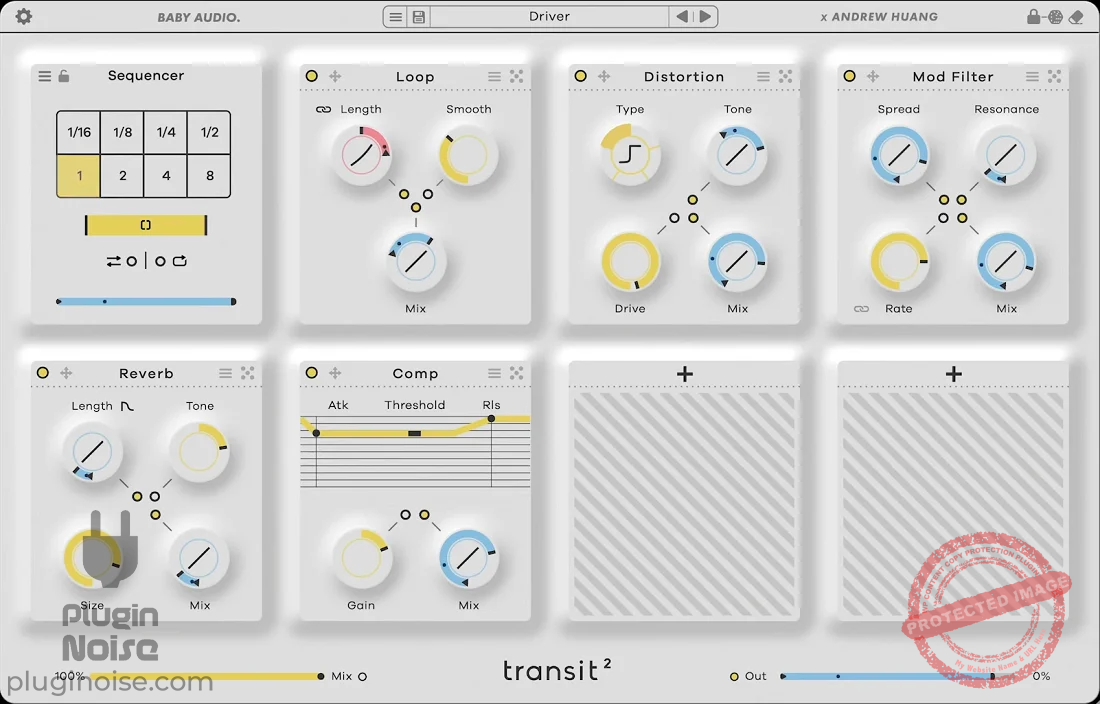
Developed in collaboration with Andrew Huang, Transit 2 is primarily built to create transitions, especially during buildups or breakdowns.
Let me start by explaining its workflow. The plugin operates on a modular system, allowing you to load up to seven effects modules into customizable slots. That gives you immense flexibility to do more detailed sound design.
- Six Motion Modes
Transit 2 offers six unique motion modes to bring your mixes to life. You can use Macro mode for sweeping transitions, LFO for rhythmic FX, or Follower to make effects respond to your track’s dynamics. Take it further with Sidechain, triggering FX via an input signal, Gate for live performance effects, and Sequencer for DAW-synced automation.
- Expanded Effects Palette
With 10 new effects, the plugin has 28 modules, including tools like Warp, Reverser, Analog Chorus, Retro Reverb, and Warp, which you can use to add a more vintage character, tweak pitch, or create glitchy, warped effects. I use it for everything from subtle soundscapes to experimental textures. Whether you’re enhancing a mix or designing intricate sound effects, the expanded library unlocks endless creative potential.
- Enhanced Workflow and Preset Library
Transit 2 boasts a redesigned interface for faster and more intuitive use. It includes a massive library of 838 presets, co-designed with Andrew Huang and other industry experts, covering everything from subtle transitions to dramatic sound-shaping effects. You can customize further with the advanced randomization engine to create unique sounds in seconds.
- Synchronization and Motion Linking
Sync effects to your DAW’s tempo for time-aligned transitions using the plugin’s motion modes. With the new option to link Global Mix and Output to Motion, you can ensure seamless integration across your mix. This makes Transit 2 perfect for both precise adjustments and broad, sweeping changes.
- Randomizer Tool
One of my favorite features is the randomizer tool, which introduces a bit of creative chaos by generating unique settings for the modules. You can lock specific parameters to maintain control while allowing others to change, which feels like having a collaborator throwing in fresh ideas.
I also love how intuitive and visually appealing the interface is. Plus, the MIDI Learn functionality means you can control parameters in real-time, expanding its useability for live performances, too.
2. Humanoid
Humanoid falls in the likes of iZotope’s VocalSynth and Waves’ Ovox and offers interesting vocal processing and manipulation, so you can subtly tune vocals or create entirely new sonic textures.
It has multiple tools for pitch correction, resynthesis, and filtering alongside creative effects such as warble and buffer freezing. I use these features to transform vocal tracks into anything from smooth harmonies to gritty, experimental soundscapes. Moreover, its intuitive interface keeps the process accessible, offering precise control without overwhelming complexity.
- Extreme Vocal Tuning
Humanoid isn’t designed for subtlety but is built to take vocal tuning to bold, futuristic extremes. Powered by an FFT-based re-tuning engine, it delivers crisp, ultra-precise hard-tuning effects that redefine modern vocal soundscapes.
- Synth Waveform Morphing
I love how this plugin has the potential to let you transform your voice into unique synth waveforms, seamlessly blending human and machine elements. You can choose from 64 built-in wavetables or import your own for endless sonic possibilities. From subtle electronic textures to full-blown synth transformations, Humanoid lets you sculpt your sound with precision using advanced shaping tools.
- Advanced Harmony Creation
Turn any vocal take into a melodic masterpiece. Control pitch manually via MIDI or automation to create harmonies, chords, and re-pitched variations. Perfect for crafting symphonic layers or futuristic vocoder effects, Humanoid’s retuning engine handles even dramatic pitch shifts with natural fluidity and precision.
- Depth and Customization
For those who love to tweak, Humanoid offers advanced calibration options hidden behind intuitive gear icons. You can adjust parameters to fine-tune your sound or dive into its 180 presets, designed by top sound designers, to achieve instant professional results.
Humanoid, for me, comes second in the list because of its ability to synthesize vocals into entirely new waveforms while retaining clarity, which ensures it blends seamlessly into both electronic and acoustic mixes. Additionally, the plugin’s MIDI compatibility lets it double as a vocoder, expanding its utility for live performances and studio work/productions alike.
3. BA-1
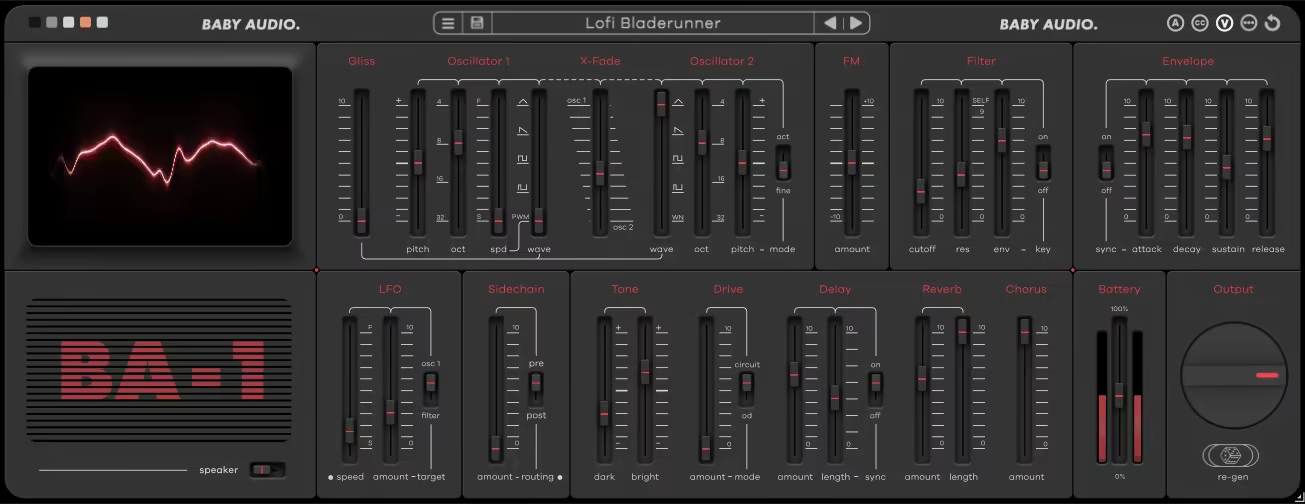
BA-1 was the first synth that Baby Audio launched and is their take on the vintage CS-01 analog mono synth.
I really appreciate how the plugin developers took inspiration from the classic synth but added their own innovations, too. Baby Audio definitely has a knack for combining simplicity, creativity, and fun, which they have used in this BA-1 to induce nostalgia and intuitiveness.
- Dual Oscillator Design
Unlike the original CS-01, which had just one oscillator, the BA-1 offers two oscillators plus an FM oscillator, giving you significantly more sound-shaping possibilities. Both oscillators come with four wave shapes (triangle, sawtooth, square, and pulse), and Oscillator 1 adds pulse-width modulation for even more versatility. Oscillator 2 introduces fine-tuning and octave control, letting you craft harmonically rich tones with ease.
- Characterful Filters
The plugin’s filter section brings warmth and character to your sound, featuring a resonant filter capable of self-oscillation. While the envelope is shared between amplitude and the filter, its simplicity allows for intuitive sound design. Additionally, if you’re a modulation enthusiast like me, you might appreciate the built-in LFO, which can be routed to the oscillators or the filter for dynamic effects.
- Lo-Fi mode
One of the most playful additions is the Lo-Fi mode, which recreates the quirky imperfections of aging vintage gear. The built-in speaker emulation delivers a deliberately cheesy sound, while the battery drain simulation mimics the degraded performance of a low-powered synth, introducing fuzzy noise and drift for an authentic retro vibe.
- Effects section
The effects section is another highlight, featuring tone-shaping tools, drive distortion, a DAW-synced delay, and a lush reverb. The built-in chorus effect, inspired by the legendary Juno chorus, adds rich stereo depth to your patches. These effects not only enhance the synth’s capabilities but also make it a powerful tool for modern productions.
- Regen button
If you love experimentation, I think you’d love exploring the Regen button. This feature generates random but musically usable presets, serving as an inspiring starting point for new ideas. Moreover, the plugin comes with 500 presets, covering a range of styles, from synthwave to bass-heavy tracks, which are combined with a library of factory and artist presets from creators like Michael Oakley and Pegboard Nerds.
4. Atoms
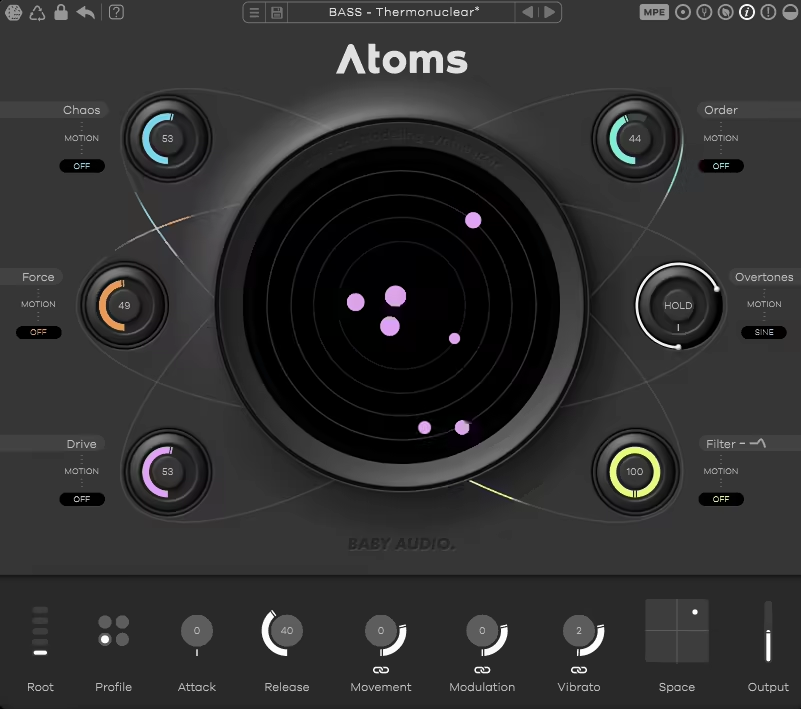
The best part about Baby Audio plugin Atoms is that it is a physical modeling synthesizer that breaks away from traditional sound design.
Instead of emulating analog classics, Atoms leverages mass-spring network modeling, simulating the interaction of a bow with a virtual system of springs. The result? A textural, unpredictable instrument that thrives on experimentation.
It replicates the behavior of a bow moving across a spring network, creating rich harmonic textures and organic sounds. Its core design focuses on parameters like force, overtone control, and chaos, allowing you to shape your sound by tweaking bow pressure, position, and string tuning for a natural yet highly customizable tone.
- Four Profile Types
You can choose from Standard, Alternative, Inharmonic, and Lowii profiles to fundamentally alter the character of the spring network. Each profile introduces distinct tonal possibilities, from smooth and harmonic to experimental and gritty.
- Intuitive Modulation System
What I found insane about the plugin is how each main parameter features its own LFO with flexible options like sine, square, or drift waveforms. Modulation can be synced to your DAW, inverted, or triggered per note, providing dynamic movement and evolving textures in your sound design.
- Dual Randomization Buttons
This is something that I witnessed in a plugin for the first time. Atoms take creativity a step further with two randomization options. An idea from me: you can create entirely new presets with the Global Randomizer or tweak existing settings with the Variation Randomizer, both of which are perfect for sparking fresh ideas.
- Built-In Reverb and Space Controls
The integrated Space reverb uses Baby Audio’s signature XY control, blending mix and size parameters for a seamless ambient effect. Whether you need subtle space or vast, atmospheric reverb, this feature can potentially enhance the synth’s capabilities.
- Flexible Workflow Options
Customize your experience with features like monophonic mode, chaos parameter disabling, and MIDI compatibility. Atoms is designed for both casual experimentation and precise control, ensuring it adapts to a wide range of workflows and styles.
Overall, Atoms is ideal for producers who love exploring unconventional sounds. Its Movement feature mimics a bowing motion, syncing to your DAW or setting a specific speed. Meanwhile, modulation pickup introduces subtle timbral variations, making each note feel alive and expressive.
5. Crystalline

Crystalline is Baby Audio’s innovative take on algorithmic reverb, blending vintage inspiration with modern precision.
Unlike convolution reverbs, which mimic physical spaces, Crystalline is purely algorithmic, designed to create spaces limited only by your imagination. I would like to highlight its clean, responsive interface and unique controls, which make it a joy to work with.
- Tempo-Synced Reverberation
One of Crystalline’s standout features is its BPM-synced attack and decay times. That lets your reverb flow naturally with your track’s rhythm, ensuring cleaner mixes and rhythmic coherence. If you’re like me and prefer a traditional approach, its “Sync/MS” toggle will let you switch to millisecond-based settings for pre-delay and decay times.
- Reflections Tailored to Your Mix
Crystalline gives you quite a lot of control over your reflections. The “Size” parameter lets you create everything from intimate spaces to cavernous halls, independent of the decay time. On top of that, I like adding a sparkling sheen to my vocals, for example, with the “Sparkle” control, and sculpting your stereo field using the “Width” slider, ranging from mono to ultra-wide stereo.
- Depth and Character
You can tailor the reverb’s fidelity with its “Resolution” control, which ranges from basic CPU-saving modes to a pristine setting free of metallic artifacts. The “Modulation” option introduces subtle pitch variations for a lush, organic feel, while the “Shimmer” effect creates a cascading, ethereal quality by extending the decay of high frequencies.
- Clean-Up Tools for Polished Mixes
Crystalline’s “Damping” and “Sides” controls help eliminate muddiness by filtering out unwanted frequencies. The inclusion of a gate allows for quick recreation of the iconic 1980s gated reverb sound, perfect for punchy snares or dramatic effects.
- Creative Sound Design Features
With features like “Reverse” playback and “Freeze,” you can do a lot of experimentation. It has a “Ducker” control that ensures that the reverb doesn’t overpower your dry signal, maintaining clarity in dense mixes.
- Seamless Integration
I like how Crystalline’s interface is fully resizable and includes light and dark modes to suit your workflow. It even offers a low-CPU “Eco Mode” for resource-conscious sessions without sacrificing too much on sound quality.
6. TAIP

TAIP uses artificial intelligence for tape emulation and can help you add gentle warmth to lifeless digital tracks or push your mix into bold, saturated textures.
I use it to soften harsh vocal tracks, clean up cluttered mixes, and even add polish to finished masters. Overall, TAIP’s intuitive, effective, and delivers professional results every time.
- Intuitive Sound Design Tools
It has a Drive control that lets you dial in a spectrum of tones, from subtle harmonic enhancement to full-blown tape distortion. The Lo-Shape and Hi-Shape features complement this, which allows targeted frequency saturation. These are perfect for boosting, let’s say, a bassline’s punch or adding shimmering detail to vocals.
- Dual Mode
I specifically am a fan of the Dual Mode, which adds even more character by stacking two tape emulations, creating a thicker, more textured sound. This subtle layering is particularly effective when you want to enhance depth without overwhelming the mix.
- Smart Functionality for Seamless Workflow
I like how this plugin uses AI and digital features and goes beyond traditional tape limitations. The Presence Control restores high-end clarity, ensuring your mix stays bright and detailed, while the Glue Effect mimics the tape’s natural compression to add cohesive warmth.
The Wear Setting introduces subtle imperfections like pitch variations and speed fluctuations, adding a beautifully human touch. Plus, the Noise Adjustment lets you fine-tune tape hiss to suit your vibe.
- Adjustable Interface
TAIP’s interface is completely resizeable, meaning you can drag and stretch or map it around to adjust its size as per your preference so it looks good on your screen. For aesthetic purposes, you can also switch the plugin’s background between three different colors: grey, white, and black. Moreover, I find the interface design really cool, showing 2 rotating tapes along with a minimal display of controls and meters.
7. Smooth Operator
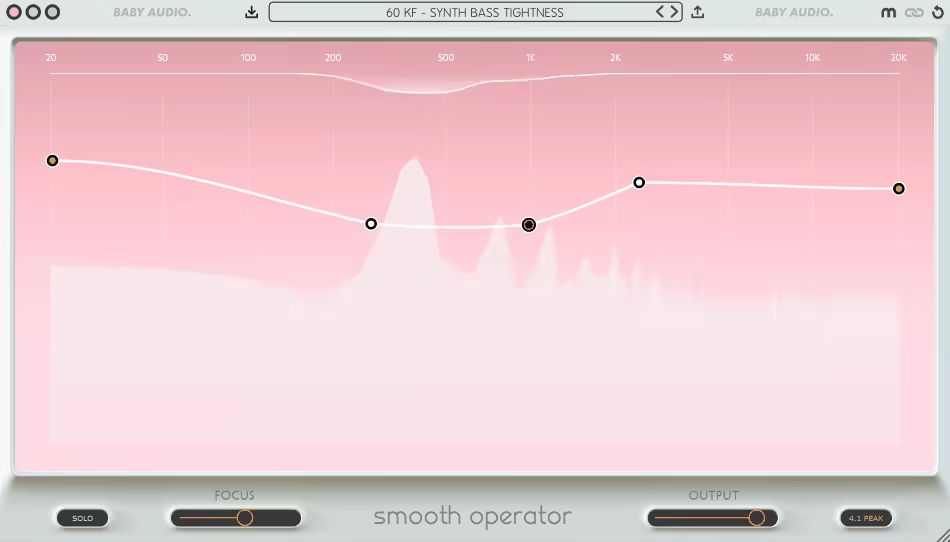
Baby Audio plugin Smooth Operator, combines resonance suppression, spectral compression, and EQ into one intuitive tool for cleaning resonances and problematic frequencies in audio.
Different rooms, ears, and monitoring systems have limitations, due to which they end up under or over-producing certain frequencies. The problematic area in my room is between 610 and 640 Hz, so I can’t rely on my current systems for cleaning those frequencies. Similarly, note B4 resonates a lot in my room, so I often end up overcorrecting that.
For problems like these, you need plugins like Smooth Operator, which can automatically detect the “problem” frequencies in your audio and help you reduce unnecessary resonances from it. It does so automatically and quite reliably if you ask me.
- Effortless Tone Shaping
When I used Smooth Operator (replaced by PRO version), I was simply able to drag the nodes on the frequency curve to sculpt my sound, and Smooth Operator took care of the technical heavy lifting. Whether it’s tightening a muddy low end or smoothing out harsh mids, it handles everything well.
You get a seamless way to tackle resonances and sculpt frequencies. By simply dragging a ‘central circle’ node in the plugin downward, you can control the global threshold, allowing the effect to be applied uniformly across the frequency spectrum.
- Surgical Precision Potential
The Focus slider lets you choose between targeting individual resonances with pinpoint accuracy or taking a broader, more musical approach. If there’s a trouble spot in the mix, the solo feature makes it easy to isolate and fix it.
With the slider set to higher values, it hones in on specific resonances, delivering pinpoint accuracy. When set lower, it provides a smoother, more natural attenuation that works wonders for musical applications. This flexibility ensures that Smooth Operator can handle anything from surgical repairs to broad tonal adjustments.
And the sidechain mode? I use that to create space between tracks, especially with bass and kick. I’ve used it to soften harsh vocal tracks, clean up cluttered mixes, and even add polish to finished masters. It’s intuitive, effective, and delivers professional results every time.
- Dual Algorithms
Depending on your production or mixing needs, Smooth Operator includes two algorithm modes: Classic and High Resolution. I prefer using the Classic Mode for low-latency workflows during production or tracking and the High-Resolution Mode for providing a cleaner, more detailed response for mixing and mastering tasks.
- Customization Options for a Personal Touch
Smooth Operator also caters to visual preferences with adjustable display colors, like pink, green, or blue, and a fully resizable interface. Whether you’re working on a large monitor or a compact laptop screen, you will find yourself a comfortable and optimized experience with this plugin.
8. Spaced Out
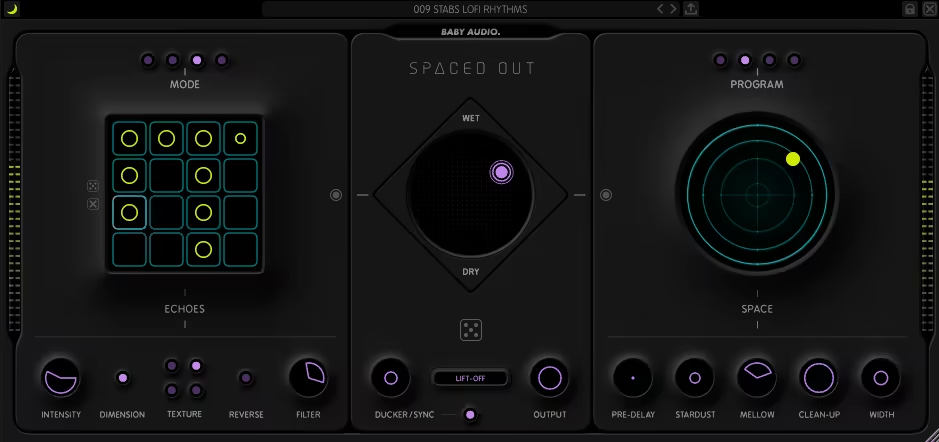
Spaced Out combines delay, reverb, and modulation into a single plugin and is the ultimate tool for creating dreamy, atmospheric effects.
I would say that its design allows you to seamlessly blend reverb and delay, offering over 50 interconnected effects that work together beautifully. The workflow is so different from any other reverb I have used. It includes a 16-step delay sequencer synced to your DAW, with modes for straight, dotted, and triplet patterns.
- Effortless Balancing
One feature I rely on is Spaced Out‘s X-Y joystick mixer, which makes balancing wet and dry signals intuitive and precise. Instead of endlessly tweaking sliders, I simply glide between delay and reverb blends or tweak the wet/dry ratio until it feels just right. It’s an intuitive way to maintain clarity while adding depth, especially for vocals and intricate instrumental layers.
- Customizable Delay Textures
The delay section is a dream for rhythmic effects. Its 16-step sequencer syncs perfectly with my DAW, letting me create everything from subtle echoes to complex, cascading patterns. With textures like clean, wonky tape and lo-fi, I can fine-tune the character of the delay to suit anything from polished pop vocals to raw, experimental tracks.
- Generate for Instant Ideas
The Generate button is my secret weapon when I’m creatively stuck. One-click randomizes delay, reverb, and modulation settings, instantly giving me something fresh to work with. Sometimes, the results are perfect as-is; other times, they spark ideas I wouldn’t have thought of otherwise. It’s like having a collaborator who always brings exciting new perspectives to the session.
9. IHNY-2
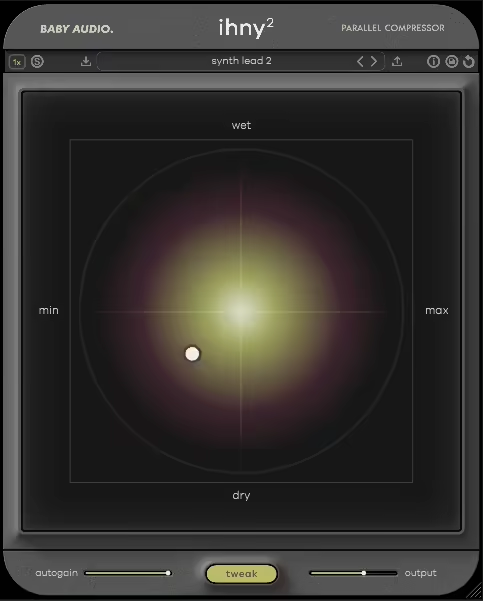
Another Baby Audio VST IHNY2 gives you parallel compression operation and excels at the “New York” style of parallel compression, which combines heavy compression with uncompressed audio to retain dynamics while adding intensity.
The plugin features an XY pad-based workflow, making parallel compression fast and accessible. Here’s how I think that works. The plugin splits your audio into Dry (unaffected) and Wet (compressed) tracks. By moving the node along the vertical axis, you control the Dry/Wet balance, while the horizontal axis adjusts the compression intensity. This two-in-one functionality allows you to pinpoint the sweet spot quickly and seamlessly.
- Consistent Output with Autogain
I love this feature. So, IHNY-2 features a smart Autogain algorithm that ensures consistent output levels as you adjust settings on the XY pad. If the output level doesn’t feel right, the Autogain slider allows you to tweak the behavior for better control.
The Adjusted Gain Reduction (AGR) display helps you monitor compression intensity, providing a clear starting point for optimal settings. You can aim for AGR values between -10 and -20 dB for balanced results.
- Tone-Shaping Power
IHNY2 goes beyond compression with tools like Punch and Harmonics controls, letting you tailor the character of your sound and add suitable harmonics. I’ve used these features to add snap to drums and grit to basslines, achieving the kind of bold textures that stand out in a mix.
- Sidechain and Filtering Made Easy
With built-in sidechain filtering, IHNY2 gives you the ability to focus compression on specific frequency ranges. For example, you can keep low-end rumble untouched while tightening the mids and highs, which could be helpful for shaping kick drums or vocals in dense arrangements.
- Upto 4x Oversampling
With Oversampling options of 1x, 2x, or 4x, you can choose between maximum audio fidelity or improved CPU performance, depending on your needs. I’d use it at 1x during the session and at 4x during exporting.
- Easy to use
There are many intuitive features in the plugin that I think could be quite useful for producers of all levels. For those new to the plugin, the Tooltips feature provides helpful explanations for each parameter, making it easy to learn and experiment. You can also save your favorite settings as a default preset, ensuring the plugin always opens with your preferred configuration.
A Reset to Default button allows you to quickly return to your saved preset, while the Baby Audio logo functions as a bypass switch for instant A/B comparisons. Finally, the Resize icon ensures the plugin’s interface adapts to your screen size, offering a comfortable experience on any display.

Shaurya discovered his passion at the intersection of writing and music. Starting his career as a songwriter and rapper, he gradually picked up FL Studio and soon delved deep into the world of audio engineering and music production. Based in Delhi, India, he has worked with top studios, been featured on Red FM, garnered millions of streams on Spotify, and released music with major labels like Sony and Hitz.