
Stepic is a powerful and versatile step sequencer that excels in creative flexibility, real-time control, and seamless DAW integration. While its learning curve and lack of presets may deter beginners, experienced producers will find it an invaluable tool for crafting intricate patterns and evolving modulations. With its affordable price, Stepic is a great investment for anyone serious about MIDI sequencing and live performance.
Price
Pros
- Highly flexible 16-step grid for pitch, velocity, and modulation control, enabling intricate sequences.
- MIDI Play mode offers real-time control, perfect for live performances and creative experimentation.
- Scale-lock feature ensures all sequences remain harmonically coherent, even during improvisation.
- Integrated automation lanes allow for advanced modulation directly within the plugin.
- Affordable price, providing exceptional value for its capabilities.
Cons
- Steep learning curve for beginners due to its depth and complexity.
- No built-in sound engine, requiring external instruments or synths for output.
- Lack of presets makes it less accessible for users seeking quick starting points.
- Limited documentation can make exploring advanced features challenging.
As one of the key plugins I’ve been using for quite a while now, Devicemeister Stepic sequencer is pretty flexible to create melodies and modulations and today I will put it under the microscope for you to decide if it deserves a place in your arsenal.
I love using sequencers because they help me break out of my usual habits and instead of just playing or programming everything manually, I can use a sequencer to explore rhythms, melodies, and modulations in ways I wouldn’t normally think of. Stepic VST, as a sequencer, provides flexibility for almost everything you can think of.
Initially, I was of the belief that why would I need a step sequencer, especially if I already have a DAW?! However, when I encountered Stepic, it changed a lot of things for me. It’s impossible to cover every single tool and function in one review, so I’ll focus on the main features here and stick to FL Studio as the main DAW.
One thing to clarify is that Stepic doesn’t generate sound independently. It outputs MIDI data, meaning you’ll need to route its output to a virtual instrument or even external hardware.
I have been using this plugin for quite a while now, and I wanted to share my experience with its latest update, which is Stepic 1.5, so you can decide for yourself if you’d like to buy this plugin or not.
Before we jump in, we also included Stepic in our list of the best sequencer plugins.
Features
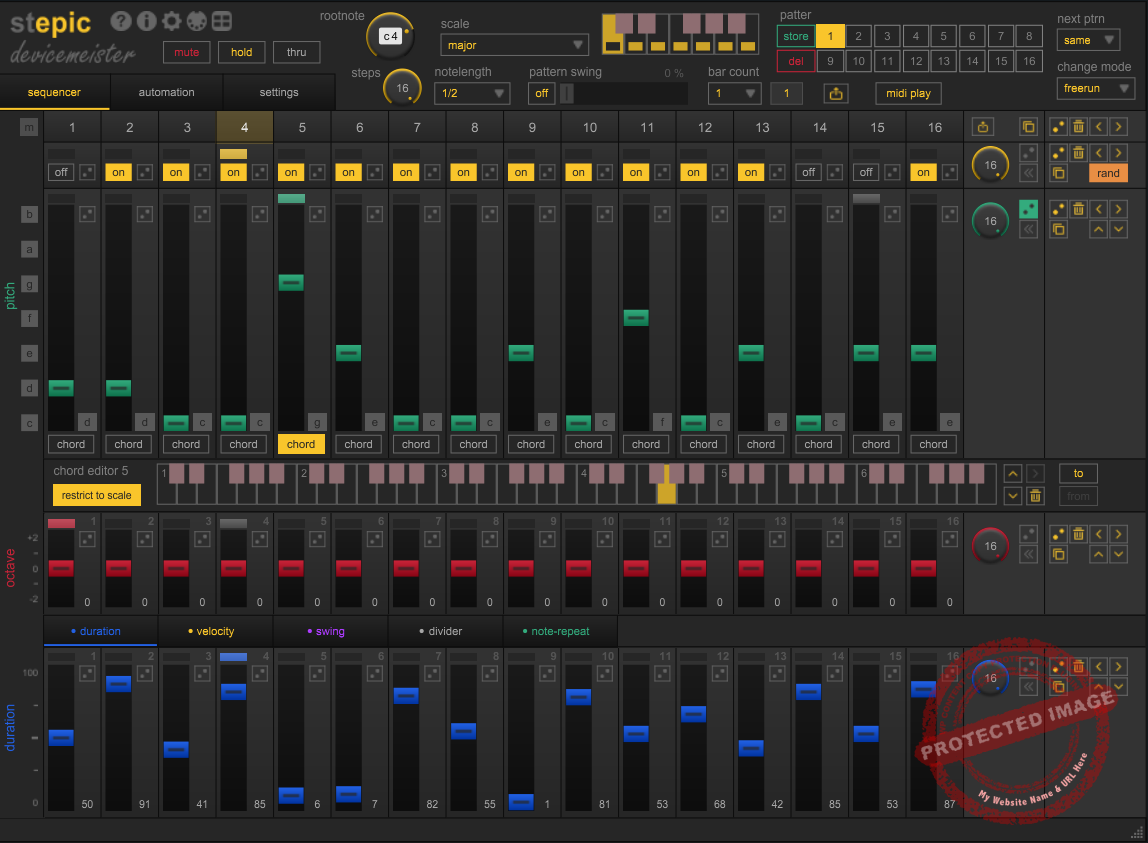
In order to make this review more structured, I divided the interface into parts that I will review step-by-step. So, let’s discuss the basic workflow first. Stepic boasts of an adjustable 16-step grid, and each step may be controlled for pitch, velocity, and modulation which leaves an immense flexibility while composing different patterns.
Its clean design ensures that even with its advanced features, navigating the interface doesn’t feel overwhelming.
Sequence Customization: Scale, Swing, Steps, & Other Setting

You can quickly set the root note and choose from a wide variety of scales, ensuring your sequences always match the harmonic context of your track. This feature is perfect for exploring melodies without worrying about hitting the wrong notes.
To further personalize your patterns, the site offers a pattern swing slider that adds a grooved feel by subtly altering the timing of the notes; it’s especially useful to give your rhythms a more natural feel.
It is useful when building drum sequences or melodic phrases. The note length control will allow for adjustment of each note duration, giving an additional means of expression for your patterns. If you want really short, staccato notes or you want super long, sustained ones, it’s that simple: just tweak the parameter.
Last but certainly not least is the ability to define the length of your sequence via the steps knob up to 16 steps. Further, the pattern and delay step features in Stepic give you another layer of control in customizing your sequences.

- MIDI Play
The most thrilling change regarding Stepic VST 1.5 is MIDI Play mode. Stepic, previous to 1.5, used to sync totally with the host tempo of your DAW, meaning the Stepic sequencer used to start playback at the click/play in your DAW. It is possible today to actually trigger and control its sequences straight through by applying MIDI input now.
To enable MIDI Play, you simply toggle the option in the top right corner of the plugin. By default, Stepic’s MIDI Play settings are fully compatible with older projects, so sequences you’ve built in previous versions will play as expected. However, you can modify these settings to suit your workflow, and if you come up with new preferences, you can save them as defaults for future sessions.

Then there’s the exciting Devicemeister Stepic’s synchronization mode switch that allows you to go from Sync to Host to Note On. In this mode, Stepic begins playback whenever you press a key or send MIDI input. That makes Stepic function more like a performance tool, allowing you to trigger sequences live or experiment with ideas in real-time.
The inclusion of quantization mode ensures that your sequences stay perfectly aligned with your DAW’s tempo, even if there’s a slight delay before playback begins. It waits until the next beat to ensure everything stays on time.
For even more flexibility, the Note Latch option lets you sustain playback as long as a note is held, while the latch release setting stops playback when the latch is turned off.
MIDI Play also introduces Note Input Modes, which include Transpose, Arpeggiator, and Chord Play. These modes allow you to influence Stepic’s sequences directly through your MIDI controller.
-
- Transpose Mode: This adjusts the pitch of the entire sequence based on the notes you play. For example, if your sequence is rooted in F3, pressing different keys will transpose the entire pattern up or down relative to the root note. This is perfect for quickly exploring harmonic variations without reprogramming your sequence.
- Arpeggiator Mode: This mode transforms incoming MIDI notes into arpeggiated patterns, blending the live input with Stepic’s programmed steps for complex, layered melodies.
- Chord Play Mode: The Chord Play Mode triggers harmonized chords based on your sequence and the notes you play, making it a fantastic tool for live performance or harmonic exploration.
- Next Pattern
I also like how Next Pattern settings let you define how Stepic transitions between sequences. I found this especially useful when I was building a live set where I wanted the energy to flow naturally between patterns without manually triggering them.
For instance, I set it to Next, so Stepic would automatically move to the following pattern in my sequence list, creating a seamless progression for a build-up section in my track. Another time, I used the Random setting during an experimental jam session. I had programmed several variations of a melody and let Stepic randomly pick between them.
Sequencer Settings

The Sequencer Settings in Stepic give you quite some control over your patterns. For instance, the on/off buttons for each of the 16 steps make it easy to control which steps are active in a sequence. I’ve used this feature to quickly mute certain steps when building minimal beats or to highlight specific notes for emphasis during live tweaking. It’s simple but effective for fine-tuning your rhythm or melody.
You get a pitch slider to set notes. Since Stepic automatically adheres to the scale you’ve chosen, adjusting the pitch of individual steps becomes effortless. I often use this when creating melodies for basslines, for just sliding notes up or down until I get something that fits perfectly with the mood of my track. It’s great knowing I can experiment without worrying about hitting notes outside the scale.
When I want to break away from predictability, the randomize function comes to the rescue. I’ve used it to quickly generate unique patterns, especially for drum sequences or melodic ideas. Plus, if I land on a note that’s particularly inspiring, the lock pitch feature ensures it stays in place while I randomize the rest of the sequence.
Octave & Duration Settings
With its intuitive tools for controlling octave and note duration, I love how Stepic sequencer makes it easy to add depth and variety to your sequences.
The red sliders are responsible for octave adjustments, which I’ve just used to create a bassline for a house mix.
By dropping certain steps down an octave, I gave the bassline a heavier, more grounded feel, while lifting others up an octave added a subtle melodic flourish. It’s incredibly satisfying to experiment with these settings to find just the right balance.

If you want to experiment, Stepic VST also includes a randomized feature for octave settings. You can randomize individual steps or apply randomization across the entire pattern by using the yellow dice icon. I like to narrow the randomness range to -1 and +1 octaves in the settings menu, ensuring that all changes stay musical and cohesive but without sacrificing to introduce unexpected variations.
The blue sliders next to the red ones are for note duration, controlling the sustain of each step’s note. It is like adjusting the gate length, with values ranging from 0 to 100 percent, meaning from short percussive hits to fully sustained notes. I really enjoyed the sensitivity here as it offers great versatility for tweaking the sustain.
- Divider
Amongst all parameters like duration, velocity, and swing that you can sequence, one of the most interesting feature here is the divider function. This part allows you to play up to four notes within a single step and is suitable for introducing rapid note bursts or rhythmic subdivisions without altering your overall step length. By dividing a step’s time, you can program the notes to play faster while keeping the sequence synchronized.

For example, you can set a sequence to 12 steps and then enable the Divider on specific steps to trigger two or three notes within that single step’s duration.
This way, you can create fast-moving, intricate patterns with energy and unpredictability, making it ideal for melodic runs or percussive grooves. With the help of octave adjustments, you can easily create harmonic variations and dynamic rhythmic interest in real time.
- Note Repeat
By repeating notes across multiple steps, the Note Repeat feature adds another dimension to your sequence. With the note repeat slider, you can define how many times a note is retriggered before the sequence moves on. For instance, increasing the repeat value on a step can cause the note to echo into subsequent steps, creating unique stutter effects or sustained rhythms.
The blue duration sliders come in handy when I want to shape a sequence’s rhythm. For a recent synth-wave project, I shortened the note durations on every other step to create a tight, punchy feel while leaving others extended for a smooth, flowing melody.
Automation Tab
I think the Automation Tab is one of my favorite features of the plugin, as it gives you another level of control when creating your sequences. You can connect parameters from your synths or samplers directly to Stepic, which makes synchronized automation seamless when evolving alongside your patterns.

So for those who want to tweak filter cutoffs, resonance, or other controls, automation in Stepic gives life to you sequences, transforming them into breathing compositions. Each lane offers its own set of 16 steps, with values ranging from 0 to 127, and what really sets this system apart is its flexibility.
You can assign each automation lane a unique step length and clock speed, making it possible to create endlessly evolving automation patterns that interact dynamically with your sequences. For instance, I’ve used this feature to slowly modulate the filter cutoff of a pad sound while keeping other lanes focused on faster, rhythmic changes for percussive elements.
The randomization tools in the automation lanes are a fantastic way to introduce unpredictability to your sequences. A single click on the randomize button can create intricate variations in real-time, while the preset shapes, which are accessible via right-click help you quickly apply common automation patterns like ramps or sine waves.
Interface and Workflow
Interface
The interface of Devicemeister Stepic sequencer is clean and simple yet powerful enough to handle complex tasks. A 16-step adjustable grid is the backbone for controlling pitch, velocity, and modulation for each step.
The colored sliders are such a nice touch, they make it super easy to differentiate parameters, and honestly, the design just feels intuitive, even when I’m working on longer sequences. Then there are the automation lanes, which are integrated for seamless control of modulation parameters.
Most impressive is the scalability of the interface, though. Whether I’m working on a laptop or a multi-monitor setup, Stepic adjusts beautifully. Plus, those tooltips and clear labels, wow, they’re lifesavers. I never felt lost navigating around, which isn’t something I can say about every plugin.
Finally, the interface is resizeable and convenient.
Workflow
Once I got used to Stepic’s layout, it felt natural and effortless. Pattern building is easy, pick a root note and scale, and voila, your sequences stay harmonically coherent.
From there, the grid lets you play with pitch, velocity, and modulation adjustments. And swing and note length adjustment in real-time? These are super handy for when inspiration strikes during a session.
But on stage, Stepic really shines. Its MIDI Play mode and synchronization options make it a great tool for live performances. It’s been fantastic for triggering sequences on the fly. Whether you’re trying something out in the studio or on stage, Stepic is always pushing for discovery and creativity.
Oh, and integration with other DAWs? Easy, no MIDI data routing headaches for virtual instruments or external hardware.
First Impressions and Sound
My first impression of Stepic VST? It looks awesome. Even though it doesn’t produce sound on its own, its MIDI sequencing capabilities are insane. It shows in the precision and flexibility, whether I’m writing basslines, melodic leads, or rhythmic patterns. But the ability to lock sequences to a given scale, man, that really helps keep even the wildest patterns musically coherent!
What struck me first was how intuitive and fun it felt to play around with. The grid is responsive, and the design is built for quick creation and modification of sequences. It’s perfect for projects where you’re constantly iterating, Stepic lets you test out ideas quickly and effortlessly without messing up your workflow.

When it comes to sound, everything depends on what you route Stepic to. But since it sends precise MIDI data, your virtual instruments will sound their best. For basslines, I had so much fun with the octave controls and randomization, it’s so easy to make patterns that feel dynamic and engaging. For melodies, the scale-lock feature was my salvation. Just experiment and not worry about hitting wrong notes.
Stepic is also a monster for making complicated rhythmic patterns. The Divider feature lets you break steps into smaller note values to create tight drum sequences or complex melodic runs. Just using Stepic makes me feel inspired and excited. It’s like each feature is designed to keep you in this loop of experimenting and creativity.
Stepic’s learning curve isn’t beginner-friendly. While there are tutorials available online, the lack of a proper manual was frustrating when I wanted to dive deeper into specific features. This plugin is incredibly comprehensive, which is both a strength and a challenge is powerful but also a bit overwhelming if you’re new to sequencers.
I think beginners might find this plugin a bit overwhelming and confusing; I’d hesitate to recommend it outright unless they’re willing to put in the time to learn. On the other hand, for sound designers and audio engineers or those working on OSTs and scoring, I think Stepic is a gem.
Compatibility
Devicemeister Stepic sequencer is available in AU and VST plugin formats and works with both Windows and Mac operating systems, It also works with Max for Live (Ableton Live) for live sequencing.

Berk Öztuna, a musician from Istanbul, is skilled in handpan, percussion, and guitar, performing and recording his own compositions globally. With expertise in music production and audio technology, he integrates virtual instruments and sound design tools seamlessly into his work. He also writes insightful articles on music production and gear for platforms like Plugin Noise and shares his music on Spotify and Instagram.
DONATE: Love our content? Help us keep Plugin Noise alive in the age of AI — Your donation fuels better content for music creators like you! You can donate here: pluginoise@gmail.com (Every amount counts.)