
Waves Curves Equator is an affordable, intuitive resonance suppressor with advanced features like Shape, Tilt, and sidechain functionality. It offers transparent results and flexibility but requires careful use to avoid over-processing. A great value tool, rivaling Soothe2, especially at the offered price.
Pros
- Intuitive interface with a clean and sleek design, making it beginner-friendly
- Unique sensitivity and shape controls allow precise resonance suppression and tonal shaping
- Adaptive and Captured Modes provide tailored solutions for different tracks
- Effective sidechain input functionality for frequency unmasking
- Excellent price compared to competitors like Soothe2
Cons
- Requires manual adjustments post-processing to achieve the best results
- Advanced features might overwhelm less experienced users
Let’s review Waves- Curves Equator’s cost-effective resonance suppressor and frequency unmasking tool.
I remember being pleasantly surprised when I heard Soothe 2 by Oeksound in action for the first time. It is a resonance suppressor plugin that was launched four years back. Since then, I have always wondered what’s taking companies like Waves and Izotope so long to develop their resonance suppressors.
When Waves finally announced Curves Equator, I was eager to see if it could deliver the same performance and flexibility level or even outshine Soothe 2. When I started experimenting with it, I could tell that Waves aimed to create a tool that wasn’t just a copycat but a reimagined take on dynamic resonance suppression.
Before we dive in, we also included Curves Equator in the list of the best Waves plugins for vocals.
Features
Waves Curve Equator is a great dynamic resonance suppressor that brings a fresh take on frequency balancing with intuitive controls and smart sensitivity adjustments. Below are its key features, highlighting its innovative approach to audio processing.
- Dynamic Convolution System
Equator operates on the same principle: it scans for problematic frequencies and dynamically reduces them based on the sensitivity you set. However, the way Waves implemented the controls felt refreshingly intuitive. Unlike Soothe 2, where increasing sensitivity means moving sliders up, the Equator takes an inverted approach, so you move them down to increase the cuts.
It’s a subtle but impactful change resembling a traditional EQ. This small tweak immediately made it feel more natural to me as someone who spends a lot of time fine-tuning EQ curves. While the basic concept might feel familiar, Equator brings its flavor to the table with an intuitive workflow, multiband functionality, and smart sensitivity curve adjustments.
- Main knob
At the heart of the plugin is the Main knob, which is where you set the processing threshold. Think of it as the line that separates what frequencies will be reduced and what will stay untouched. By default, the threshold is set to 10 dB, but you can drag it up or down to adjust how much processing is applied. If you lower it, more frequencies get “shaved off,” which is a fancy way of saying that problematic peaks are reduced. It’s simple but super effective.
- Delta button
One of my favorite features here is the Delta button, which you’ll see as a little triangle next to the Main knob. When you click it, the plugin lets you hear only the frequencies that are being cut out.
- Threshold Curve Based on a Sidechain Input
Additionally, Curves Equator offers the ability to generate a threshold curve based on a sidechain input. This feature is useful for addressing frequency clashes between tracks, as it allows you to reduce frequencies in one source to create space for another, ensuring the more critical audio elements shine through in the mix.
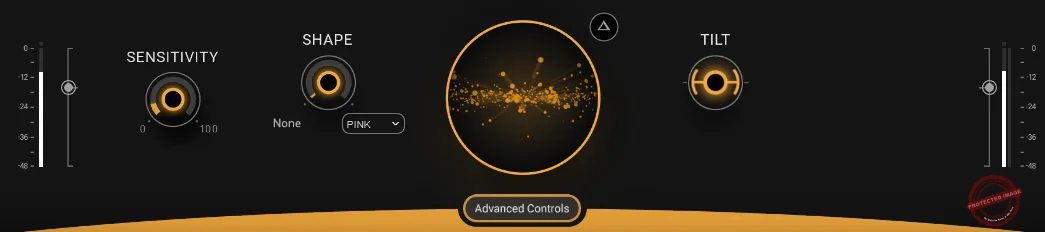
- Sensitivity and Shape Controls
The Sensitivity control is all about how aggressively the Equator reacts to the audio. It sets the knee and ratio for the reduction. A harder knee means the Equator jumps into action the second the audio crosses the threshold, which works great for really stubborn resonances. On the other hand, a softer knee lets the plugin ease into the reduction more gradually, giving you a smoother, more natural sound. It’s nice to have both options, depending on what you’re working on.
Now, the Shape knob is where things get fun. This lets you morph the threshold curve into different preset shapes. For example, if you’re starting with a flat curve, you can use Shape to add tonal flavor or balance out your mix. A quick tweak with the Shape knob can make things clearer and more balanced, which saves a ton of time.
- Tilt and Curve Nodes
Tilt is another great tool. It adjusts how the plugin focuses on the low or high frequencies. For instance, if you want to make your mix warmer, you can cut more highs and fewer lows by tweaking the Tilt towards the negative side.
If you’re going for brightness, just tilt it in the positive direction, and it’ll emphasize the highs more. It’s a quick way to get the overall tonal balance where you want it without overthinking.
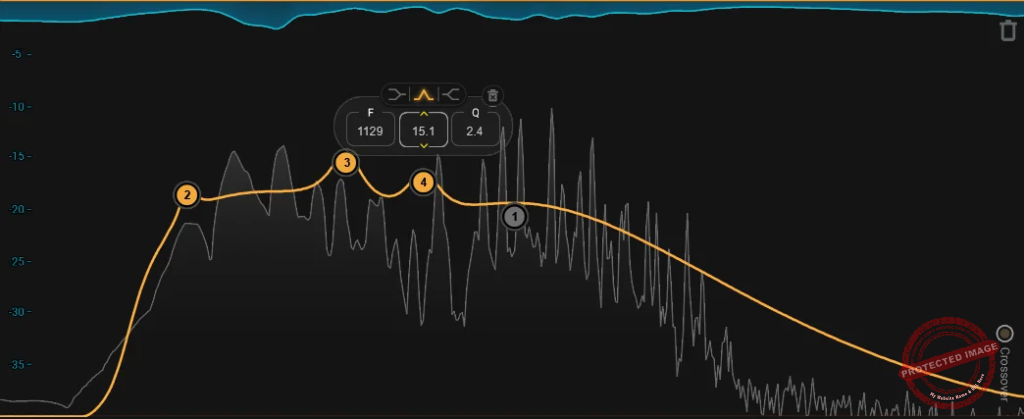
Lastly, let’s talk about the curve nodes. These are little handles on the threshold curve that you can grab and move to fine-tune specific areas. You can add up to eight of these, which is awesome because it means you can get super detailed with what’s being reduced. I love how intuitive it is, as it just clicks where you want to make a change, drag the node, and you’re good to go. The same thing applies if you’re working with a sidechain signal.
- Advanced Controls
Advanced controls immediately open the multiband section, where you can perform controlled dynamic processing. You also get attack, release, and precision knobs for each band, as well as controls for Tilt Frequency and Curve Smooth. Additional features include a limiter and autogain buttons for further dynamic control.
Further, there are two methods to craft a threshold curve in the Waves Curves Equator:
-
- Adaptive Mode: Starts with a flat curve or a preset one, allowing for significant corrections or adjustments.
- Captured Mode: Analyzes a section of your audio and generates a precise threshold curve based on its characteristics. This mode is ideal for tracks that already sound good but need subtle enhancements like resonance control or gentle tonal adjustments.
These advanced tools allow users to shape the threshold curve and tailor the processing to meet their needs. They work seamlessly with the sidechain input, providing a versatile solution for managing resonance and frequency clashes.
Interface & Workflow
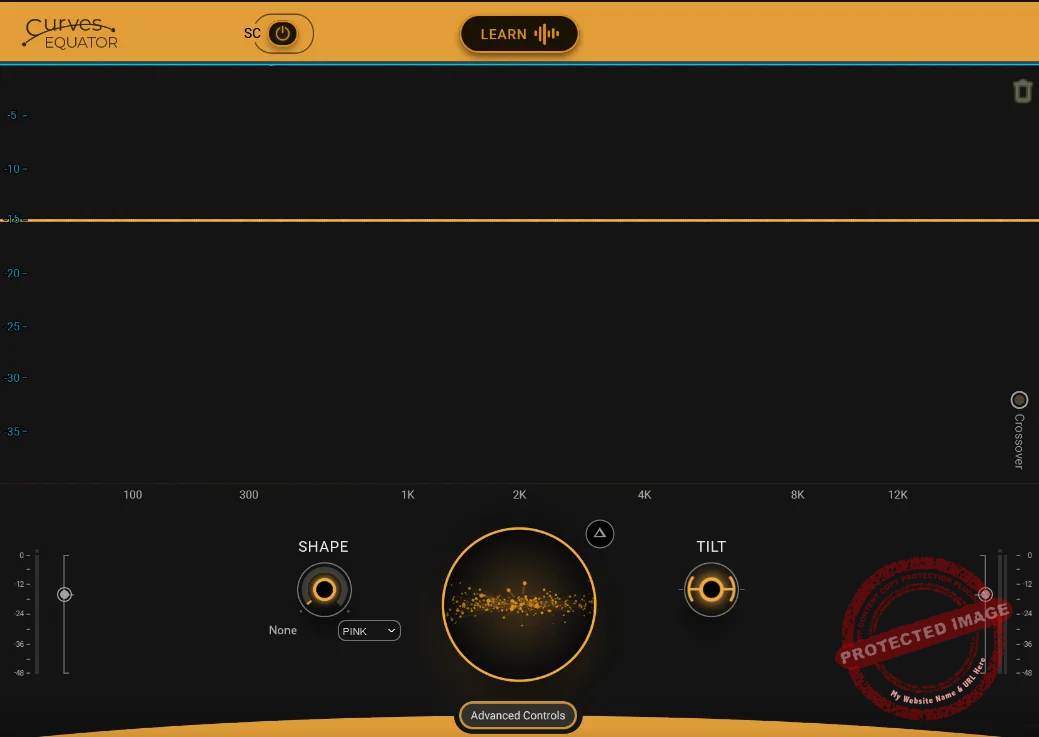
The plugin opens really cleanly and sleekly and shows very little information, so you don’t get overwhelmed.
Interface
Waves Curve Equator boasts a sleek and minimalist interface, designed to simplify resonance suppression and dynamic control tasks. Its clean design reduces clutter while remaining functional.
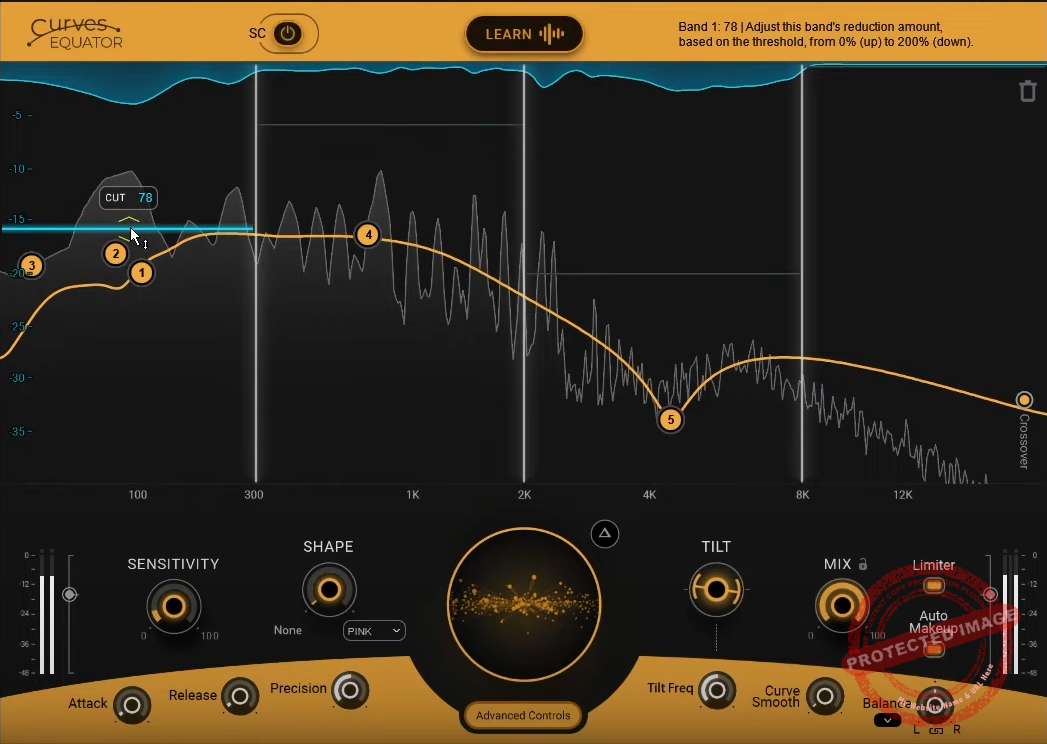
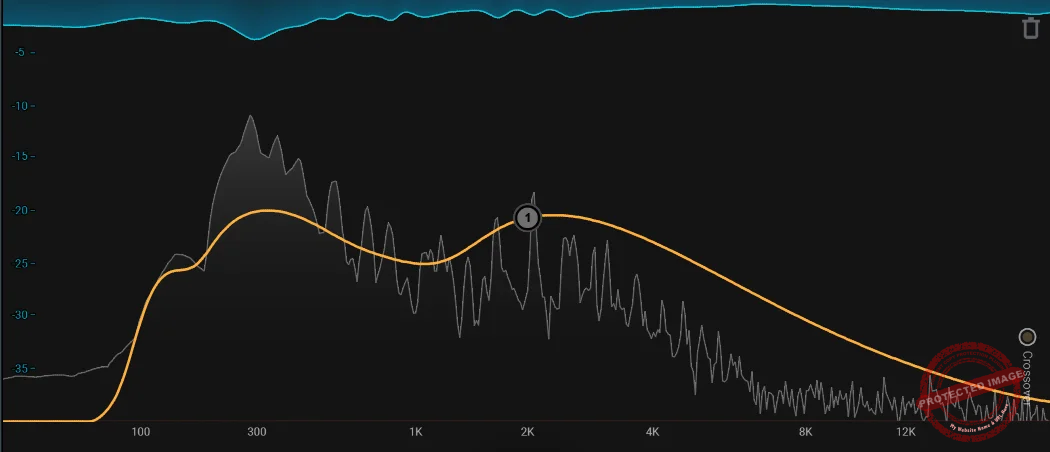
The plugin opens really cleanly and sleekly and shows very little information, so you don’t get overwhelmed. The frequency spectrum display is front and center, giving you a real-time visual of the areas being affected.
While the display works well enough, I did find myself missing a grid overlay to better gauge which frequencies were being reduced and by how much. That said, the visual feedback provided by the suppression curves was generally clear and responsive, making it easy to see how my adjustments were shaping the audio.
Worfklow
Here’s how it works. Waves Curves Equator’s processing involves two main steps: first, creating a threshold curve to define which frequencies will be affected and which will remain untouched, and second, adjusting how the selected frequencies are processed.
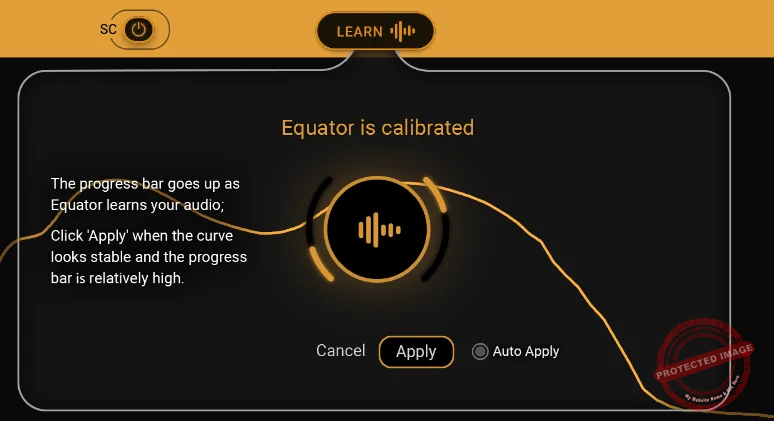
The threshold is set at -15 dB by default but can be set to a different decibel level by dragging its main knob. You click on its ‘Learn’ button and feed your audio into it. The plugin then automatically listens to the audio and analyzes it, and when it has heard enough audio data, the ‘progress bar,’ which is the sliders around the circle, goes up.
I found myself getting slightly impatient for the ‘progress bar’ to go up, but it took less than a minute to do the entire thing. You can click on ‘Apply’ after that and apply the suggested equalization to the audio. After that, you will find an EQ curve applied over your audio.
After that, you can listen, apply your own equalization, and customize it as per your taste and preferences. You can also use the controls to change things around. For each band you create using this EQ, you get controls for the frequency, q-value, and band selection.
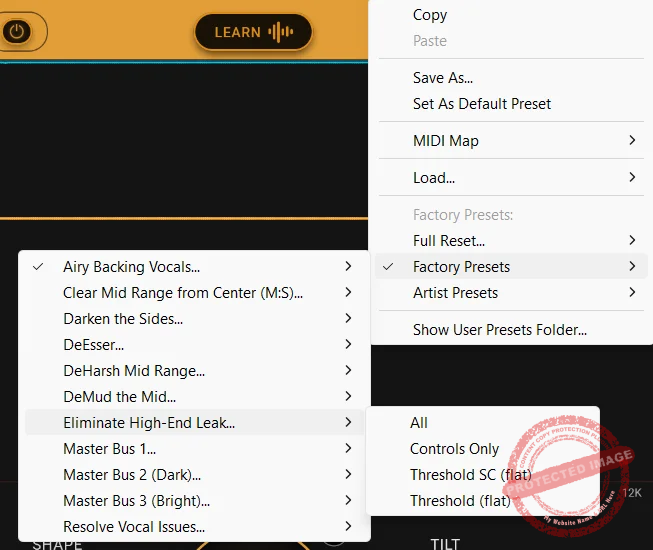
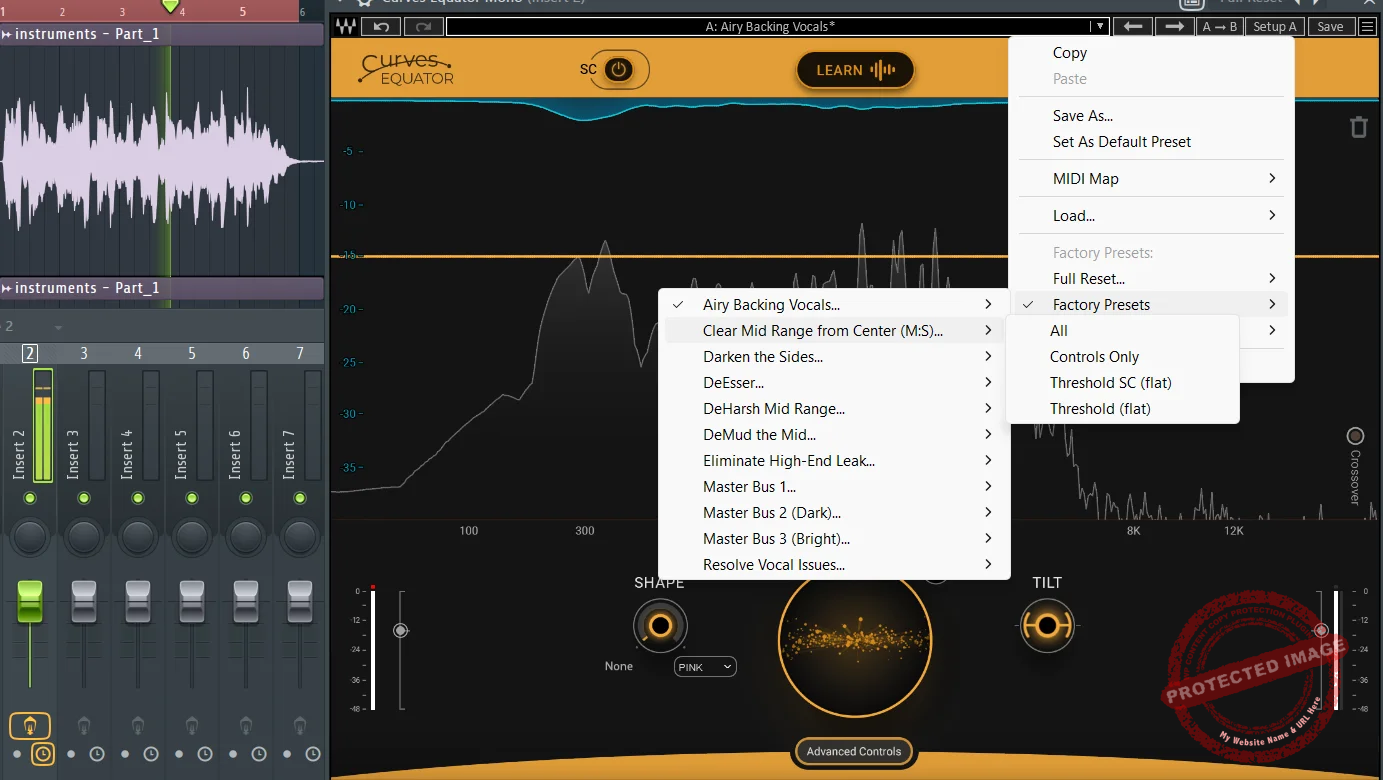
The presets in the Waves Curve Equator plugin offer extensive flexibility and are tailored for specific tasks. Factory presets include solutions for common challenges like taming high-end leaks or refining mid-range clarity.
Artist presets provide genre-specific adjustments for instruments such as brass, woodwinds, and vocals, with contributions from industry professionals. These presets streamline workflows, making it easy to achieve polished results while preserving creative freedom.
First Impressions and Sound
I tested Waves Curves Equator on a range of materials: vocals, instruments, and full mixes to see how it handles resonance suppression and frequency balancing. I found the overall result to be clean and balanced, and it retains the natural quality of the music while enhancing its clarity.
For example, vocal tracks reduce muddiness and reveal fine details like articulation and breathiness, making vocals stand out in the mix. On instruments like guitars and pianos, it eliminates unwanted resonance while preserving their tonal integrity, resulting in a more vibrant and defined sound.
When used on full mixes, the Curve Equator subtly transforms the overall balance. It controls low-end buildup, clears mid-range congestion, and maintains smoothness in the highs. This makes the mix feel more open and cohesive, with every element occupying its space harmoniously.
On one mix, it uncovered a problematic low-mid resonance I hadn’t noticed, and fixing it brought entirely new clarity to the track. So that was eye-opening. That is why I most likely will be relying on it for the final stage of every mix, knowing it’ll catch those last-minute issues.
One standout feature is its ability to learn and adapt to the audio, creating custom frequency curves that target specific issues in real-time. Whether it’s softening harshness, taming low-end rumble, or ensuring the mix remains dynamic, Curve Equator works like an intuitive equalizer that enhances the listening experience without compromising the original feel of the track.
Yes, I did find myself changing things after applying the results, but that’s exactly what it’s meant for.
Compatibility
| Category | Mac Requirements |
Windows Requirements
|
| Processor (CPU) | Intel or Apple Silicon architecture (with specific notes for Apple Silicon processors) |
64-bit compatible Intel or AMD processor
|
| Memory (RAM) | Minimum: 8 GB; Recommended: 16 GB |
Minimum: 8 GB; Recommended: 16 GB
|
| Disk Space | 16 GB free on the system drive |
16 GB free on the system drive
|
| Operating System | macOS versions: Monterey (12), Ventura (13), Sonoma (14), Sequoia (15) |
Windows 10 (64-bit) or Windows 11
|
| Screen Resolution | Minimum: 1024×768; Recommended: 1280×1024 or 1600×1024. USB displays are not supported as primary screens. |
Minimum: 1024×768; Recommended: 1280×1024 or 1600×1024
|
| Supported Plugin Formats | AU, VST3, AAX | VST3, AAX |
Waves Curves Equator Review: Final Thoughts
I would be using Curves Equator as an assistant to guide my mixing decisions rather than as a one-click solution. The Waves Curve Equator provides a starting point, highlighting areas that need attention and allowing me to refine them further.
Automatically detecting resonances and unmasking frequencies saves time and ensures that no problematic zones go unnoticed. As an assistant, it excels in maintaining the creative flow, letting me focus more on the artistic elements of mixing while it handles the technical groundwork.
It’s like having an extra set of trained ears that ensures my mixes sound polished and professional, with clarity and depth. Sure, it doesn’t always replace manual adjustments or subjective judgment, but it does provide a reliable foundation, making the entire mixing process smoother and more efficient.
Regarding the interface and workflow, even for beginners, the visual feedback and controls are accessible and helpful, but I think it’s helpful for both pros and beginners. So, at $39, is Waves Curve Equator worth it? Compared to Soothe2, which costs $209, my conclusion is that it definitely is worth it.
It’s smart, intuitive, easy to use, and filled with more advanced features. I also love the fact that the advanced features are hidden, keeping the overall interface clean, neat, and well-organized.
We also included the Equator in our roundup, focused on the best resonance suppressor plugins.

Berk Öztuna, a musician from Istanbul, is skilled in handpan, percussion, and guitar, performing and recording his own compositions globally. With expertise in music production and audio technology, he integrates virtual instruments and sound design tools seamlessly into his work. He also writes insightful articles on music production and gear for platforms like Plugin Noise and shares his music on Spotify and Instagram.
DONATE: Love our content? Help us keep Plugin Noise alive in the age of AI — Your donation fuels better content for music creators like you! You can donate here: pluginoise@gmail.com (Every amount counts.)