
Let’s compare the two go-to OGs of vocal pitch correction in the music production world, Melodyne vs AutoTune, to find out which one has more to offer!
If you are in the music production world, you probably know the love-hate relationship with pitch correction gear. The two giants in this area, Antares Autotune, and Melodyne, are both designed to achieve pitch-perfect vocals, but they take different paths to the top of the mountain.
Before these units, pitch correction was a slow process with note-by-note manual edits on the audio or re-recording the problematic parts over and over again. Then, in 1997, Auto-Tune came out with a Cher song and changed the music industry for good, as it introduced real-time and automatic pitch correction and gave us that distinct robotic effect and a new tone to vocals.
Shortly after, Melodyne took the game to a new level with an upgraded tuning process, offering a manual and more natural-sounding solution for correcting vocals, letting producers adjust pitch, timing, and even tone with ease. Today, Auto-Tune and Melodyne are essential in studios everywhere, shaping the way we produce vocals and expanding what’s possible in music.
The Antares Auto-Tune has a different advantage as it gives quick, polished results, or that iconic, robotic pitch-correction effect is fast, intuitive, and perfect for modern pop or hip-hop tracks, compared to the surgical precision of Melodyne. I turn to it when I want precise, detailed control over every nuance of vocal performance, from subtle pitch shifts to timing adjustments.
As clear, I will discuss in more detail when I use one over the other and share my personal experience with both plugins! Let’s begin!
Features
| Feature | Antares Auto-Tune | Melodyne |
| Ease of Use | Beginner-friendly; fast setup with a minimal learning curve | Advanced requires practice to master its precision |
| Real-Time Processing | Yes, it is ideal for live performances and studio sessions | No real-time; requires importing audio into the editor |
| Editing Style | Automatic pitch correction with optional manual mode | Highly detailed manual adjustments with note-level editing |
| Signature Effect | Robotic, stylized vocal tones (e.g., T-Pain, Cher) | Natural, organic corrections with subtle enhancements |
| Precision | Limited in graphical mode; best for quick fixes | Unmatched precision for pitch, timing, and tonal adjustments |
| Best For | Pop, Hip-Hop, EDM, and modern genres | Acoustic, Ballads, Jazz, and emotive vocal performances |
| Unique Features | Humanize, Flex-Tune, and Retune Speed controls | Polyphonic editing, harmonies, and pitch drift adjustments |
| Use Cases | Speedy corrections and stylized effects | Nuanced corrections and multi-track editing |
| Polyphonic Editing | Not available | Yes, allows editing of chords and complex harmonies |
| Learning Curve | Low, intuitive interface for quick results | Moderate to high; requires an understanding of advanced tools |
| DAW Compatibility | VST2/3, AU, AAX | VST2/3, AU, AAX |
| System Requirements | Lightweight, runs efficiently on most systems | Resource-intensive; needs a powerful setup for smooth operation |
| Pricing | Subscription ($150/year, $12.49/month) and perpetual license ($229.5) options | Perpetual licenses ($49-$399) |
Sound and Character: AutoTune vs Melodyne
One of the main differences is the sound character section, which makes these units useful for various projects.
- Antares Auto-Tune Pro
As one of the most popular pitch-correcting tools in modern music production, Auto-Tune has become known as such a name, from subtle corrections for natural performances to the robotic effect of pop and hip-hop.
The plugin’s results are polished, modern sound with a slightly synthetic character, but the real deal is the Retune Speed, that sharp little thing that gives you quick tuning or that stylized “Auto-Tune effect.”
EDM, pop, and hip-hop demand tight and polished vocals, and that is exactly where this plugin excels. But, it also performs well with the Humanize Control for a more natural-sounding flow for sustained notes, good enough for ballads and acoustic tracks.
Its real-time capabilities also make it a favorite for live performances, as it provides low-latency pitch correction without delay.

- Celemony Melodyne
At the other corner is Melodyne, which offers natural and expressive pitch correction. Its style favors advanced editing and works best on detailed projects.
It has polyphonic editing supported by Direct Note Access (DNA) technology and is ideal for handling guitar chords, harmonies, or full mixes.
It also gives you full control of pitch drift, modulation, timing, and even tonal quality in any genre where emotional authenticity is required, like jazz, singer-songwriter, and acoustic styles.
There’s a longer, windy route instead, where producers can fine-tune every note without losing the performance’s feel.
- Comparison
So basically, the main difference between these two popular plugins, as you can see, is how they approach pitch correction.
Auto-Tune is quick and accurate, and it can be used for real-time correction or as an effect, like the iconic robotic sounds. Its powers are more fully unleashed in live and fast-paced studio sessions where immediate results are required.
Melodyne is best suited for more precise editing as the ability to manipulate individual notes within polyphonic audio gives it an edge when working on harmonies or complex musical passages.
So, basically, Auto-Tune is better for basic pitch correction, and Melodyne is better for more advanced editing.
Features and Interface: Melodyne vs AutoTune
- Real-Time Processing
Auto-Tune is popular for real-time processing of live shows and quick adjustments due to its low latency and quick adjustment power.
Powerful though it is, Melodyne needs offline processing and lacks real-time processing.
- Editing Precision
Auto-Tune supports some manual controls in the Graph Mode, but Melodyne reigns in the advanced editing tools.
Melodyne’s visual interface allows precise pitch, timing, and tone manipulation. It also supports polyphonic editing, changing individual notes in chords or other audio material.
- Creative Flexibility
Beyond pitch correction, Melodyne offers many creative possibilities: edit harmonies, adjust timing, and change the timbre of individual notes with the Sound Editor.
The simpler but less versatile Auto-Tune is all about pitch and timing.
- Interface
The interfaces actually reflect their souls since Auto-Tune has a very simple GUI, whereas Melodyne is more complex to learn but much more controllable.
With an intuitive interface, Antares made it possible to quickly set keys and adjust parameters such as Retune Speed and Humanize. You can familiarize yourself with the unit and start working immediately.
Melodyne is for musicians who want more control with its graphical editing interface. Its visual note representations as “blobs” make issues easy to spot and fix, but the learning curve is steeper than Auto-Tune’s plug-and-play simplicity.
Also, both units are pretty great interfaces in their own ways. The best choice is Auto-Tune for quick, polished results or for a stylistic, robotic vocal effect. In contrast, Melodyne is for those who want to have full control over every detail of a performance in projects where naturalness and emotion are paramount.
Performance
Compatibility
Both Melodyne and Auto-Tune are offered in VST, AU, and AAX formats for Windows and macOS users.
Melodyne also supports ARA (Audio Random Access) integration in compatible DAWs, providing a more seamless editing experience for offline processing.
CPU Use
Regarding CPU use, I found out that Auto-Tune is slightly more efficient, but both plugins are fairly modest in terms of resource use. So, there is nothing to worry about regarding performance in that sense.
Even in real-time use, Auto-Tune works with super low latency and low CPU use.
In Practice: Melodyne vs Antares AutoTune
Auto-Tune
The Autotune plugin is way more straightforward. It’s as simple as slapping the plugin on the vocal, setting the key, adjusting some settings, and you are done. So, for the Autotune plugin, here’s the step-by-step workflow that I use:
- Add Auto-Tune to the Vocal Track
I start by inserting the Auto-Tune plugin on your vocal track in your DAW (Digital Audio Workstation). Whether it’s lead vocals, harmonies, or ad-libs, Auto-Tune can be applied directly to the track as an effect.
- Set the Key and Scale
Identify the key and scale of the song. You can do this by ear, with a reference track, or by using a key detection tool. You can also use Autokey, which is the key detection plugin in the Antares suite.
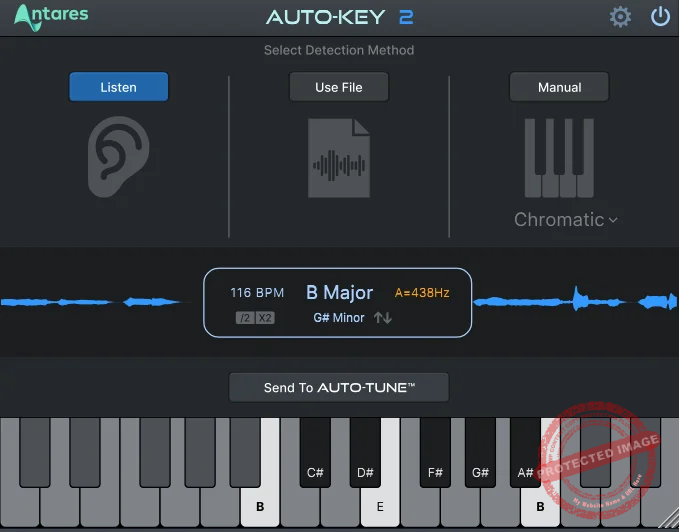
Once you know the key, input it into Auto-Tune’s settings. This step ensures that pitch corrections are musically accurate.
- Choose the Input Type
You can also set the input type based on the singer’s vocal range: soprano, alto/tenor, or low male. Pick the one that best fits the singer’s voice for optimal results. There’s also the learn button by which the plugin automatically detects and sets the voice type.

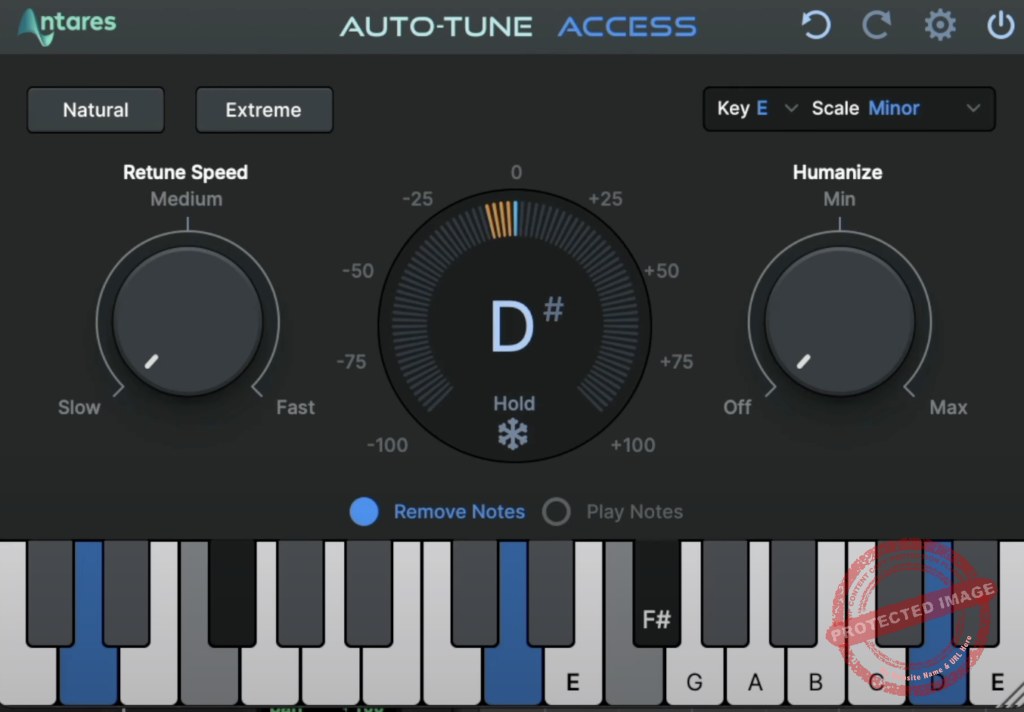
- Adjust the Retune Speed
The Retune Speed determines how quickly Auto-Tune corrects pitch deviations.
-
- Fast (0-10 range): Creates the iconic robotic effect often heard in pop and hip-hop.
- Slow (20-50 range): Offers a more natural correction that retains the organic qualities of the vocal.
I adjust this based on the style I’m going for. If I want something subtle, I’ll slow it down. For dramatic effects, I push it to its fastest setting.
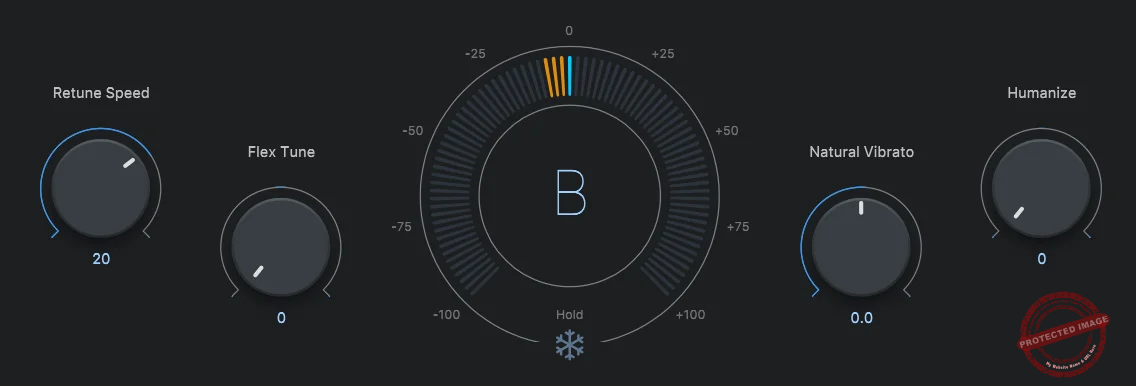
- Set the Humanize Parameter
The Humanize feature helps maintain the natural flow of held notes. It’s great for more natural and acoustic performances like ballads or sustained vocals. I use this to strike a balance between naturalness and precision.
- Fine-Tune the Flex-Tune and Vibrato Settings
Flex-Tune controls the amount of pitch correction applied, allowing me to fine-tune how tightly Auto-Tune adheres to the target pitch.
I often adjust this parameter to allow for subtle pitch deviations that retain the expressive qualities of performance, especially when I want the vocal to feel more natural. Similarly, the Vibrato setting plays a crucial role in shaping the final sound by determining how much of the singer’s natural vibrato is preserved or enhanced.
- Listen and Adjust
Playback the track and listen carefully. Sometimes, the initial settings need tweaking depending on how the corrections blend with the track. I’ll go back and adjust the Retune Speed or scale if the results don’t feel right.
- A/B Comparison
Before committing, I always toggle Auto-Tune on and off to compare the raw vocal with the processed version. This ensures I’m enhancing the performance without overprocessing it. Many artists, producers, and engineers also use the graphical mode for manual pitch correction, but as I mentioned above, I don’t find that as effective in this plugin.
Melodyne
Using Melodyne can be slightly more complicated than using the auto-tune plugin. When I use Melodyne, it’s all about precision and preserving the emotion of the vocal performance.
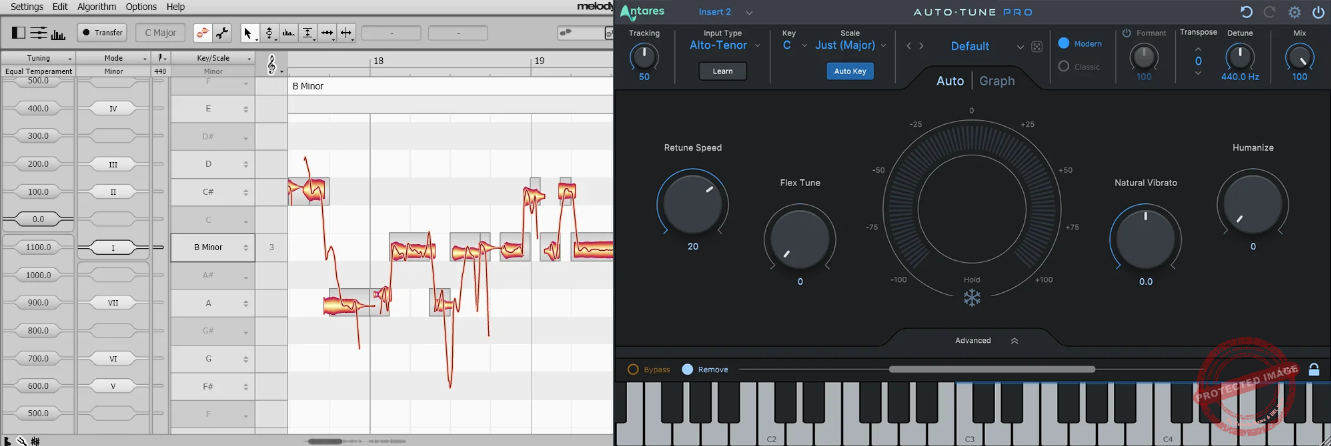
- Transfer audio into the plugin
My workflow often starts with importing the vocal track into Melodyne’s editor by clicking on the ‘Transfer‘ button in the software and then hitting the space bar.
![]()
- Set the scale/key
Once the algorithm analyses the audio, it displays as a series of note blobs, visually representing pitch, timing, and even the tonal quality of the performance. This layout makes it easy to spot any areas that need improvement. So, I mostly edit vocals every 4 bars. Melodyne would also detect the key automatically based on the input. However, you can also set the key manually.
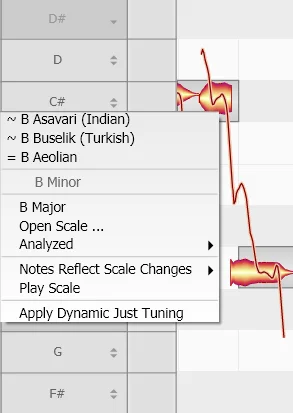
Then, I alternate between different tools by Melodyne to cut notes on different points and move those notes around to manually adjust their pitch.
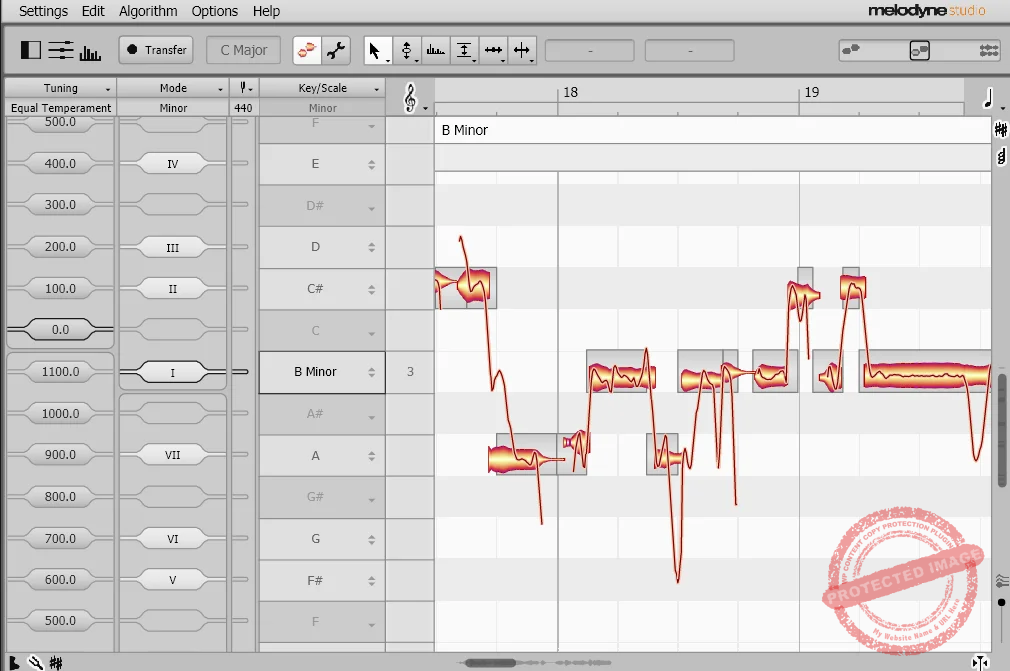
- Start Editing
![]()
You can also, after you have selected the notes, automatically center the pitch of all selected notes to the song scale by using the ‘Macros > Correct Pitch’ editing in Melodyne.
- Use Macro Pitch Correction
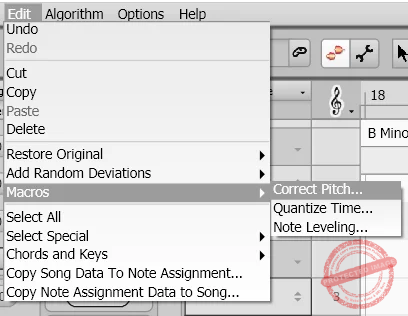
This will snap the selected notes to the scale of the song.

I usually use this Macro pitch correction along with manual editing to get a workflow that’s both efficient and accurate. However, Melodyne still takes a lot of time to edit.
Conclusion: Melodyne vs AutoTune
If you’re looking for speed, simplicity, or that iconic robotic effect, Auto-Tune is the perfect tool. Its real-time processing capabilities also make it an essential choice for live performances or fast-paced studio sessions.
On the other hand, if your focus is on natural-sounding corrections, nuanced adjustments, or intricate vocal arrangements, Melodyne is unparalleled. It shines in projects where vocal expression and precision are key, such as acoustic ballads, jazz, or emotive performances. Its advanced tools for manual pitch and timing adjustments allow you to preserve performance authenticity while refining every detail.
In my workflow, both tools play crucial roles. Instead of making them compete, I like to use them as complements. Sometimes, I also manually pitch correct vocals with Melodyne and just add a light touch of the Antares auto-tune for its tone. Using these tools interchangeably or together allows me to adapt to any project, ensuring that the final product meets both technical and creative standards.

Berk Öztuna, a musician from Istanbul, is skilled in handpan, percussion, and guitar, performing and recording his own compositions globally. With expertise in music production and audio technology, he integrates virtual instruments and sound design tools seamlessly into his work. He also writes insightful articles on music production and gear for platforms like Plugin Noise and shares his music on Spotify and Instagram.
DONATE: Love our content? Help us keep Plugin Noise alive in the age of AI — Your donation fuels better content for music creators like you! You can donate here: pluginoise@gmail.com (Every amount counts.)