
1. Arturia Bus PEAK

Bus Peak is a good choice for musicians looking for a limiter and a clipper in the same package with its easy-to-use, straightforward design.
The first thing I must say about Bus Peak is its intuitive user interface. It features a soundwave graph with a blue and a purple line.
The purple line sets the Threshold for clipping, and the blue sets it for the limit. On the left, you have the Input Gain control, and there is the indicator on top of the graph, which shows where the plugin is limiting and where it is clipping.
On the bottom, you have the Knee and Color for the clipper and the Release and Color for the limiter. And that’s it! The plugin does the rest, it’s like the self-driving car of limiters, except it won’t crash your mix.
- Transparent Limiting & Mastering Uses
I like how transparent this limiter plugin is; it does not add harmonics, transients, or any kind of character to the sound.
So, it is great for projects where you must maximize the loudness without adding anything to the mix. That is why I prefer this one for mastering channels, in general.
I’ve thrown it on a few tracks, and honestly, it just gets the job done without fuss. It’s like that one friend who helps you move without complaining, reliable and no unnecessary baggage.
- Additional Features & Oversampling
What I like about the plugin besides its user-friendly design is that it has these little details like soloing sections to hear what the limiter and clipper do.
It also has True Peak Limiting to control inter-sample peaks, Oversampling, and Equal Loudness for unity gain. I often do not use these except oversampling, but I think having them under your pocket is nice, like carrying an umbrella even when it’s sunny.
So, to summarize, I think Bus Peak is a pretty good limiter and clipper, although it is a bit pricey.
It does not give you much control, but it is great for music producers who are not experienced in using limiters or clippers so that they can get the job done without making things too complicated.
Bus Peak is available for Mac and Windows in VST, AAX, Audio Unit, and NKS formats.
2. PluginBoutique PeakLimit
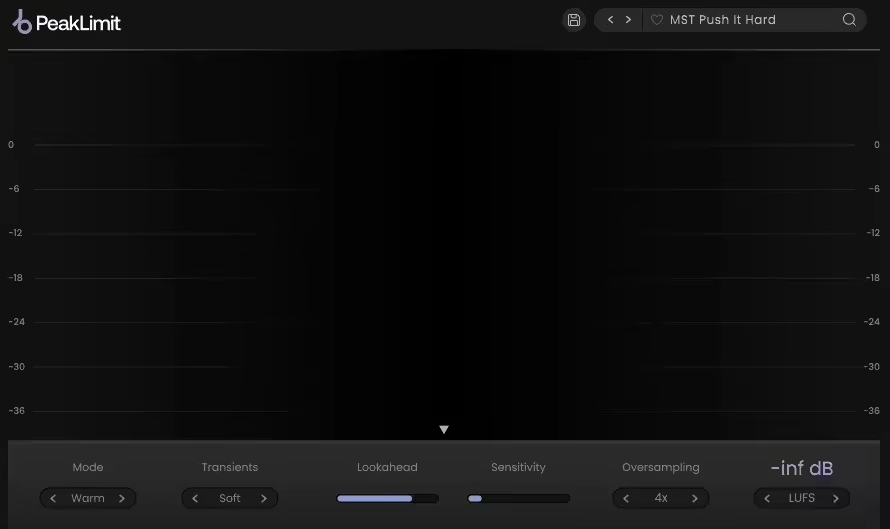
One-plugin-for-all type of limiters are quite sonic chameleons that come in handy on many different occasions. PeakLimit limiter VST is just like that, providing great performance for mastering, bus, or instrument group channels.
When I used it what I noticed immediately about PeakLimit was the amount of options it had for finetuning your mix.
With versatile limiter styles, the pluginis quite useful, as you can maximize the loudness of your mix and get it ready for commercial release by using it on the master channel.
You can also use the plugin to add character and punch to individual instruments. I love having these options because, honestly, it feels like choosing a mood for my mix, do I want it classy, aggressive, or smooth?
- 4 Limiter Styles
I have to talk about the plugin’s 4-limit style. The Lucid mode is the transparent mode, which is great for mastering channels when you don’t want any color in your sound.
The Punch mode emphasizes the dynamics for a punchy sound, so this mode is great for single tracks to make them stand out in the mix.
Warm mode emphasizes the low-end frequencies for a warmer and deeper tone. Finally, Bright mode gives brightness to the sound, making the high-end frequencies shine.
Depending on your mix and the tone you are after, you can use these two for instrument groups or buses. I love this flexibility, as it’s like dressing my track in a suit or a leather jacket, depending on the vibe.
- Adaptive Controls & Real-Time Metering
Also, I like the plugin’s controls, as it gives you adaptive release control, Lookahead, and sensitivity parameters.
- Real-Time Displays
It also features real-time displays of RMS metering and Gain reduction with real-time LUFS, RMS, and Peak gain values.
I appreciate having all this information on screen because, let’s be honest, guessing levels is like cooking without measuring ingredients, sometimes it works, sometimes it’s a disaster.
So, if you want an all-rounder kind of Limiter without breaking the bank, I recommend PluginBoutique PeakLimit.
PluginBoutique PeakLimit is available in VST, VST3, AU, AAX, and as a Standalone app for Mac and Windows.
3. SSL X-Limit

Solid State Logic is one of my favorite plugin makers, and their X-Limit limiter plugin would be a great choice for tracks and buses with its transparent sound, making them sound larger and more dynamic.
I want to start by complimenting the beautiful user interface SSL created for X-Limit.
You have one screen to monitor incoming audio, processes applied, and outgoing audio. Underneath it are the usual suspects for control, such as gain, threshold, and ceiling.
- 4 Modes
Plus, it features Transparent, Glue, Punch, and Auto modes for different flavors. I love that everything is so clean and easy to follow, no spaceship control panels here, just straight-up efficiency.
- Punch Mode
I must say all modes sound pretty transparent, but my favorite one was Punch, as it made the drum track sound much more dynamic and larger without coloring the sound.
The Punch mode is the one with the most color, but it still sits on the transparent side to my ear. It’s like giving your drums a protein shake, stronger, but still natural.
- Auto Mode
The Auto mode is another one I like because it works well with synths and orchestral arrangements.
- Transparent Mode
It sounds just like the Transparent mode, but the threshold and ceiling transitions were smoother. If my mix were a rollercoaster, this mode would be the shock absorber keeping the ride smooth.
Although it is a bit pricey plugin, I would suggest X-Limit, especially for drum tracks, to make them stand out in the mix and sound big. Definitely deserves the spot as a nice contender for best limiter plugins list.
X-Limit comes in VST, VST3, AU, and AAX formats for macOS and Windows.
4. Newfangled Audio ELEVATE (part of bundle)
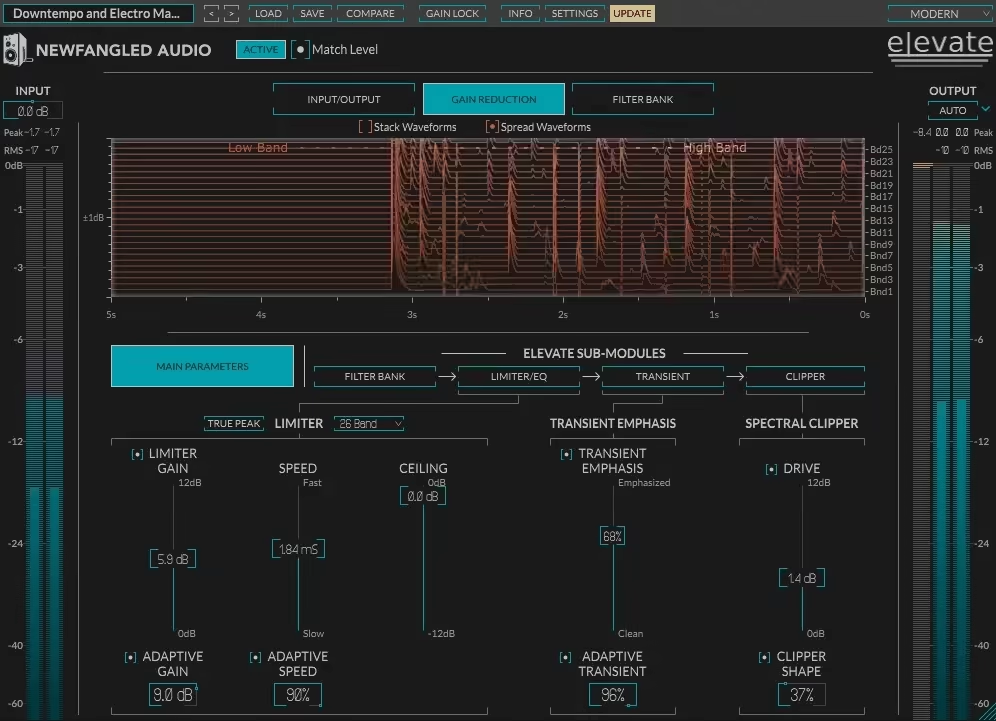
If you want more than just a limiter VST plugin and are looking for an advanced mastering plug-in, Elevate is the way to go with its all-in-one unique multi-band limiter, human-ear EQ, and powerful audio maximizer.
Elevate is one of the most complete mastering plugins I have ever used. It uses an adaptive limiter to listen and examine 26 frequency bands to adjust each band’s speed, transients, and gain, all in real time.
And my favorite part of this plugin is that even if you push it to the limit, it protects the natural sound. No more worrying about my mix turning into a crunchy mess,it’s like having a safety net for my loudness.
- User Interface & Automatic Analysis
I found the user interface to be okay but a bit complicated. You have a screen for 6 different types of metering and controls for adaptive gain, speed, transient, and shape.
But what I like here is that you don’t really have to get into the controls, as the plugin automatically analyzes the mix and sets the controls accordingly.
And it does quite a successful job. Honestly, it’s like having an assistant who does 90% of the work, now if only it could make coffee, too.
- Frequency Bands & Sound Shaping
To better understand the workflow, you have to understand the bands and their role. So there are 8 bands that I find as the key ones. 0 is for tamping down the rumble, 50 is the kick zone, 100 and 200 handle the low-end bass, and 400 takes out the mud in a mix.
800 is where you adjust the meat in the tone, while 1400, 2500, and 5000 shape the higher frequencies.
You can manipulate these bands as you like, limit or clip them, which gives you huge control over your sound.
I love that I can solo bands or draw curves to emphasize different frequency bands or instruments. It’s like EQ but with superpowers,I can almost hear it saying, “Don’t worry, I got this.”
- Transient & Clipper Adjustments
My workflow’s final steps with Elevate are with transient adjustments. The last is clipper adjustments, which is probably the best part of the plugin.
It sounds quite incredible, and the adjustments can be done in a very short time. I love how quick and precise it is, no more fiddling for hours. It’s like dialing in the perfect haircut in seconds, except, you know, for my mix.
I think Elevate is an amazing-sounding all-in-one EQ, limiter, and clipper to make your mixes stand out.
It is a bit pricey, but I recommend it to save time and make your mixes shine.
Elevate is available for Windows and Mac users in AAX, AU, VST, and VST3 formats.
5. Brainworx bx_limiter True Peak

Another great limiter VST plugin is True Peak, which has a full set of controls to signal dynamics to master your tracks professionally.
Talking about bx_limiter True Peak, I have to start with its exceptional metering section.
It features a peak and RMS meter combined, dynamic range meters, a gain reduction meter for individual channels, stereo balance and correlation meters, and finally, a meter for loudness.
I loved that you can switch between momentary and short-term in this section to analyze partitions better. It’s like having a microscope for your mix, because sometimes, you really need to zoom in.
- Stereo & Channel Isolation Controls
It also provides an option to isolate mid, right, and left channels or to flip the stereo signal fully.
Furthermore, you can adjust all of them to signal output or input signals. This level of control is amazing, I can pretty much dissect my track like a mad scientist experimenting on sound.
- Mastering Knobs & Limit Modes
After analyzing every detail of your mix on the monitor, you can start adjusting the knobs, which are also plenty.
As I said, you take full control over mastering with this plugin.
It has a modern and classic limiter mode, gain, release, XL, and ceiling knobs, as well as a pre-limiter for high- and low-pass filtering and tonal weighting.
- Additional Features
Finally, it features a channel link, limiter mix, and output dim for final adjustments. This plugin really gives you everything, at this point, I wouldn’t be surprised if it could make me coffee, too.
True Peak is for professionals who want to play with every detail when mastering their mixes.
I would not recommend this one to beginners for its price and complexity. But, for experienced producers, this plugin offers quite a lot.
True Peak comes in AAX DSP, AAX Native, AU, VST2, and VST3 formats for Mac and Windows.
6. BUTE Limiter 2

Producers searching for high-fidelity, ultra-transparent True Peak Brickwall limiting should check Bute Limiter 2, with its high value-for-money design.
- Overshoot-Proof Brickwall Limiting Algorithm
The star of the show for Bute Limiter 2 is Signum Audio’s novel overshoot-proof brick wall limiting algorithm.
When I tried the plugin, I was impressed with how transparent the mix sounds, the smooth gain reduction, and the natural sound.
The plugin features 5 different release curves, allowing you to find the one that fits your mix best. Honestly, it’s like picking the right mattress, soft, firm, or somewhere in between, all for a smooth and comfy mix.
- Control Panel & Warning System
On the control panel, you have the standard pre-gain, post-gain, and automatic max target controls, along with a warning system for post-gain overshoots.
This way, you can immediately see any audio issues. I love that it catches problems before they happen, like having an alarm that goes off before you burn your toast.
- Simple Yet Highly Effective Limiter
There is not much to tell about Limiter 2 besides that it is a simple yet highly effective limiter, especially for the mastering part.
Its transparency and smoothness, combined with its price tag, make this the most cost-effective option on the list.
I love when a plugin delivers exactly what it promises; no fluff, no nonsense, just clean, solid limiting. It’s like finding a budget-friendly restaurant with Michelin-star quality.
Limiter 2 comes in VST, AU, and AAX formats for Mac and Windows.
7. FabFilter Pro-L 2
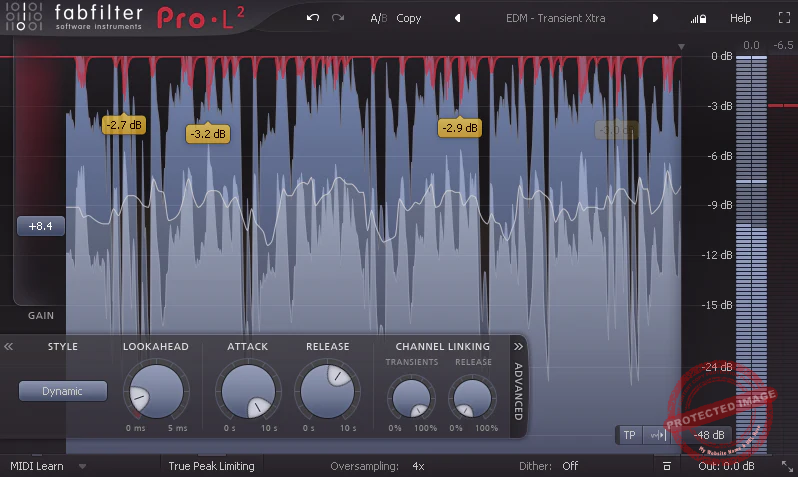
FabFilter Pro-L 2 has been the number-one choice for most audio engineers and producers regarding limiters. And that is for a reason.
FabFilter Pro-L 2 limiter plugin has been a staple for my mixing and mastering workflows.
It features nine limiting algorithms, True Peak limiter, 32x linear-phase oversampling, and loudness metering, which check all the boxes you expect from a limiter.
I love that it does everything I need while still feeling intuitive—like a luxury car that’s somehow easy to drive.
- Real-Time Display & Metering
Maybe it’s because I’m used to it, but I love the true peak level meters and extensive loudness metering of the plugin.
Its unique real-time display allows you to see all the information on the board without complicating things.
I never feel lost when tweaking settings, which is rare for a high-end plugin. Some limiters feel like they need a NASA manual—this one keeps it clean.
- Lookahead, Attack & Release Controls
It has Lookahead, Attack, Release, and smart Channel Linking controls with Transients and Release.
However, the best part is the eight algorithms that cover all the mixing and mastering limiter needs.
I like having so many options—it’s like having different flavors of compression, except none of them ruin your mix like an overcooked steak.
- 8 Limiting Algorithms
The Transparent style is the best for me as it prevents coloration and pumping.
I use it mainly for mastering channels, while Punchy is for pumping sound, which I prefer for single tracks.
You can use Dynamic when you want to preserve detail and punch, and All-Round is the balance mode for transparency and loudness. The Modern algorithm is for high transparency even with high loudness, and Aggressive is almost like clipping.
The Bus style gives a pumping sound, which I like to use for drums, and the Safe mode is great for acoustic elements, giving a distortion-free output.
Honestly, the number of choices here makes me feel like I’m ordering off an exclusive menu, except instead of food, I’m choosing how hard my mix slams. I can honestly say that I think this is the best-sounding plugin on the list.
Plus, it is quite versatile in terms of sound. The only con of the plugin is its price tag, which is why I would recommend this only to professional audio engineers and producers with a high budget.
FabFilter Pro-L 2 is available in VST, VST3, AU, AAX Native, and AudioSuite formats for Windows and Mac.
How to use a limiter to increase loudness?
There are different ways to use a limiter to maximize the volume. I use it mainly on the mastering chain or the group bus. Basically, you can adjust the ceiling level and increase the input gain to make the mix louder without losing integrity.
- Mastering: One of the most common ways to use a limiter is to use it in the mastering chain. You can increase the input gain while adjusting the ceiling level to maximize loudness. But, try not to overdo it as the result will be a loss of dynamics and increased perceived overall loudness.
- Group Bus: When using buses for multiple instruments, the overall volume sometimes gets to undesired levels. So you can use a limiter on the bus to control the peaks. You can add a bit of gain to increase the loudness of quiet parts while keeping the peaks under control.
What is the best setting for a limiter?
To understand the best setting parameters for a limiter, you must know about the controls. There are 4 main controls on a limiter, including Ceiling, Gain, Attack, and Release.
The ceiling decides the maximum level at which the limiter will give output. The ceiling is typically set to 0.0 dB or 0.1 dBFS for mastering channels. For instrument or bus channels, you can set it as you like, but it is advised to keep it between -1 and -0.3 dBFS. A trick I use to find the right Gain level is to loop the busiest part of the track and raise the gain slowly to the point that I hear the first hints of distortion. From that point, I will return to around 0.5 dB, and that’s the spot.
The Gain controls the volume input going to the limiter. So, keeping the ceiling level stable on the output and increasing the Gain on the input will increase the overall volume of the mix. But, it will lead you to lose dynamics, so you have to be careful.
The Attack controls the speed at which the limiter reacts to the input signal and sets the limit. I often use the Attack as fast as possible and then start to lower it to find the balance between clean sound and strong transients. A mix with a slow attack sounds distorted, but it keeps the transients sharp.
The Release decides how long the limiter will be active after the input level drops down from the ceiling level. Just like the Attack control, the Release level is also about finding the sweet spot. Too fast release will result in distorted sound and pumping effects, while too slow release will cause loss of dynamics and loudness your limiter can add to the mix. So, start with a fast Release level and slowly go down to find the sweet spot.
Some limiters have extra features like modes. If that is the case, you must read the manual to learn what they do or simply experiment with them to find the right one for your mix.
And do not forget that your limiter should be the last module in your signal chain. For mastering, make everything ready with your effects chain and mix. And use the limiter as the last step of the mix.
