
Today, we’re diving into some of the best vocal plugins out there, because your vocals deserve more than just reverb and wishful thinking.
I’ve spent countless hours trying different vocal chains, and trust me, not all plugins are created equal. These days, we’ve got everything from channel strips that handle EQ, compression, and de-essing in one go to AI-powered assistants that help shape your tone without breaking a sweat.
There are also enhancers and saturation tools that add warmth and clarity, plus character plugins modeled after legendary studio gear that I use when I want that polished, radio-ready sound. And let’s not forget automation tools, as I rely on these to keep my vocal levels smooth without constantly riding faders.
In this list, I’ve rounded up 9 vocal plugins I keep coming back to when I want vocals to truly shine. Whether you’re tracking at home or finishing a commercial mix, these picks have got your back.
1. Pulsar Vocal Studio
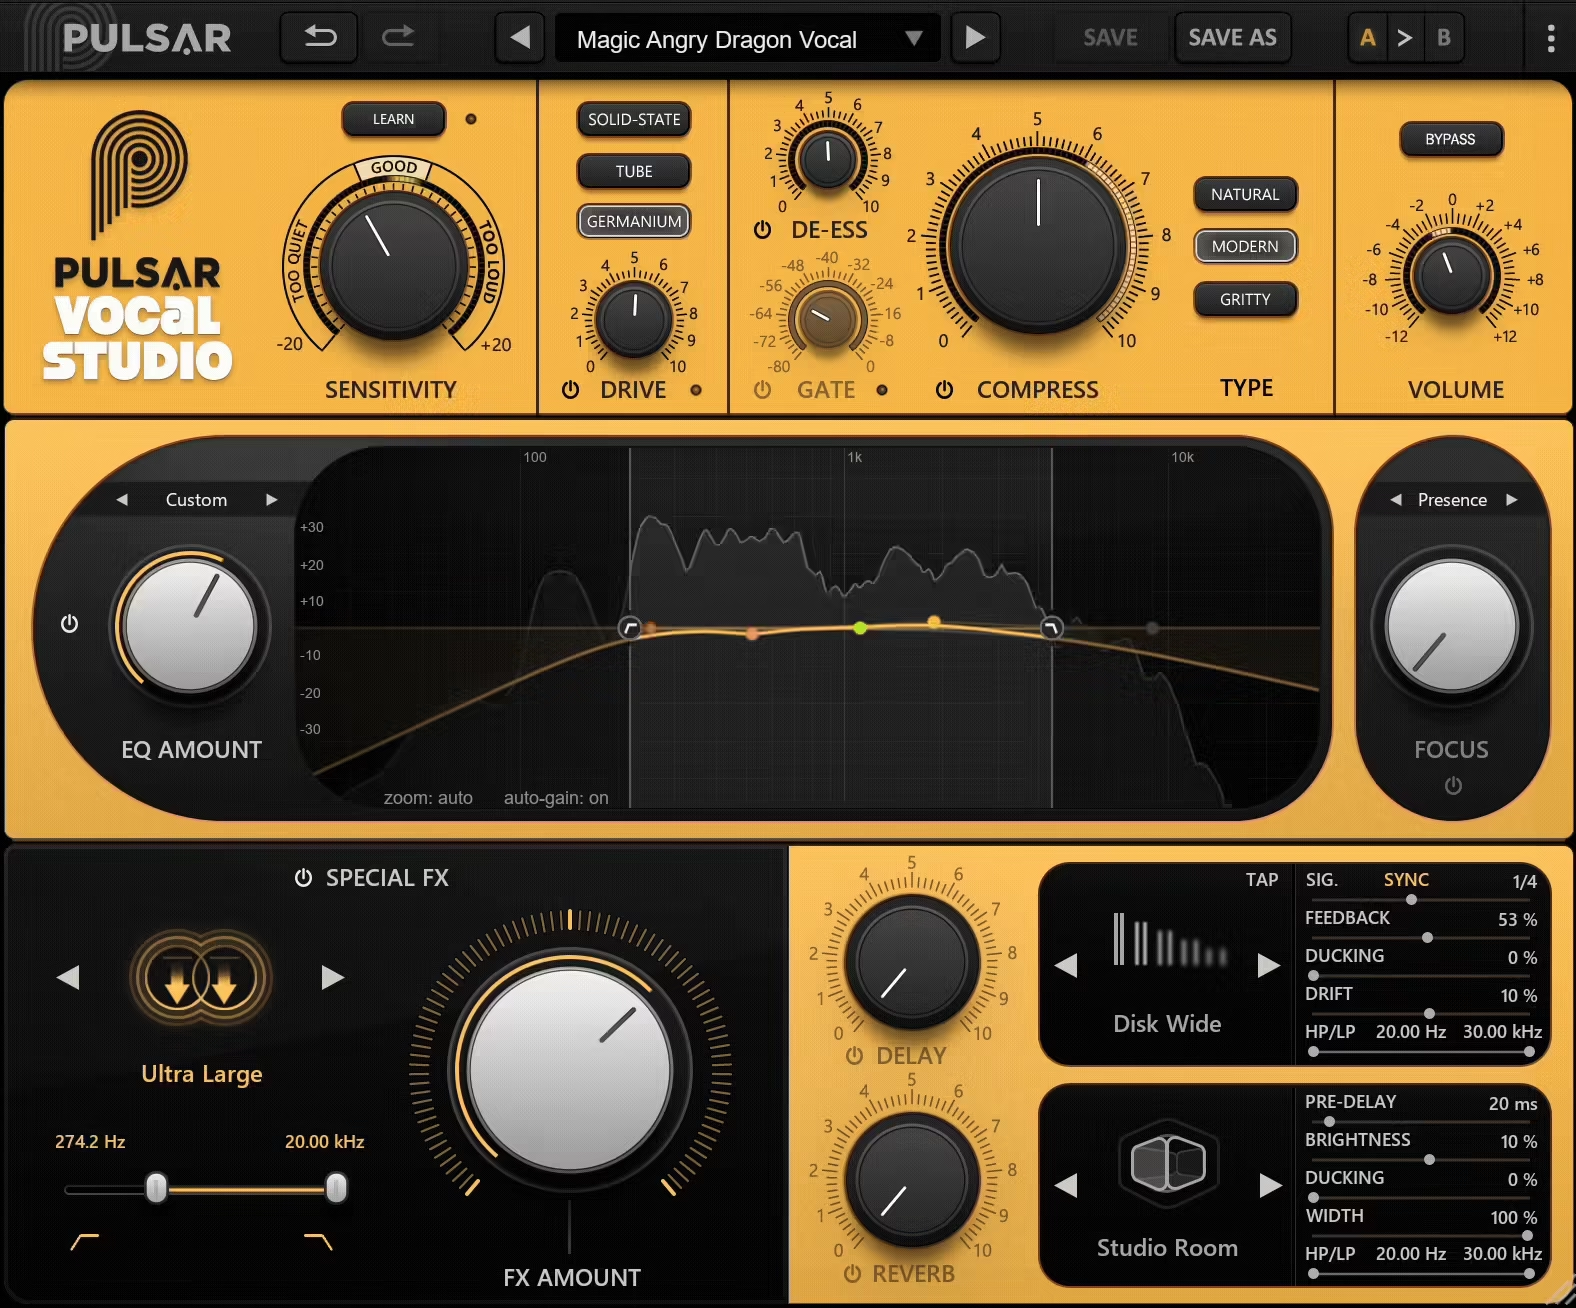
I’ll start with one of the recent plugins, which I truly enjoyed working with, Pulsar Vocal Studio, which wraps everything you actually need for vocal mixing into a single, good-looking box.
Pulsar Vocal Studio is like your favorite vocal chain got together, hired a designer, and decided to make your life way easier with a nice workflow and powerful features.
The interface look pretty good with a clean, elegant, and super reactive design. Each section has its own vibe, from soft-glow metering to those tactile knobs that make you want to touch your screen (don’t worry, I did it too).
I’ve used it on everything from podcast dialogue to full-on belted choruses, and it worked pretty well. Dragging the Focus band around is oddly satisfying, and everything is where your eyes expect it to be. Workflow-wise, I’m moving faster and tweaking less. That’s rare.
- Auto-Learn Sensitivity
This thing listens during playback and adjusts your input gain automatically. No more playing guess-the-level or peeking at meters like a hawk, I just hit play and trust it.
- Single-Knob Dynamics with Visual Feedback
The compressor, de-esser, and gate are each handled with just one knob, but they still sound polished and musical.
I especially love the LED-style meters around the knobs, they make me feel like I’m in the cockpit of a vocal spaceship.
- 3 Compression Modes
“Natural” is perfect for subtle smoothing, “Modern” makes pop vocals leap out, and “Gritty” adds lovely character when I want something raw.
It’s like having three personalities in one plugin, and I switch depending on the mood of the track.
- 5-Band EQ with Global Amount Control
Each band is fully parametric, so I can sculpt the tone with surgical precision. The global Amount knob is a lifesaver, if I go too hard on EQ, I just dial it back instead of redoing the whole thing.
- Focus Enhancer
This is where vocals go from “meh” to “main event”. I use the Air band all the time to make vocals sparkle without sounding harsh. Presence gives clarity and detail, while Body adds warmth right where it’s needed.
- Special FX Section
These effects are like secret sauce for background vocals and hooks, Octaver Thick is huge, and Wide Stereo makes things feel lush. Every effect also has filters built in, so I’m not juggling more plugins just to shape the tone.
- Delay & Reverb with Ducking and Filtering
The delay options are pretty solid as Slapback is a fav for vintage flavor, and the ducking keeps the effects clean when the vocal hits.
The reverbs (like Spring and Hall) sound legit and are easy to tweak without digging through endless menus.
I’d say don’t be afraid to push the saturation hard when working on stacked gang vocals. It adds so much glue and grit. And for breathy ballads, try using the Focus band around 5–9kHz and blend in some doubler and reverb, it gives a really nice tone real quick.
Pulsar Vocal Studio has become my vocal ride-or-die as it’s fast, powerful, and doesn’t get in the way of creativity. Whether it’s a quick demo or a polished mix, I grab this thing when I want pro vocal vibes without opening five windows.
Pulsar Vocal Studio comes in VST3, AU, and AAX formats for macOS and Windows users.
2. Ablaze Screamer
If you can tell your pig-squeals from your death growls, Screamer feels like it was built in your honor.
Developed by Amsterdam’s Ablaze, headed by a metal vocalist, this Screamer beast is one of my favorite metal vocal plugins, as it takes raw screams and turns them into the bold, punchy, “larger-than-life” tone modern metal lives for.
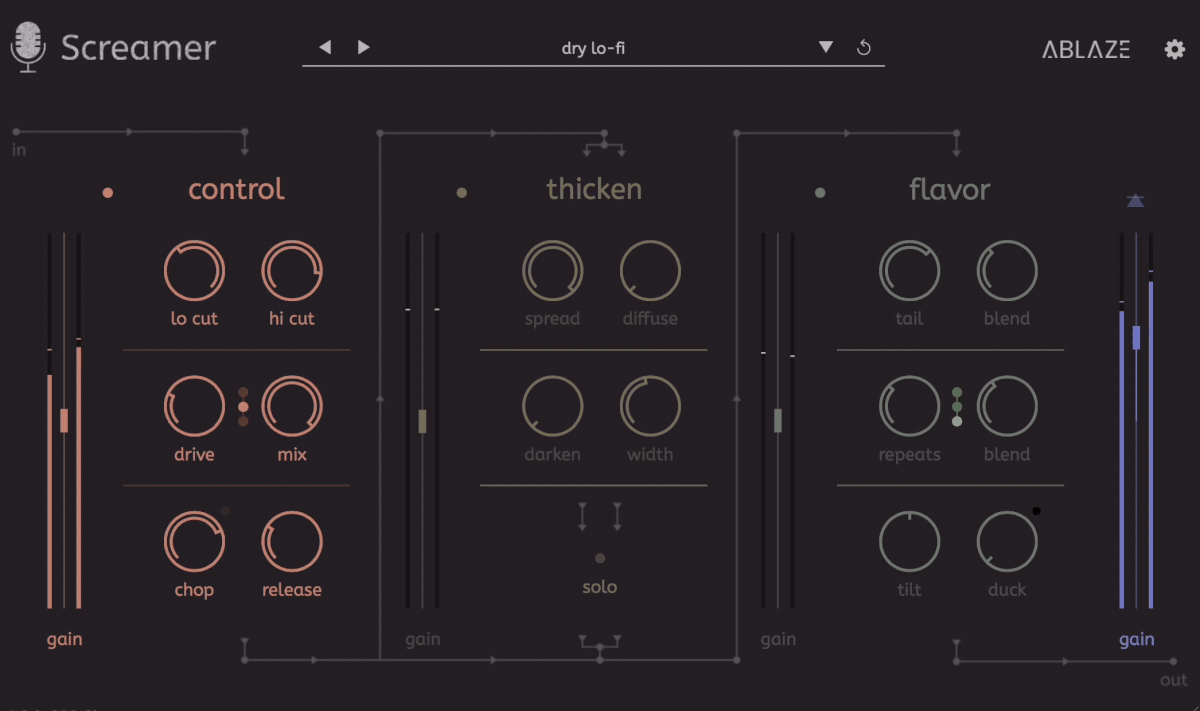
I love the organized interface with three main sections: Control-Thicken-Flavor, so that I can track while hearing the full, crushing sound in real time.
- Control-Thicken-Flavor
Control gives me drive, filters, compression, and limiting to lock in aggressive precision. Thicken spreads my vocals wide with stereo comb filtering for that wall-of-sound impact. Flavor layers reverb and delay, auto-ducked so the effects explode only when I want them.
- Rich Preset Library
I liked the quantity and quality of the presets as they gave me instant mix-ready settings for almost every scream style.
- Parallel Processing
This is a great addition as it keeps effects powerful without sacrificing clarity.
With killer presets for every vocal style and a workflow made by metalheads for metalheads, Screamer has become my go-to for turning raw power into mix-dominating vocals.
Screamer comes in VST/AU/AAX for macOS and Windows.
3. UAD Topline Vocal Suite
One of my favorites here, UAD Topline Vocal Suite, stands out with its fast, polished, and mix-ready workflow without dragging in 10 different plugins.
I’ve used a ton of vocal chains over the years, but UAD Topline just slaps everything together in one package. It feels like someone packed a vocal producer’s cheat sheet into one smart UI.
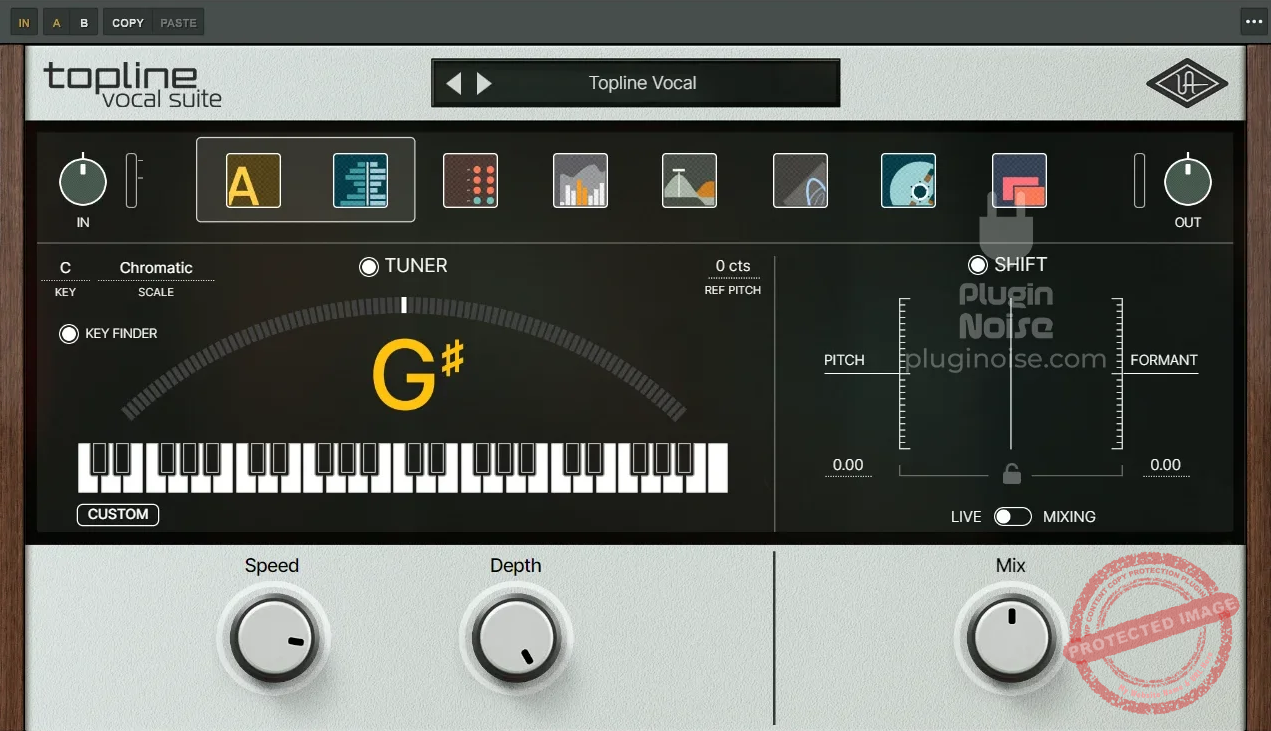
The layout is super streamlined. Everything you need is right there in one window without flipping through tabs or loading extra modules.
I really appreciate how the controls are labeled clearly and visually grouped by function. That makes the whole thing incredibly intuitive, even when I’m moving fast. Plus, you’ve got metering baked in, so it’s easy to dial things in by ear and eye.
- 1176 & LA-2A Style Compression
The compression section is where the magic starts for me. You get two flavors of iconic UAD-style compression, and they sound amazing.
The 1176-style comp adds punch and edge, while the LA-2A smooths things out beautifully. I love toggling between them based on the vibe, 1176 for aggressive rap vocals, LA-2A for buttery pop hooks.
- Smooth De-Essing
De-essers can be hit-or-miss, but this one just works. It tames harsh S’s without dulling the vocal tone. I’ve tried it on breathy female leads and gritty male rock vocals, and it’s handled both without making things sound plasticky.
- Auto-Tune Core Integration
This is a huge win, having Auto-Tune Core built right in saves so much time. It’s not just pitch correction; it’s creative tuning too.
I’ve messed with the retune speed for subtle polish or gone full T-Pain, and the results always feel musical.
- Precision EQ Section
I dig how the EQ is set up as it’s a fixed-band design but hits all the sweet spots for vocal shaping. I can cut mud, boost presence, and add shimmer in seconds. It’s surgical when it needs to be, but still musical.
- Vintage Preamp Tone
The preamp section gives vocals that subtle analog vibe without having to stack saturation plugins. Just a touch adds warmth and presence; it’s great for making thin recordings sound beefier and more pro.
- Limiter with Mix Control
I wasn’t expecting to love the limiter, but it actually sounds great. There’s a mix knob too, which is perfect for parallel processing. Sometimes I’ll crush the vocal and then blend it in to add energy without losing dynamics.
Honestly, I wish they’d included a gate or noise suppressor for cleaning up breaths and room tone, that’s the one thing I end up adding from another plugin. It’s not a huge issue, but for bedroom vocalists like me, it’d complete the all-in-one vibe.
I used Topline on a recent handpan-and-voice ambient track, and it brought out all the breathy texture in a way that felt effortless. It shines in pop, R&B, singer-songwriter, and even lo-fi sessions where you want a vibe without fuss.
UAD Topline Vocal Suite comes in VST3, AU, and AAX formats for macOS and Windows users.
4. Howard Benson Vocals
If you want the signature vocal chain of legendary producer Howard Benson in one all-in-one powerhouse, enter Howard Benson Vocals!
Howard Benson Vocals nails that polished, radio-ready vocal sound straight out of the box without endless tweaking. It’s like having Howard Benson himself sitting beside me during the mix, handing me the exact tools he uses on top-charting hits.
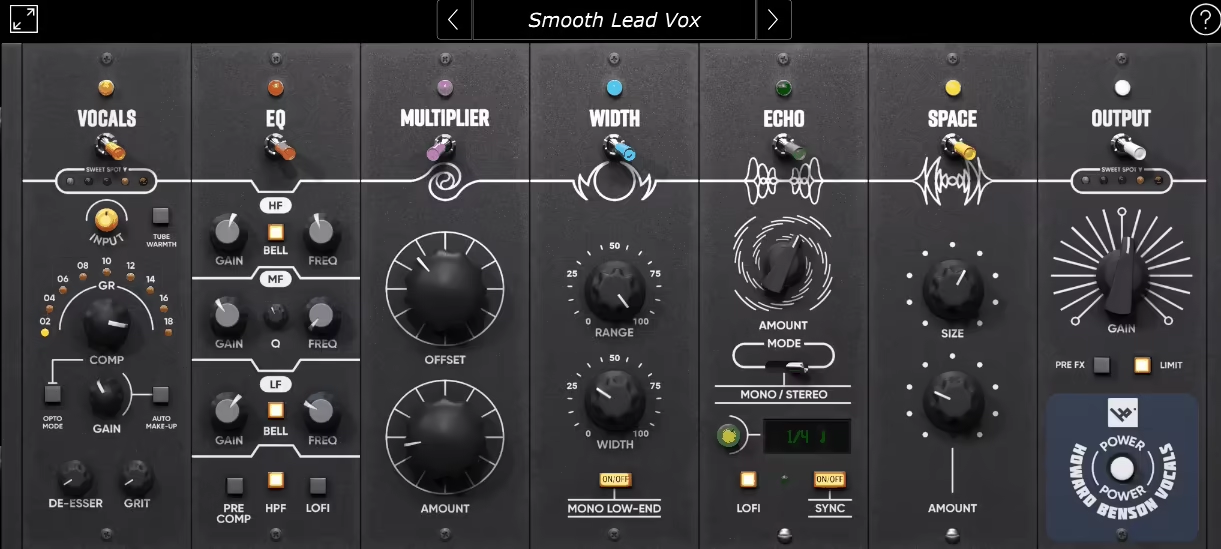
The interface got a fresh 3D GUI that’s both sleek and super easy to navigate. I love how everything is logically laid out, so you’re never hunting for controls.
The workflow flows relatively naturally; you tweak compression, EQ, spatial effects, and time-based effects all in one place, which speeds up the process big time. The visual feedback helps me dial in settings confidently, even in busy sessions.
- Sweet Saturation Compressor
This compressor is my go-to starting point. It’s got that warm tube saturation and gritty edge that adds some real character to vocals.
I use the “Opto Mode” when I want smooth, natural compression and flip to the standard algo for a punchier vibe. The de-esser knob is clutch too, quickly taming those nasty sibilants without messing with the vocal’s vibe.
- Creative 3-Band Semi-Parametric EQ
The EQ lets you paint your vocal sound with broad or surgical strokes. I often roll off the lows with the built-in Hi-Pass Filter, then boost presence with the mid and top bands.
Plus, choosing to put the EQ pre- or post-compression makes it super versatile, depending on whether I want to color the signal before squashing or clean it up afterward.
- Multiplier for Double Tracking
I love this trick for fattening up vocals without having to record multiple takes. The Amount and Offset knobs let me dial in that lush doubled vocal vibe with realistic variations, because no one wants a robotic double track.
- Width Control for Spatial Presence
This module is killer for spreading vocals wide without losing body. The Mono Low-End switch anchors the vocal’s core in the center, keeping it full while the width adds air and depth. I find it perfect for modern pop and rock vocals that need to cut through the mix.
- Expressive Echo Module
This delay unit is tailored for vocals, tempo sync or ms delay times, mono or stereo, and LoFi options for character. Automating delay throws with this plugin is effortless, making the vocals feel alive and dynamic.
- Space Reverb Section
From intimate and close to massive and arena-sized, the Space control covers all bases. I use lower settings for intimate singer-songwriter stuff and crank it up for big anthems.
- Limiter and Output Stage
The limiter is a nice safety net catching peaks, letting me push vocals confidently without worrying about clipping. Plus, the Pre FX switch means I can route the signal differently depending on what the track needs, flexibility is always a plus.
Honestly, the only thing I sometimes wish for is a built-in gate or noise reduction to clean up breaths or room noise, but that’s a minor gripe considering how much this plugin bundle covers.
The included presets from Howard Benson and other top producers are a fantastic starting point, too, especially if you’re new to vocal mixing.
If you want that pro, chart-topping vocal polish without fussing over a bunch of plugins, the Howard Benson Vocals Bundle is a no-brainer.
Howard Benson Vocals Bundle comes in AAX, AU, and VST3 formats for macOS and Windows users.
5. iZotope VEA
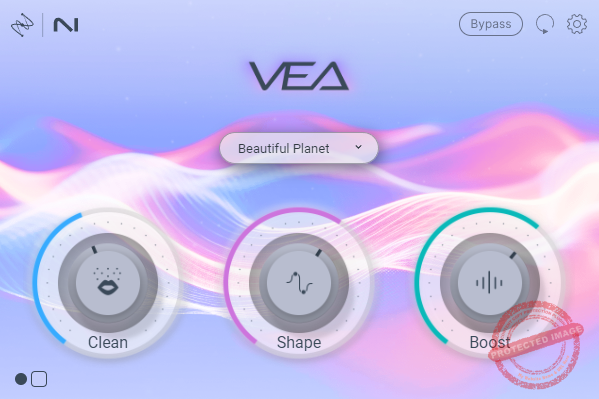
What I liked about Izotope VEA is that it’s aiming straight at content creators and podcasters with a super simple, all-in-one approach.
The star of VEA for me is the low latency and easy-quick work right inside my DAW without fussing with complicated settings.
The interface is clean and straightforward, making it easy for beginners to jump in without reading a manual.It’s got a nice minimal vibe, with a Boost knob front and center that gives your voice some oomph fast.
Workflow-wise, it’s a breeze to drop on a vocal track and tweak without getting bogged down by technical jargon, though I wish it had more detailed meters and controls.
- Two-Stage Noise Reduction
VEA’s noise reduction uses both static and adaptive modes, which is cool because it can tackle different kinds of background noise dynamically.
I’ve tested it against other plugins, and it handles mild noise pretty well if your recording is decent to start with. I like using this when I have a clean-ish podcast track that just needs a little polish without sounding too processed.
- Simple Voice Enhancement
The plugin aims to polish your voice with subtle EQ and dynamics shaping. It’s not a magic wand, but I find it useful for quickly tightening up spoken word audio, especially if I’m short on time.
It’s definitely not a replacement for learning proper EQ or compression, but it saves me some hassle on quick edits.
- Lightweight & Low Latency
VEA feels light on CPU and doesn’t introduce lag, which makes it perfect for live podcasting or quick content edits where you want instant feedback. This is something I really appreciate since I hate waiting around for plugins to catch up when recording.
Downsides? The big one is the lack of reverb reduction. For me and many content creators, that’s a huge miss.
Also, the Boost knob is great but there’s no loudness meter, so I’m flying blind on levels and have to double-check elsewhere.
Plus, the plugin relies heavily on having pretty clean source audio to work its magic, so it’s not great for fixing rough recordings.
Honestly, Izotope seems to be holding back here, probably so they don’t cannibalize their RX suite sales. If you’re a podcaster or creator with decent recordings who wants a quick, simple noise reduction and voice polish tool, VEA is worth a look at.
Izotope VEA comes in VST3, AU, and AAX formats for macOS and Windows users.
6. UVI Opal

Opal’s Hybrid Reverb Engine effortlessly combines the best of algorithmic and convolution reverbs, delivering a natural yet versatile ambiance that stands miles ahead of typical reverbs.
Opal’s got this vibe that feels fresh and different right from the start; it’s not just another reverb plugin trying to be flashy. Instead, it nails a smooth, natural ambiance that instantly made me wanna toss it on almost every track.
I’ve found it especially useful when I need a reverb that doesn’t clutter up my mix but still adds some lush space.
The interface, I found to be clean and simple. You don’t have to be an expert to get around it, which is great when you’re juggling a bunch of plugins and want something that just works without fuss.
- Hybrid Reverb Engine
This is where Opal really stands out as it blends algorithmic and convolution reverb techniques in a way that gives you that natural feel but with some creative flexibility. I use it mostly for pads and vocals because it adds depth without sounding artificial or over-the-top.
- Intuitive EQ Section
The EQ lets you shape the reverb tail with precision. I’ve tweaked it to carve out muddy frequencies or brighten up the space, and it feels like a little secret weapon for keeping the mix clean and clear.
- Smooth Decay Control
Adjusting the decay time on Opal feels super organic. Whether I want a short, tight space or a long, dreamy tail, it responds smoothly, letting me craft ambiance that fits the mood perfectly. It’s helped me bring that subtle shimmer on some chill tracks I’m working on right now.
A couple of downsides here; sometimes I wish there were more presets to speed up starting points, but honestly, once you get used to the controls, it’s pretty quick to dial in your own sound.
Also, it can get a little CPU-heavy if you crank it too high, so keep an eye on that during big sessions.
All in all, Opal’s a good choice when I want natural, airy reverb that feels musical and not like some weird space effect. If you’re mixing anything from ambient to indie rock, this plugin’s gonna slide right into your setup without any drama.
Opal comes in VST3, AU, and AAX formats for macOS and Windows users.
7. SSL Vocalstrip 2
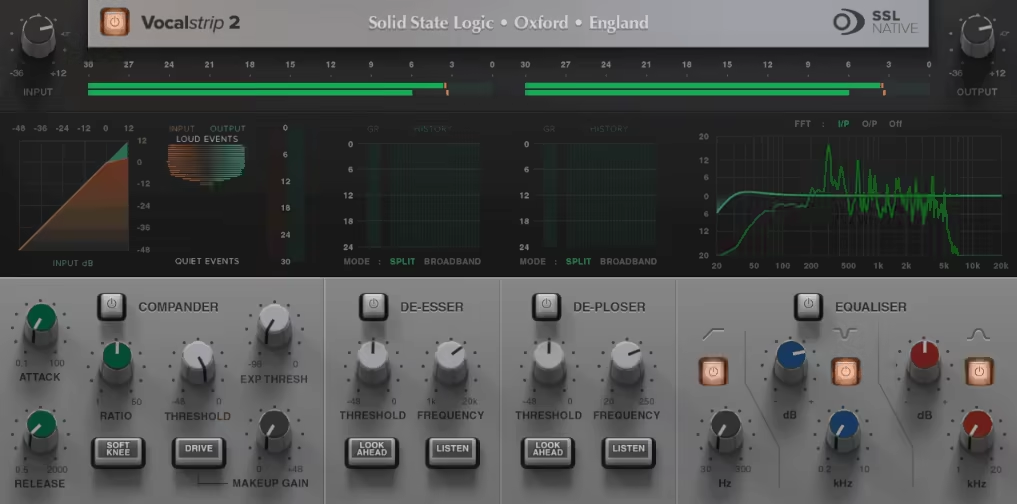
If your vocals are fighting the mix or each other SSL Vocalstrip 2 is there with its no-fuss, vocal-specific channel strip that gets them sitting right where they belong.
Vocalstrip 2 is a 4-in-1 vocal weapon as you get a Compander, De-Esser, De-Ploser, and 3-band EQ, each one tailored specifically for vocal work. It’s the kind of plugin you can slap on a raw vocal and quickly bring it into shape without diving down a rabbit hole.
The layout is exactly what you’d expect from SSL: sleek, smart, and dead easy to navigate. Each section has meters and visual feedback, so you can actually see what’s being fixed, especially handy for dialing in fast results on a deadline.
- 4 Essential Vocal Processors
What stood out to me was how Vocalstrip 2 wraps a Compander (compressor + expander), De-Esser, De-Ploser, and a clear-sounding 3-band EQ into one unit. From tightening dynamics to cleaning up muddiness, it really covers all the bases in one go.
- Smart De-Esser and De-Ploser
“S” spikes and plosive pops are always a pain, but the intelligent De-Esser and De-Ploser do a solid job zeroing in on trouble spots. I didn’t have to fiddle much as they just worked, and my vocals instantly felt cleaner.
- Clean and Musical EQ
The EQ section includes a handy high-pass filter, a surgical asymmetrical notch for dialing out trouble zones, and a silky Air band to lift the highs. That sparkle on top makes vocals feel more open and mix-ready.
While it might not fully replace a hand-crafted vocal chain, I found Vocalstrip 2 to be reliable when I wanted quick, pro results. SSL really nailed the balance between simplicity and quality. So, it’s a great time-saver for vocal production.
SSL Vocalstrip 2 is available in VST2, VST3, AU, and AAX formats for both macOS and Windows.
8. Waves Silk Vocal

I didn’t expect to fall for this plugin so fast. One minute I was testing vocals for a rough demo, the next I had Silk Vocal slapped on every track like it owed me money.
Well, what makes Silk Vocal special? It’s that instant, glossy finish you normally have to fight through layers of plugins to get. I’m talking mix-ready shine with just a couple of tweaks and somehow, it doesn’t sound overprocessed or fake. It just sounds right.
The layout feels like it was made by someone who actually records singers, not some engineer buried in code. Big knobs, no fluff, and an animated display that responds like it’s listening along with you.
I didn’t even look at a manual. I just dove in, nudged some controls, and boom, clean, present vocals that felt glued to the track.
- Silk Control
This thing is wild,I don’t know what kind of wizardry is happening under the hood, but when I turn up the Silk knob, it’s like I’m brushing the vocal with soft light.
It lifts the highs without getting crispy and smooths the mids in a way that feels expensive. I tried it on a husky female vocal and a gritty spoken-word part, both came out sounding luxe.
- Auto Gain with Built-In Loudness Matching
I was doing my usual back-and-forth to check if I liked the plugin or if it was just louder (we’ve all been there). But Silk Vocal takes care of that for you.
The auto gain system constantly balances the output level against the input, so you’re always comparing apples to apples. I didn’t have to adjust volume manually even once.
Whether I boosted the Silk control, compressed harder, or leaned into saturation, it automatically compensated for the loudness jump.
- Dynamic Tools That Actually Play Nice Together
De-essing, compression, saturation…normally I’d juggle these with separate tools and pray they don’t step on each other. But here, they feel like one coherent system.
I nudged the compressor and it hugged the vocal, not crushed it. The saturation added a little “hello, I’m alive” vibe without fuzzing up the top end. It felt like painting with a single brush, not piecing together a Frankenstein chain.
If I had to nitpick, I’d say deep tweakers might find it a bit too streamlined. There’s not a ton of customization under the hood, but that’s the charm.
Silk Vocal is designed to get you there fast. And for me, when I’m knee-deep in a session and need to move, I’ll take smart defaults over endless tweaking any day.
Silk Vocal comes in VST3, AU, and AAX formats for macOS and Windows users.
9. Waves Vocal Rider
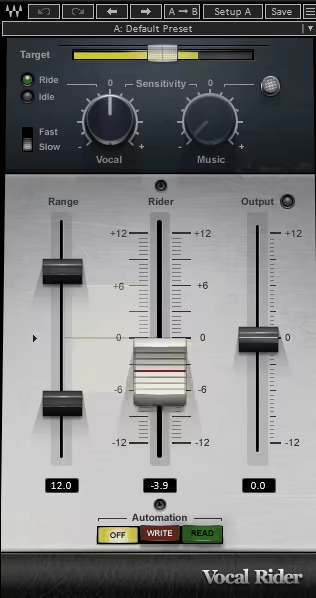
Waves Vocal Rider got in the list as it gave me that “set it and forget it” ease. What I love most is how it rides vocal levels automatically without smashing the dynamics with a compressor.
It listens, it adapts and it makes the life easier. I don’t even have to draw automation manually anymore, which used to eat up hours of my mixing time. It’s like having a super polite studio assistant whose only job is to make your vocals sit perfectly in the mix without ever asking for a coffee break.
Working with Vocal Rider feels surprisingly human. The interface isn’t flashy, but it’s smart where it counts. You load it on your vocal track, feed it the mix via sidechain, and it just… works.
- Target and Rider Fader
I really enjoy the target fader, which shows you exactly where your vocal level is sitting. It feels intuitive, especially with the transparent fader cap that moves in real time.
Watching the Rider fader dance along to the performance is low-key satisfying. And once you’ve got your settings dialed in, you can even write that movement straight into your DAW’s automation lane. I’ve done this in Logic Pro and it’s saved me so much back-and-forth.
- Dynamic Vocal Leveling Without Compression
This is the bread and butter of Vocal Rider. Instead of squashing your vocals with heavy-handed compression, it adjusts levels using smooth, subtle automation.
I’ve used this on podcasts, voiceovers, and full vocal stacks and it never fails to keep things balanced and natural. And since it’s not technically compressing anything, your vocal tone stays clean and untouched.
- Sidechain-Responsive Mixing
Here’s where it gets cool: Vocal Rider actually listens to your entire backing track via sidechain, then adjusts the vocal based on what’s happening in the mix.
I love this for busy choruses when the instruments ramp up, the plugin gently nudges the vocal up so it doesn’t get buried. It’s like having automatic empathy for your vocalists.
- Customizable Range and Sensitivity Controls
This might sound nerdy, but these controls are a lifesaver. You get separate vocal and music sensitivity knobs, plus a range slider to keep the fader movements within your chosen limits.
I always tweak these until the vocal rides feel just right, not too jumpy, not too stiff. It’s especially handy when mixing narration or audio books where level consistency is key.
Okay, I’ll admit: setting up the sidechain input can be a bit of a head-scratcher if you’re new to it. But once you do it once, it’s no biggie. Just route your instrumental bus to the sidechain and you’re off to the races.
Honestly, I think this plugin can be great for natural vocal balancing commercials, YouTube voiceovers, even audiobook editing. It’s especially handy when you want consistency but don’t want to squash the life out of your vocals.
Waves Vocal Rider comes in VST3, AU (Mac only), and AAX formats for macOS and Windows users.
Extra:
1. Lindell Audio 69 Series

If you’ve ever wanted that classic rock sound in your DAW without mortgaging your house for vintage gear, this is your ticket.
Lindell 69 Series is one of my favorite vocal VSTs, as it captures the unmistakable punch and smoothness of the vintage Helios Type 69 consoles. The same ones that powered hits from Zeppelin, Hendrix, Bowie, and Sabbath, the golden age of rock production.
I’ve used both the Channel and Buss versions, and they give you the flexibility to go from detailed tone shaping on individual tracks to gluey analog cohesion across buses.
Everything is laid out logically, and even though there’s a lot going on, it never feels overwhelming.
- Helios-style EQ section
I think Helios-style EQ section is the crown jewel. The 3-band EQ nails the original Helios sound, as it’s musical, powerful, and impossible to make sound bad.
I love using it to add shimmer to vocals, fatten up guitars, or dig out midrange mud on drums. The high-pass filter options at 40 and 80 Hz are perfect for taming low-end junk before it hits your mix bus.
- F760 Compressor with SMASH mode
This beast of a bus compressor is based on the classic 1176-style FET comp but with more attitude. The SMASH button is insane, as it adds 20 dB of input gain and compensates output, giving you gnarly, explosive compression that’s perfect for drums.
I’ve smashed the living daylights out of kicks and snares with this thing, and it just makes them feel huge without falling apart.
- Customizable Preamp and THD Control
The preamp section includes a THD knob that lets me dial in the exact amount of harmonic distortion I want.
Just pushing the input gain adds a smooth vintage saturation that makes anything sound more alive. It’s subtle when you want it to be, or you can drive it for some serious analog mojo.
I do wish the Limiter and Gate had a bit more visual feedback, especially for fine-tuning, but they get the job done and add a lot of value in terms of dynamic control.
If you’re working with rock, country, jazz, even lo-fi or cinematic stuff, this plugin delivers. I’ve thrown it on vocal buses and drum tracks and instantly felt like I was working in a classic studio.
Lindell 69 Series comes in AAX, AU, VST2, and VST3 formats for macOS and Windows users.
2. Flooic Pro Vocals (FL Studio Only)

If you are someone who mixes a lot of vocals in FL Studio, my free pick, Flood Pro Vocals, offers a streamlined and intuitive channel strip for mixing vocals.
The Flooic Pro Vocals interface is pretty clean and modern, with all the controls clearly labeled and easy to dial in. You’ve got instant access to EQ, compression, saturation, reverb, delay, and even vocal width tools, all laid out in a single page.
It really speeds up the process and keeps your creative flow going, so there’s no digging through menus or switching between plugins.
- Main Mix Controls
These are the heart of the plugin. With multiband compression and Air Excite, you can make your vocals sound bright, full, and in-your-face. I use this section to glue the vocal to the beat without it sounding squashed.
- Clean Tools & Deesser
I love how easy it is to clean up noisy or harsh vocals using Low Cut, Clean Mids, and the Deesser. Whether I’m working with budget mic recordings or just taming an overly sharp take, this section helps smooth everything out fast.
- Tonal Controls & Effects
From Full Warmth to Wide Doubles and Ensemble, this is where the real creative fun begins. I often push the Big Lows and Add Air to give vocals that pro-grade polish.
The Reverb and Delay are dynamic, meaning they only kick in when there’s space, it’s subtle but super smart.
Honestly, there’s not much to complain about, as this is a free and simple unit. Though keep in mind it’s only for FL Studio users, and you’ll need the Producer Edition or higher to access all features.
But if you’re already in that ecosystem, this is a no-brainer. It takes care of the whole vocal chain, letting you focus on the vibe instead of technical setup.
Flooic Pro Vocals comes in VST3 format for macOS and Windows users (FL Studio only).
Last Words
Alright, let’s wrap this up! Whether you’re going for silky smooth R&B vocals, gritty hip-hop bars, or wide cinematic choruses, having the right vocal plugin can make or break your mix.
I’ve tried everything from vintage emulations to futuristic vocal processors, and trust me, once you find the right tool, your workflow and sound level up instantly.
Don’t be afraid to experiment. Stack your favorites, push some knobs too far, and see what magic happens. Each plugin we’ve covered brings something unique to the table, whether it’s buttery compression, crisp top-end sheen, or that rich analog mojo we all chase.
At the end of the day, the best vocal plugin is the one that fits your voice, your vibe, and your DAW. So dive in, try a few demos, and let your ears be the judge!
