
Battery 4 provides a sleek interface, a genre-spanning library, and in-depth sound design tools, making it well-suited for producers who need flexibility in creating custom kits and manipulating samples. While the library may require additional hunting, its editing features stand out.
Price
Pros
- Clean, modern interface with color-coded pads for intuitive workflow
- Extensive preloaded library covering multiple genres, including electronic, hip-hop, and cinematic
- Flexible sound design options with envelopes, filters, and modulation tools
- Advanced sample editing features like waveform control and velocity sensitivity
- Ability to layer and customize samples easily for unique textures
Cons
- Sample library requires additional hunting for highly specific styles
- Steeper learning curve for beginners unfamiliar with advanced editing tools
- Limited pre-made acoustic kits compared to competitors like Addictive Drums
Designed to handle everything from basic beat-making to deep, experimental sound design, Battery 4 plugin is a powerful drum sampler.
As a versatile plugin, this VST can handle many genres, from electronic music to hip-hop, pop, and even cinematic production. But the main question is, what is it that Battery plugin offers that you couldn’t get from other drum samplers or DAW stock plugins?
In my experience, the answer is the flexibility, extensive detailing when it comes to sound design, kits workflow, and a decent library of samples and kits that Native Instruments provides.
Building drum kits, layering sounds, and tweaking samples are all easy with this plugin, which is the reason it became one of my favorite tools as a drum sampler. It comes with a clean and intuitive interface as well as a rich library that covers pretty much every genre.
I’ve found myself using it not only for traditional drum sounds but also for creating weird, textural elements that give my tracks more depth. However, that was my experience, but is it worth it for you? I will help you explore that in this article. So, let’s dive right in!
Note: I appologize for the images quality, there was some rendering issue causing them to look low quality.
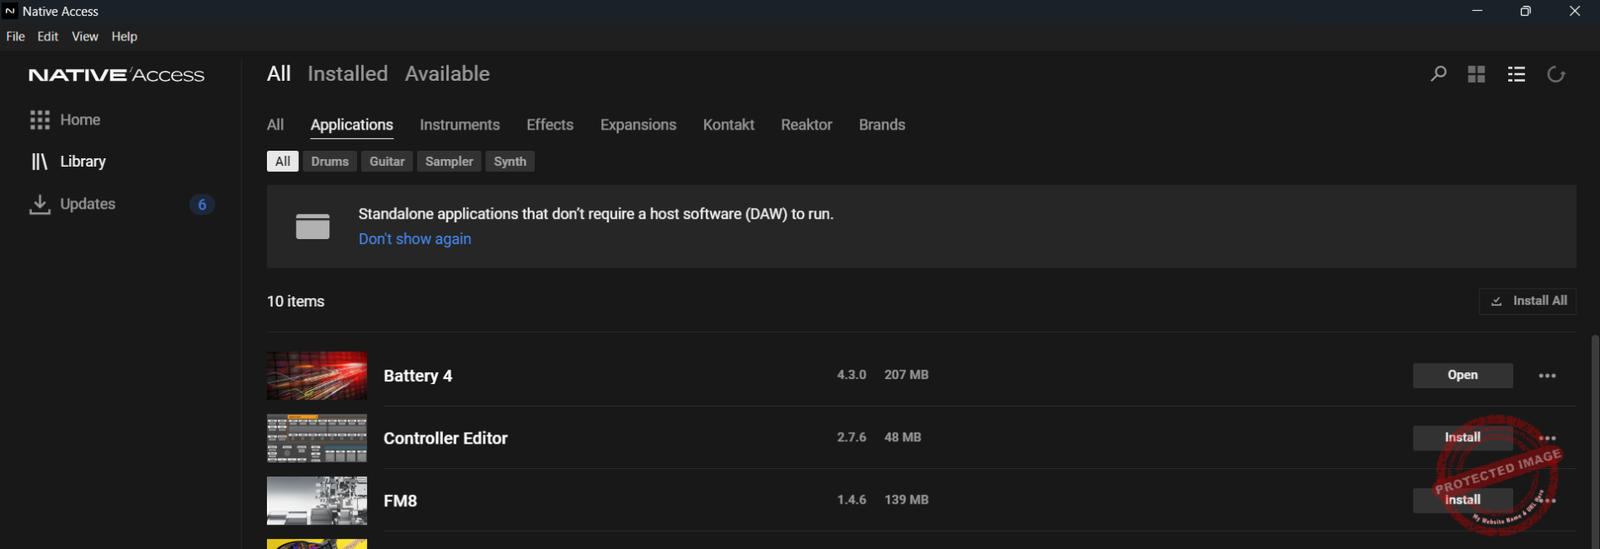
Installation
If you’re familiar with the Native Instruments universe, you must know that to install any of its plugins, you need Native Access, where all your purchased or subscribed plugins will show. Just go to the Applications tab, and there you’ll find Battery 4, which you can install by simply clicking on the ‘Install’ button.
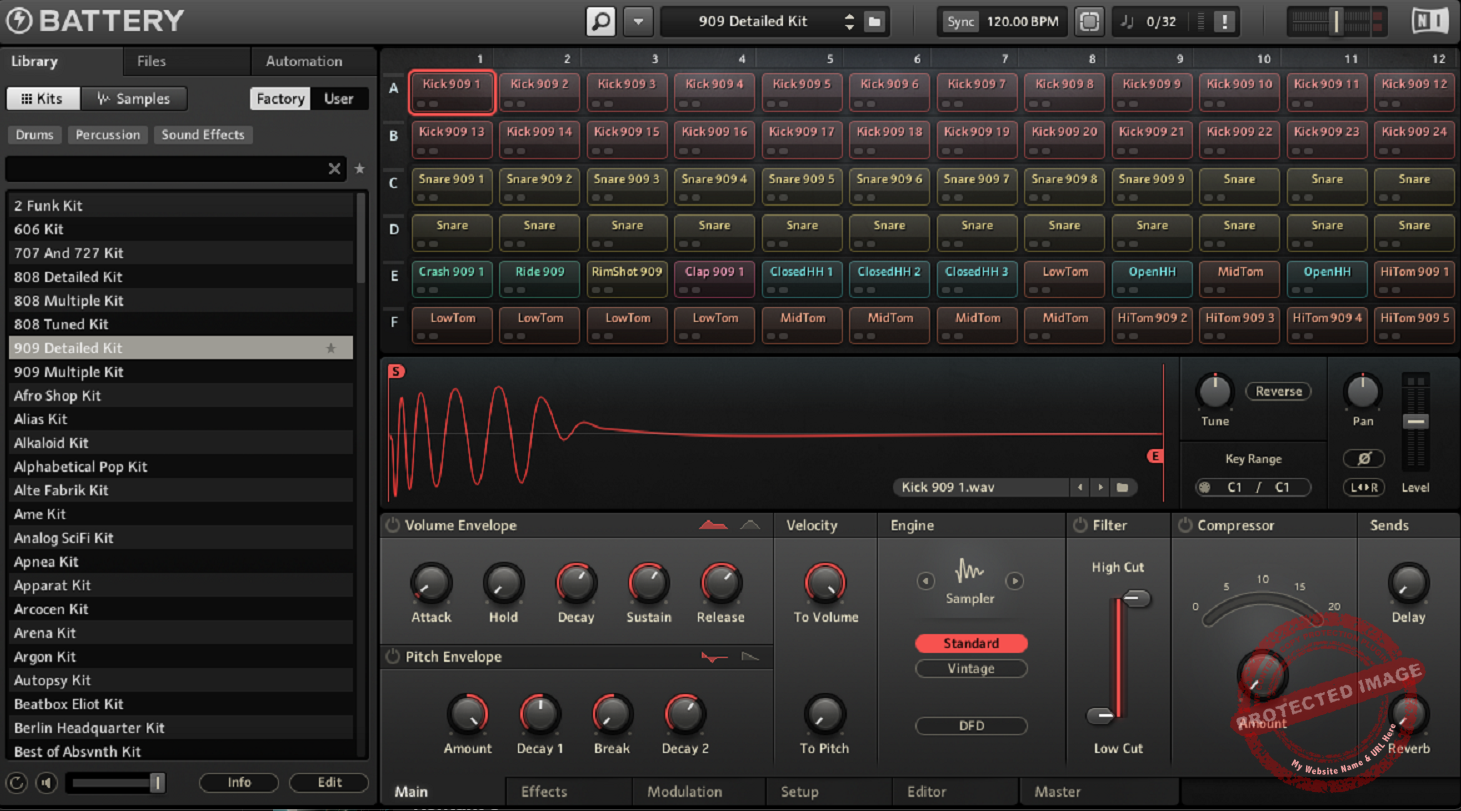
Interface & Workflow
Primarily, the interface of this sampler is divided into 2 windows. One window is from where you select samples, kits, and sounds. The other is where you can edit different aspects of these sounds.
Library, Files, and Automation
The first section, where you can do the sound selection, has 3 tabs: Library, Files, and Automation. Under Libraries, you have Kits and Samples. The Library tab is where I spend most of my time when I’m starting a new project.
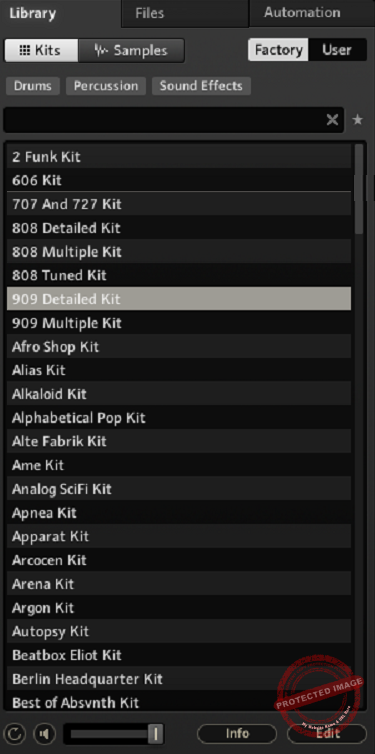
It’s packed with pre-made kits and samples, and everything is neatly organized into categories like “Drums,” “Percussions,” and “Sound Effects.” I’ll admit when I’m in a rush, I’ll often grab one of the kits straight from here, and most of the time, it works perfectly with just a bit of tweaking.
The variety is impressive; whether I’m working on a gritty trap beat or something more melodic and cinematic, I can always find a starting point here.
Then there’s the Files tab, which is basically where you can load your samples. This is a huge deal for me because I’ve got a massive library of drum hits and one-shots I’ve collected over the years. You can set the location to your external SSD or hard disk or wherever you access your samples.
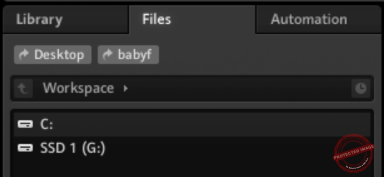
It’s especially handy when I want to mix my own sounds with Battery’s stock kits. For example, I might take a snare from my library and layer it with one of their more processed snares to get something unique.
The Automation tab is more of a hidden gem. This is where you can map your MIDI controller to different parameters, like pitch, filters, or effects. I don’t always dive into this, but when I’m doing something more hands-on – like performing or adding live tweaks – it’s quite helpful.
Mapping knobs to control parameters takes seconds, and it’s very intuitive to automate a filter sweep over a snare roll or mess with pitch live.
Sample Sound Design & Manipulation
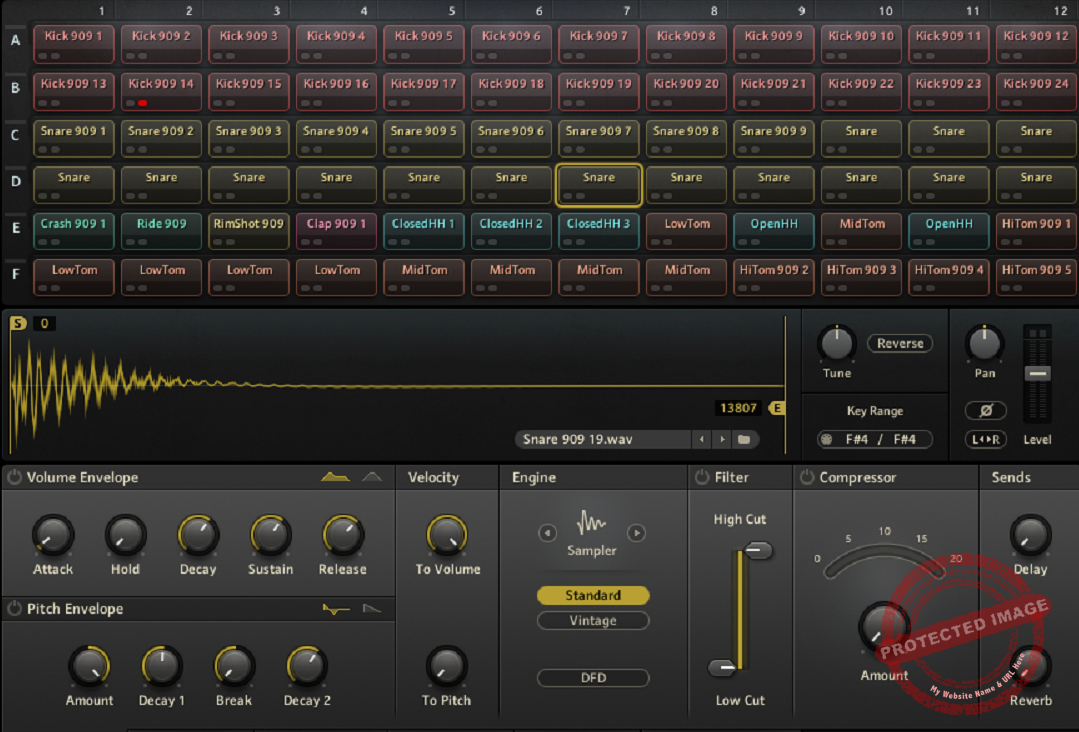
Now, the second section is where all the sound-shaping happens. Each sound you load into a cell has its own set of controls, so you can tweak it exactly how you want. The layout here is clean and graphical.
You can select a particular sound that’s loaded in that cell or the kit and can edit it from the core, from the envelope to key range changes, phase flipping, adding filter, compressor, and so on.
For example, let’s say I’m working on a kick. I’ll start by adjusting the envelope to make it tighter and punchier, then maybe roll off some high-end with the EQ to keep it clean in the mix. The filters are fantastic too – I’ve used them to take a pretty ordinary hi-hat and turn it into something that sounds almost like a percussive synth.
For instance, let’s talk about the Volume and Pitch Envelopes. This is one of the first things I mess with when I load up a sample. You can choose between two modes: AHDSR (Attack, Hold, Decay, Sustain, Release) or AHD (Attack, Hold, Decay). AHDSR is great for more sustained sounds, like crashes or cymbals, while AHD is ideal for punchy, one-shot samples like kicks or snares.
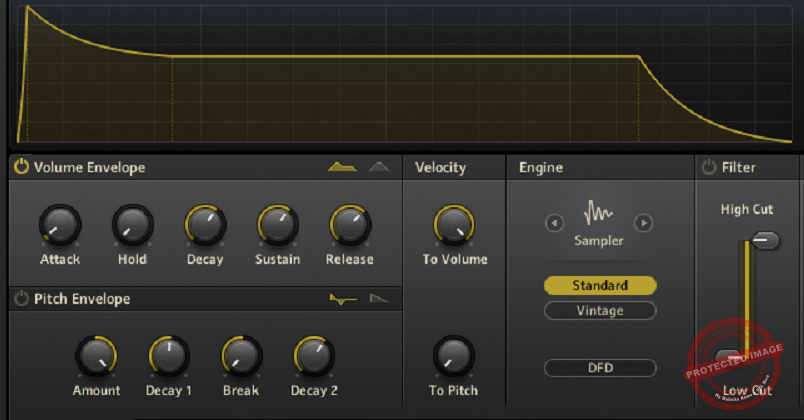
Adjusting the Attack and Decay is usually where I start – bringing up the Attack softens a sample while tweaking the Decay makes it tighter and more focused. If I want to add some snap to a snare, I’ll play with the Hold parameter, which keeps the sound at the maximum level just long enough to create a little punch.
Regarding the Pitch Envelope, I may sometimes use a quick pitch drop to give a kick more impact or experiment with upward sweeps on percussion to create tension. The two modes here – standard and easy – let you go as deep or as simple as you want.
If I’m in a rush, I stick to easy mode, where you just set the amount and decay time, but if I’m experimenting, the standard mode gives me full control over how the pitch bends.
Next, we will take a look at Waveform Control, which allows you to see the actual waveform of your sample to make precise edits like adjusting the start and end points, reversing the sample, or applying envelopes visually.
For example, for hi-hats that feel too long, you can just drag the end marker in to make it shorter and tighter. I also like that the unit offers the ability to zoom in on the waveform and fine-tune it as you like.

The Quick Access Controls are also worth mentioning. You can also reverse the sample with the ‘Reverse’ button, change the pitch by the ‘tune’ knob, pan the sound, etc.
The interface has an output level slider, which comes in handy. Also, you can assign specific key ranges to each cell. This is a great function for creating a multi-layered instrument or drum kit.
Another cool feature I use all the time is Velocity Control. It lets you determine how the velocity of your MIDI input affects the volume or pitch of a sample.
For instance, if I’m programming drums and want the snare to hit harder when I play louder, I’ll dial in some velocity sensitivity to the volume.
Furthermore, if you want to create interesting effects like shifting a percussion sound subtly in tone depending on the power you hit to the pad or key, you can add velocity sensitivity to pitch.
Finally, additional features like Phase Flip or Stereo Swap are ideal for fixing phase issues or adjusting the stereo image.
Effects
This is the section where things can either get too insane or too complicated. You can add factory and user presets for each of the sounds you load on Battery. From Saturation (Classic, Drums, Tape) to LoFi effects, different styles of equalizers (Soli G-EQ, High pass, 3-band EQ, etc.), Compressor, Transient Master, etc.
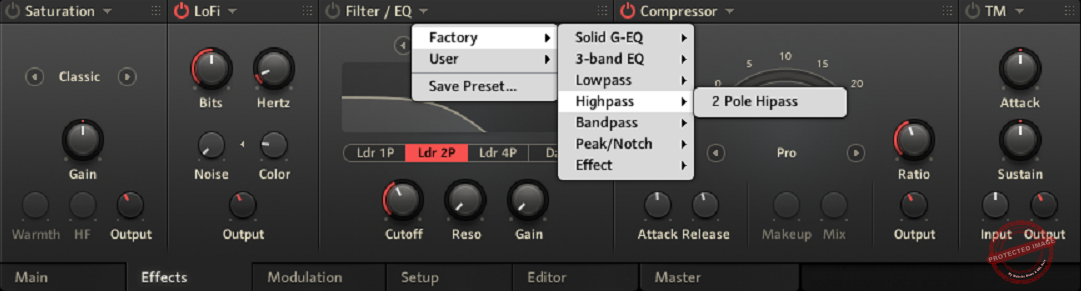
What’s really convenient is that after applying the effects, you can render the audio (with fx) and replace the older sample with the rendered one, and that will turn the effects off automatically. That can give you a lot of flexibility while ensuring there’s not much load on the CPU.
Modulation
Modulation is where your samples come to life. With BATTERY plugin, you can create subtle dynamics, like adding an LFO to slightly pan a hi-hat, or go wild by automating filter sweeps and pitch drops across an entire track. What’s really exciting is how seamlessly BATTERY integrates modulation with external MIDI controllers and DAW automation.
- Live Performance: Map modulation parameters to hardware MIDI controllers and manipulate them in real-time.
- DAW Automation: Record your performance or directly automate modulation in your DAW, blending improvisation with precise edits.
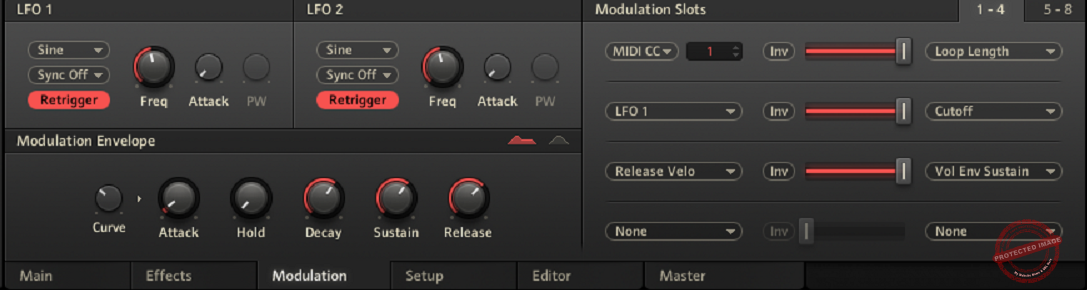
There are two LFO modules, which serve to create rhythmic or evolving effects. It has sine, saw, pulse, or random waveforms, depending on the vibe you’re going for.
Personally, I love syncing the LFO to my DAW’s tempo, as it’s amazing for things like wobbles or subtle pitch shifts that stay locked to the beat. The retrigger feature is useful, too, because it resets the LFO cycle with every note, so you have complete control over how the modulation interacts with your track.
One cool trick I’ve been using is playing with the pulse width to reshape the waveform; it adds some nice variation to repetitive patterns.
Then you also get Modulation Envelopes, which are awesome for creating dynamic, time-based changes to a sound. BATTERY 4 gives you two modes here: AHDSR (Attack, Hold, Decay, Sustain, Release) and AHD (Attack, Hold, Decay).
What can really mark a dent in your sound design journey is the Modulation Slots. BATTERY 4 gives you up to eight of these, which means you can set up some seriously complex modulation paths. You can use anything as a source – LFOs, envelopes, MIDI input like velocity or aftertouch, or even an external controller.
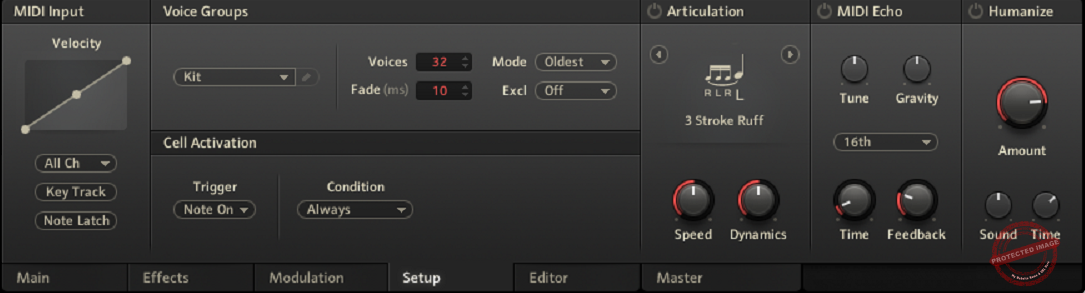
Setup
The Setup Page is used for customizations in drum programming as well as adding nuanced behaviour to cells or kits for a personalized workflow. With this page, you can add unique settings to each cell, making it great for tailoring individual sounds.
- MIDI Input: Adjust velocity curves, assign specific MIDI channels, and enable key tracking for pitch-sensitive playing.
- Voice Groups: Simulate real-world drum behavior (like open/closed hi-hats) by grouping cells with limited voices and defining their interaction.
- Cell Activation: Set conditions for triggering cells, such as cycling through cells with one key (Round Robin) or using MIDI controllers for activation.
- Articulation: Add performance effects like flams or alternate strokes to enhance realism.
Editor
The Editor Page lets you dig deep into individual samples and layers. It has a Wave Editor that lets you tweak samples and is super intuitive, so you can adjust start and end markers, crop or reverse sections, and even normalize audio with just a few clicks.
The Snap-to-Zero feature helps me often as it keeps the editing clean, preventing any pops in the waveform. The fade-in and fade-out tools are great for creating a smoother feel or adding some character.
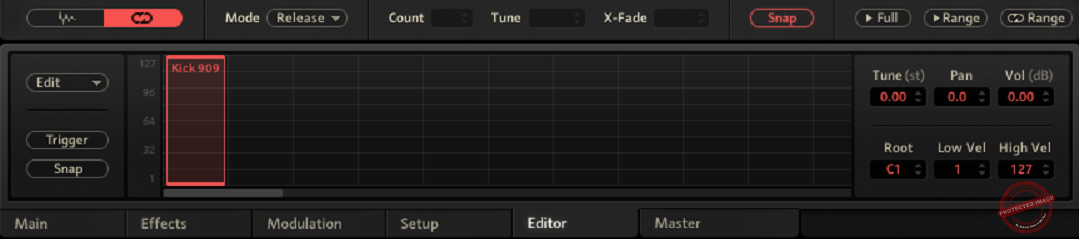
Then there’s the Loop Editor, which lets you experiment with repetition. You can set up to four loops per sample layer, and I’ve had a lot of fun playing with the X-Fade feature to make transitions between loops seamless.
The Mapping Editor is where things get really creative. It lets you control how samples respond to velocity, so you can set up layers to trigger at different intensities. I’ve used this to stack subtle layers on my kicks or make a snare hit harder when played with more force.
The visual layout of velocity zones makes it easy to see and adjust everything, and tools like Auto-Spread Layers serve great utility when you’re working with a ton of samples.
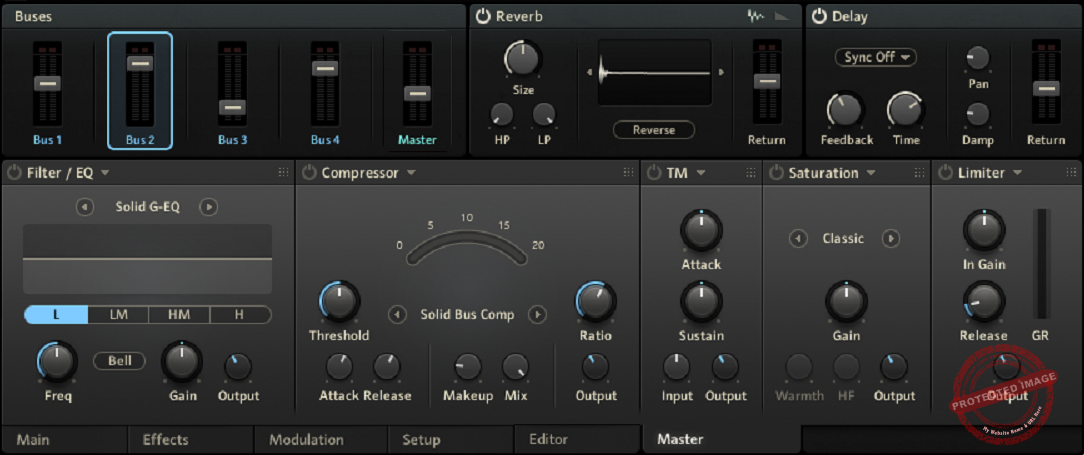
Master
The Master Page in Battery 4 is where you manage global effects, set up reverb and delay sends, and configure buses for advanced routing and mixing.
- Routing and Effects Workflow
One of the most useful features of the Master Page is how easy it is to assign cells to different buses or the Master output. You can simply drag and drop a cell (or multiple cells) onto the desired bus.
When you open the plugin, you see everything is routed to the Master by default. But, when you want to have more precise control, especially when applying effects, you can split it into groups into different buses. For instance, I always route the drums and percussion to different buses to tweak the dynamics individually.
Each bus and the master have their own effects set, which you can activate or reorder with the click-drag workflow. I like this design as it makes experimenting more intuitive and easier. Renaming the buses for clarity also helps a lot in complex, multi-track projects.
- Buses and Master Controls
The Master Page supports up to four buses, each with its own level control, peak meter, and dedicated effects. The flexibility here is great for tasks like grouping similar sounds, such as sending all your cymbals to one bus and applying a subtle reverb for cohesion.
For the Master bus, you can take things a step further, adding global effects to shape the overall sound. I often use this to add final touches like compression or saturation to glue everything together. Routing buses to specific outputs in Battery or renaming them for better organization keeps everything streamlined, especially in larger projects.
First Impressions and Sound
I was immediately drawn to Battery 4’s clean, modern interface. Its darker, more intuitive design makes finding the plugin a breeze compared to Battery 3. Color-coded pads for kicks, snares, claps, and other sounds make assembly of kits easier. The waveform display is a good idea; mirroring the pad color helps me pinpoint and adjust samples.
For sound, the preloaded kits cover electronic and hip-hop as well as cinematic sounds. Sounds are punchy and dynamic, perfect for professional production! I loaded a trap kit and was impressed that the samples fit together perfectly out of the box, with no major adjustments required during my first session. The sound quality is great, and dragging & dropping my own samples into the grid was super easy.
Most noticeable was the flexibility in sound design. I enjoyed that even basic manipulations like changing envelopes or applying filters gave the samples new life. Using a stock hit as an example, I modified the pitch envelope and added LFO modulation to give it a shimmering synth feel. Added effects such as saturation and transient shaping gave the sounds more character and depth.
In general, Battery 4 was fun to use, especially with its large library and robust sound-shaping capabilities. Be it standard drum beats or experimental textures, the plugins produce great results from the start.
Compatibility
| System | Requirements |
|---|---|
| Mac (Intel) | – macOS 11, 12, or 13 (latest update) |
| – Intel i5 or higher | |
| – 4 GB RAM | |
| Mac (Apple Silicon) | – macOS 11, 12, or 13 (latest update) |
| – Native mode or Rosetta 2 | |
| Windows | – Windows 10 or 11 (latest Service Pack) |
| – Intel Core i5 or equivalent CPU | |
| – 4 GB RAM | |
| Supported Interfaces | Windows (64-bit only): Stand-alone, VST, VST3, AAX |
| Mac (64-bit only): Stand-alone, VST, VST3, AU, AAX |
Competitive Analysis
| Feature | Battery 4 | Ableton Drum Rack | XLN Audio Addictive Drums 2 | Akai MPC Beats |
|---|---|---|---|---|
| Strengths | Extensive library, modular editing, flexible routing | Seamless integration in Ableton Live, custom macro controls | Hyper-realistic acoustic drum kits, easy mixing | Hardware-inspired workflow, beat-making focus |
| Sample Library | Over 100+ kits, genre-spanning, highly tweakable | No dedicated library, but it integrates with samples and packs | Focused on acoustic and processed kits | Small library, designed for expansion |
| Editing Features | Advanced sample layering, envelopes, modulation | Basic controls relies on effects and macros | Limited sample manipulation, focused on realism | Moderate editing tools, lacks advanced envelopes |
| Performance | MIDI mapping, responsive modulation, DAW integration | Excellent integration with Ableton Live | Minimal performance features | Pad-based workflow, ideal for live use |
| Ease of Use | Intuitive UI, quick sample access, clean layout | Streamlined for Ableton users | User-friendly but less flexible | Steeper learning curve, geared toward MPC users |
| Best For | Sample manipulation, diverse genres | Ableton Live users | Acoustic drum production | Hip-hop, electronic, and beat-focused genres |
| Pricing | Mid-range, good value for features | Included with Ableton Live | Higher price for standalone | Free, with paid expansions available |
Final Thoughts
I have a bias for Battery 4 drum sampling and sound design for its elaborate functionality, flexibility, ease of use, and the opportunity for detailing that it gives to producers, DJs, and beatmakers. I also find its interface suitable for my workflow, as I am into the grid-like cell system of arranging samples, and each sample/cell has its own editing workflow.
The library is extensive, but honestly, you can find better sounds, and you may need to do a little more hunting to find sounds more suitable for your style. However, if you’re building custom kits, manipulating samples, or layering sounds for unique textures, Battery 4 plugin can be a good choice to consider. It’s up to you to decide whether sample-based workflows and modular sound design work for you.

Shaurya discovered his passion at the intersection of writing and music. Starting his career as a songwriter and rapper, he gradually picked up FL Studio and soon delved deep into the world of audio engineering and music production. Based in Delhi, India, he has worked with top studios, been featured on Red FM, garnered millions of streams on Spotify, and released music with major labels like Sony and Hitz.