
Native Instruments is, without a doubt, one of the most important developers in music production right now. And here are some of the best Native Instrument plugins you can add to your workflow.
Whether you need an independent sampler like Kontakt, a guitar amp plugin like Guitar Rig 7, a drum machine (Battery 4), or a wavetable synthesizer (Massive X), NI has made sure you don’t have to look anywhere else.
Its Komplete 15 Collector’s Edition is the ultimate package, bundling all of its flagship plugins under a $899-$1700 price tag. I’m a huge fan of Kontakt—honestly, I don’t think I’ve finished a single scoring or sound design project without it. I can’t think of another bundle that packs this much variety, and it’s safe to say that for a lot of producers, it could be the only plugin bundle you ever need.
Since I wanted to put together this list of the best Native Instruments plugins, I deliberately tried all of them—including the ones I had previously skipped—and man, I’m so glad I did. I discovered so many hidden gems, and now I can’t wait to dive into this list with you. Let’s get started
But wait, before proceeding; all the plugins mentioned in the list are available in Stand-alone, VST3, AU, and AAX plugin formats and are compatible with macOS: 12, 13, and 14 (latest update) and Windows: 10 or 11 (latest Service Pack) operating systems.
1. Kontakt 8
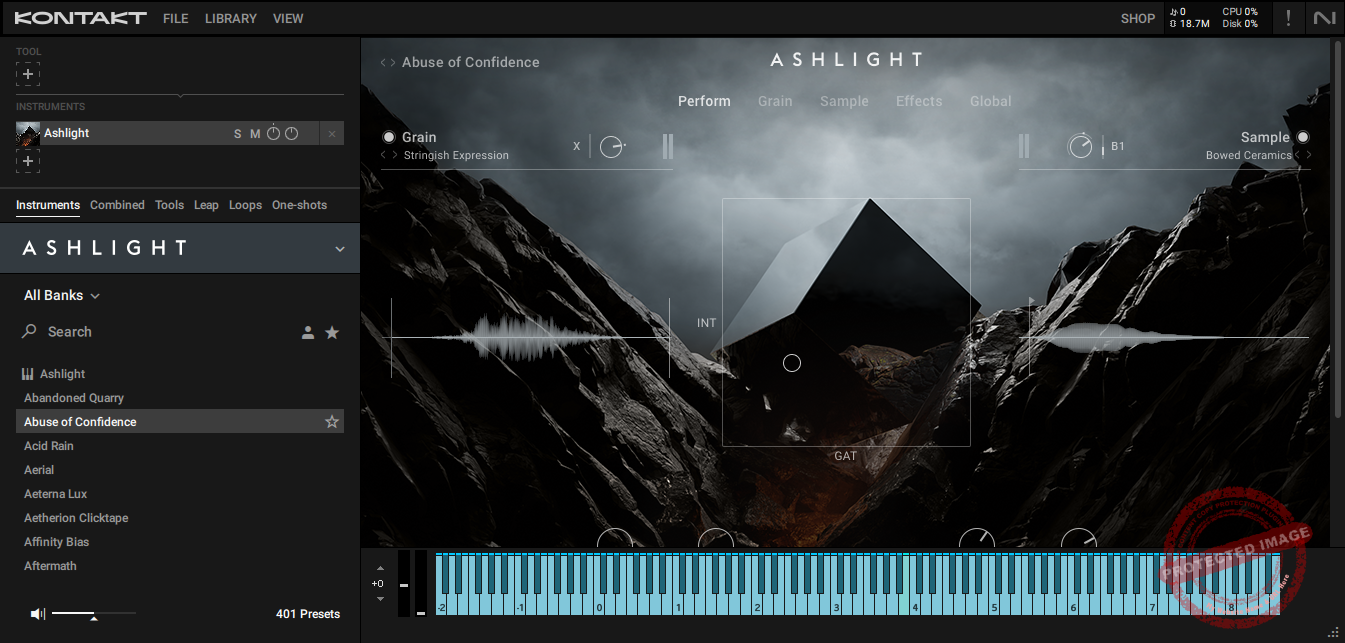
Well, I’ll be honest here and start with my favorite; I’ve been using Kontakt for years, and honestly, I can’t imagine my workflow without it.
First off, the interface is a huge improvement over older versions. If you’ve used previous editions, you know how clunky things could get with all the scrolling, searching, and CPU strain.
With Kontakt 8, everything is neatly organized into six main tabs: Instruments, Combined, Tools, Leap, Loops, and One-Shots. I love how much easier it is to find what I need without getting lost in menus.
- Instruments Tab
This is where I usually start when I’m building a project. You can filter sounds by brand, type, or character, making it super easy to find exactly what you need.
Let’s say you’re after something dark and atmospheric, just tweak the filters, and boom, you’ve got the perfect sound. The Character filter is especially useful for sound design, helping you pinpoint tonal qualities without aimlessly scrolling through libraries.
- Combined Tab
I didn’t even realize I needed this tab until I tried it. It lets you layer multiple instruments into one preset, making it effortless to create massive, lush sounds.
If you work on cinematic scores or ambient music, this feature is a total game-changer, you get rich, layered textures without spending hours tweaking individual tracks.
- Tools (Chords & Phrases)
The Tools tab introduces Chords and Phrases, two of the coolest new features in Kontakt 8.
The Chords tool includes over 100 pre-made chord sets, and you can lock them to a scale, so even if music theory isn’t your strong suit, you can still create amazing progressions.
The Phrases tool is packed with editable melodic phrases, making it easy to tweak, randomize, or adjust them to fit your track.
- Leap Tab
The Leap tab organizes curated expansions into playable kits, each mapped with 16 sounds on the white keys while the black keys trigger performance effects.
It’s a super fun way to experiment and get ideas down quickly. I’ve found it incredibly useful for layering loops and samples without overcomplicating things.
- Loops and One-Shots Tabs
These tabs make it easy to browse quick sound effects, transitions, ambiance loops, and risers. Whether you need subtle textures or cinematic hits, everything is right there, ready to go.
The eighth installment of Kontakt feels like a natural evolution, it’s lighter on the CPU, smoother, and better organized than ever.
I run my libraries from an external SSD, and thanks to Native Access, the whole setup works seamlessly. The installation process is quick and painless, which is always a relief.
2. Form
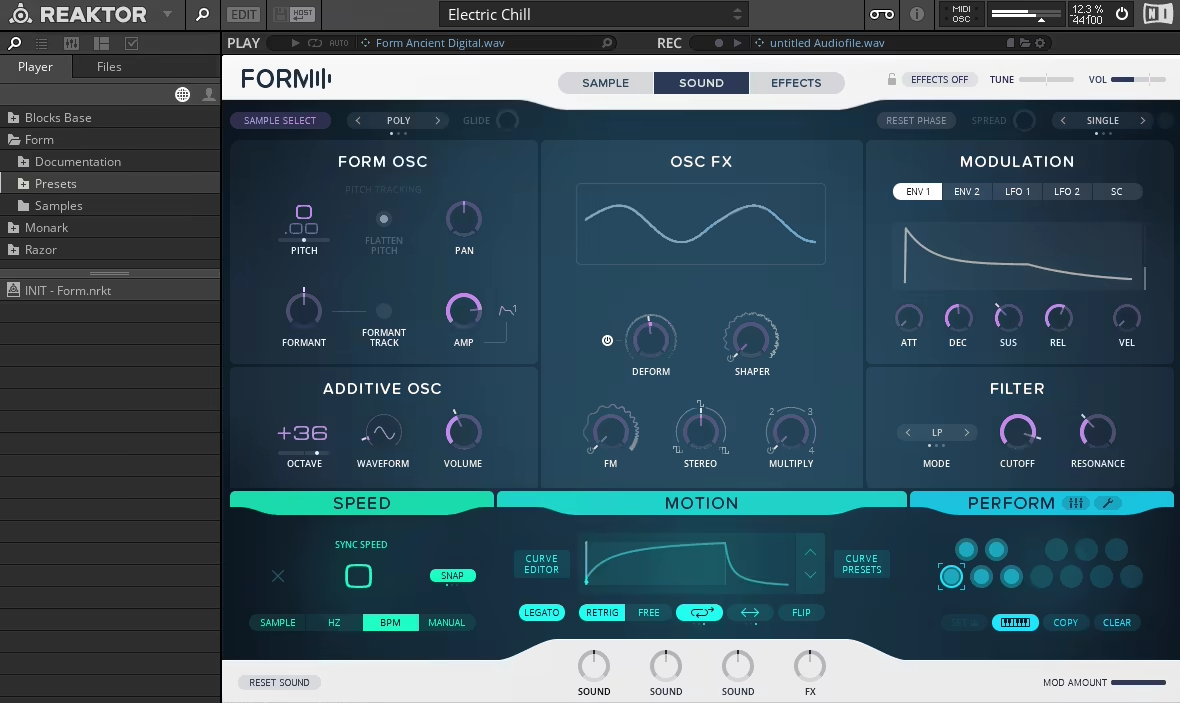
Form is one of Native Instruments’ most exciting synthesizers, and it has significantly changed how I think about sound design.
What makes Form so unique is its hybrid sample-based granular synthesis approach. That might sound a bit intimidating, but trust me, it’s incredibly intuitive once you dive in.
The idea is simple: you load any audio file into Form, and that file becomes your oscillator. From there, you can manipulate the sound using LFOs, envelopes, oscillator effects, and motion triggers to shape it however you like.
- Unique Sampler x Synth Workflow
You can throw in any sample, a vocal snippet, a modular synth loop, or even something random like jingling keys.
Form takes that audio and turns it into your sound source. You can truncate the sample, adjust pitch, and control playback, plus tweak playback speed, loop sections, and curve presets to create movement and character.
One thing I love is the additive oscillator, which layers extra harmonics to make everything fuller and more dynamic. With the OSC FX section, you can warp waveforms, experiment with frequency modulation, and go deep into creative sound shaping.
- Motion Editor
One of my favorite features is the Motion Editor, which adds sweeping movement and rhythmic patterns to sounds, making them feel more organic.
You can customize every detail or just grab a preset if you’re in a hurry. I’ve found this incredibly useful for keeping sounds evolving without overcomplicating things.
- Advanced Effects Processing
The frequency shaper splits the audio into two bands, letting you independently control dynamics and processing. You also get saturation, delay, and reverb, all of which can be modulated for complex, evolving textures.
- Performance
The Performance slots let you save and recall different snapshots of your sound, which is perfect for quick sound variations. The Multi-Mode lets you layer these snapshots across multiple voices, creating shifting, dynamic textures that feel alive.
One of the things I love about Form is its versatility. I’ve used it for leads, basslines, pads, transitions, and even vocal manipulation. Just dropping a chopped vocal phrase into it can create something totally unrecognizable but still musically interesting.
3. Reaktor 6

If you’ve ever been curious about modular synths but felt intimidated by all the cables, racks, and technical jargon, Reaktor 6 is the perfect way to dive in and one of the best native instruments plugins out there. It lets you explore the modular world without spending a fortune or getting lost in complex setups.
Imagine having a virtual Eurorack setup on your computer, but instead of dropping thousands on hardware, you get it all in one slick package. And trust me, it’s not just for modular purists, it’s for anyone who loves experimenting with sound.
What makes Reaktor 6 so exciting is how it combines pre-built instruments and effects with the option to design your own from scratch. It’s like having a full studio of synths, drum machines, sequencers, and effects, all wired together however you want.
- Blocks Collection
Blocks is a collection of over 40 virtual modules, including oscillators, filters, mixers, and sequencers. You just drag them into your workspace, patch them together, and suddenly, you’re building your own synth.
Of course, it’s easier said than done, but the flexibility, detail, and control make it worth it. This kind of modular workflow is something you can only experience in a setup like this.
- Pre-Built Ensembles
Reaktor 6 comes loaded with pre-built, customizable ensembles that are ready to go. Some favorites include Monark for thick, analog-style basses and Prism for shimmering, atmospheric tones.
I also love Rounds, which is amazing for lush, evolving layers, and The Finger, which adds wild performance effects for creative sound mangling.
- Building Custom Sounds
Creating your own instruments or effects is way less intimidating than it sounds thanks to the well-arranged interface. The Structure View makes it easy to drag modules, connect inputs and outputs, and tweak everything freely.
When I first tried this, I started small with a couple of oscillators and filters. Within minutes, I had something playable, and it felt like magic.
The deeper you go, the crazier things can get. You can add modulators, step sequencers, and multi-layered instruments that go beyond what off-the-shelf synths can do.
Reaktor 6 also comes with a solid toolkit of effects like reverb, delay, and distortion to shape and refine your sounds.
- The Free Reaktor Community
One thing I didn’t fully appreciate at first was the user library. This community has been around for over 15 years, and they’ve created hundreds of custom ensembles and Blocks.
Their shared experience and resources are a goldmine. If you’re new to virtual modular synthesis, this community can help you get started faster than you think.
4. Guitar Rig 7 Pro
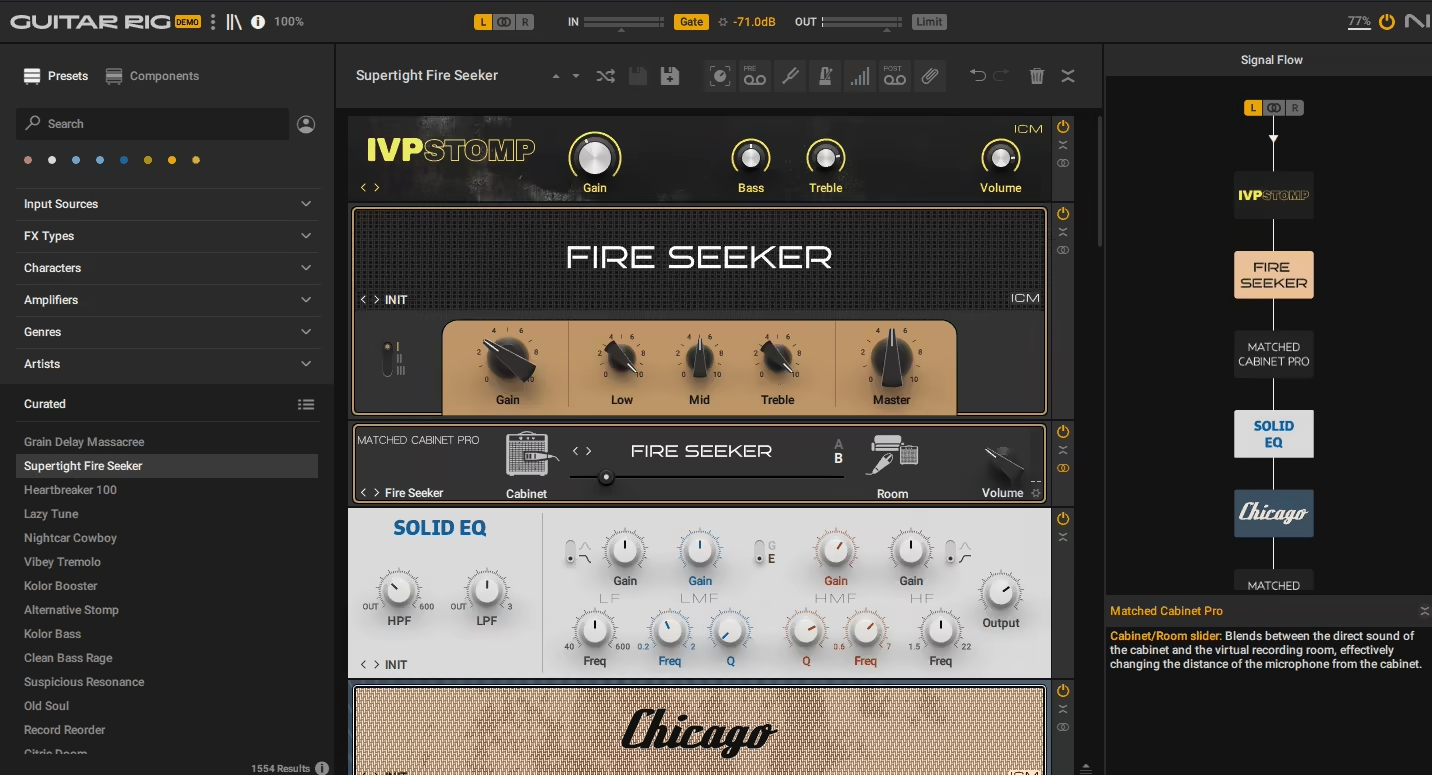
Guitar Rig Pro 7 is a collection of bass and guitar amp simulations, pedals, and effects that bring serious versatility to your DAW. Right away, the new amps and pedals in this update caught my attention.
As a guitarist, I’m always excited with Guitar Rig updates and this version features 4 new amps powered by ICM (Intelligent Circuit Modeling), making them sound more realistic and responsive than ever. Pair these with the updated cabinet impulse responses (IRs), and you’ve got a tone that feels like a real mic’d-up amp inside your DAW.
The pedals are just as exciting, in my experience, offering grungy textures, heavy metal tones, and warm analog-style distortion. I’ve already tried a few, and they nail that authentic feel in ways that older versions didn’t quite capture.
- Pedal Section
The pedal section of Guitar Rig 7 Pro includes some amazing new additions, like Seattle Fuzz, which delivers a gritty grunge sound, and Chainsaw, perfect for Swedish-style death metal tones.
There’s also Tape Wobble and Noise Machine, which I used for lofi textures, they added just the right amount of vintage warmth and imperfection.
- Impressive Interface
The updated interface is clean, intuitive, and musician-friendly. The new sidebar for customizing signal flow is another standout feature.
You can drag and drop effects, rearrange them in seconds, and even color-code everything for easy navigation. If you’ve used previous versions, this improvement alone will feel like a huge upgrade.
I also love the built-in metronome with tap tempo and time signature options, making it great for practice and recording ideas. The interface is fully resizable, so it fits perfectly whether I’m on my laptop or studio monitor.
- Comprehensive Presets
The preset library now includes over 1,500 options, and I found myself losing track of time scrolling through them.
One of my favorites is Analog Answers, which uses an analog sequencer to create a flute-like overlay on your notes.
If you’re into heavy tones, presets like Tight & Chunky add thick, aggressive energy. For lofi lovers, Lofi Delight perfectly captures that nostalgic, tape-saturated vibe.
- Workflow That Just “Works”
Rearranging effects in earlier versions could feel clunky, but that’s no longer an issue. The drag-and-drop workflow is now smooth, and the sidebar keeps everything organized.
The Loop Machine Pro has become one of my go-to tools for layering riffs and brainstorming ideas. The Ozone Maximizer is another nice addition, a built-in limiter that keeps levels in check without the need for extra plugins.
5. Massive X

Native Instruments VST Massive X is a beast of a sound design plugin, packing a dual wavetable oscillator workflow that lets you build anything from simple, clean shapes to wild, experimental textures.
It’s the kind of synth that makes you feel like a mad scientist if mad scientists cared about basslines and evolving pads instead of world domination. Along with two wavetable oscillators, you get two noise oscillators to add extra grit, texture, or randomness.
The wavetable sound sources let you tweak pulse modulation, formants, and filters to shape the sound exactly how you want. I love how Massive X gives you complete freedom over every detail, without making your brain melt (well, not immediately).
- Routing Tab
The routing system uses a node-based layout, meaning you can connect any input to any output in just a couple of clicks.
Want a raw, unfiltered oscillator straight to the output or prefer sending a noise source through a filter and into reverb for more texture? Done. The visual layout is one of my favorite parts because you can see your entire signal flow at a glance. No more guessing where your sound is going, it’s all right there, ready to be twisted and warped.
- Drag-and-Drop Modulations
Assigning LFOs, envelopes, and modulators is as simple as dragging and dropping. There’s even a Saturn ring indicator around each control to show how much modulation is happening in real time.
This makes tweaking movement and expression feel natural instead of frustrating. I honestly wish more synths made modulation this easy.
- Modulation Galore
The Performers section lets you draw eight-bar modulations and assign them to parameters for evolving, dynamic patches. You can even trigger modulation snapshots from your MIDI controller, which is perfect for adding movement during a live performance.
You also get 9 LFO/envelope slots, key trackers, and a voice randomizer. I’ve used this for analog-style drift, but it’s also amazing for creating chaotic, evolving textures that feel completely unique.
- Polish with Effects
The effects section includes reverb, delay, distortion, a speaker simulator, and a frequency shifter for shaping your final sound. You can place these anywhere in the signal chain, so you’re not locked into a fixed order like in some other synths.
6. FM8

At first, I was a bit skeptical about diving into FM synthesis because, well, to be honest, it has a reputation for being a headache-inducing labyrinth of ratios and operators. But FM8 somehow makes the whole process not just approachable but actually fun.
Native Instruments plugin FM8 delivers that signature digital brilliance, covering everything from glassy bells to evolving pads. The library is stacked with over 1,200 presets, giving you a solid starting point for any track.
- Easy Edit Page
One of my favorite features has to be the Easy Edit Page, as instead of overwhelming you with every parameter at once, this page gives you a handful of key controls that automatically adjust deeper settings in the background. It’s perfect for quickly shaping a sound without getting buried in menus.
The first time I used this, I needed a digital piano sound that was both warm and punchy. A few tweaks, and boom, exactly what I wanted with zero menu-diving.
- Morph Square
This feature alone is worth the price of admission. You can blend up to four sounds in real time, almost like painting with sound.
I tried it with a soft pad and a shimmering bell, and suddenly, I had this haunting, cinematic texture that became the heart of my track. Even better, you can automate the morphing or assign it to a MIDI controller for hands-on performance control.
- Arpeggiator and Step Sequencer
The built-in arpeggiator also doubles as a step sequencer, letting you create intricate rhythmic patterns and melodic sequences.
I’ve been using it for funky basslines and glitchy percussive loops, and honestly, it’s become a staple in my workflow. It adds instant movement and energy without needing extra plugins.
- Deep Customization for Sound Design Nerds
If you love tweaking every tiny detail, the Expert Page is where the magic happens. You can adjust individual operators, shape envelopes with precision, and use the modulation matrix to build incredibly complex patches.
It felt intimidating at first, but once I got the hang of it, I realized how powerful FM8 really is. I made a shimmery lead sound by stacking operators, tweaking envelopes, and adding subtle modulation, and it turned out better than I expected.
- Effects Rack
FM8 includes 12 high-quality effects, ranging from essentials like reverb and delay to more experimental options like Talk Wah and Psycho Delay.
These aren’t just throwaway add-ons, they actually shape the final sound. I’ve even used the cabinet modeling effect to make digital patches sound warmer and more analog, and it worked like a charm.
7. Razor
Razor runs on additive synthesis, meaning it’s built around individual sine waves called partials. It can handle up to 320 partials at once, shaping everything from filters to delays.
For me, this precision is what makes NI Razor special cause even when I crank up modulation or stack effects, the sound stays tight and defined. That’s perfect for tracks that need an extra edge without turning into a muddy mess.
The plugin features two oscillators, two filters, spectral clipping, stereo spread, and limiter effects. If you’re into ’80s, Daft Punk-style tracks, or house music, this one’s a must-have.
- Vocoder
The 34-band vocoder is one of the best I’ve used. I’ve added a robotic sheen to vocals and even crafted otherworldly textures that blend beautifully into a mix.
- Filters, Formants, and All the Fun Stuff
The filter section isn’t just your standard low-pass and high-pass setup, it gets way more creative. I’ve had a blast experimenting with the formant filter, which gives sounds a vocal-like character, and the dissonance controls, which go from subtle warmth to total chaos.
One of my favorite tricks is using echo steps for evolving, rhythmic delays. This effect adds movement and complexity to even the simplest pads or leads.
- An Interface That Makes Sense
Despite all its power, Razor never feels overwhelming. Its layout borrows from traditional synths, so if you’re used to oscillators and filters, it feels instantly familiar.
What’s different, though, are parameters like Waterbed, which unlock entirely new sound design possibilities. It’s the perfect balance of familiar and innovative.
The 3D graphical display is another huge win. Seeing partials in motion as you tweak settings makes dialing in sounds way easier.
- Macros and Performance Control
I also love using Razor for live performances. Each preset includes eight macro controls mapped to key settings like filters, modulation, and effects.
If you’re using Maschine, these macros sync perfectly with the hardware knobs. It makes tweaking sounds on the fly effortless, which is exactly what you want in a performance setup.
8. Battery 4
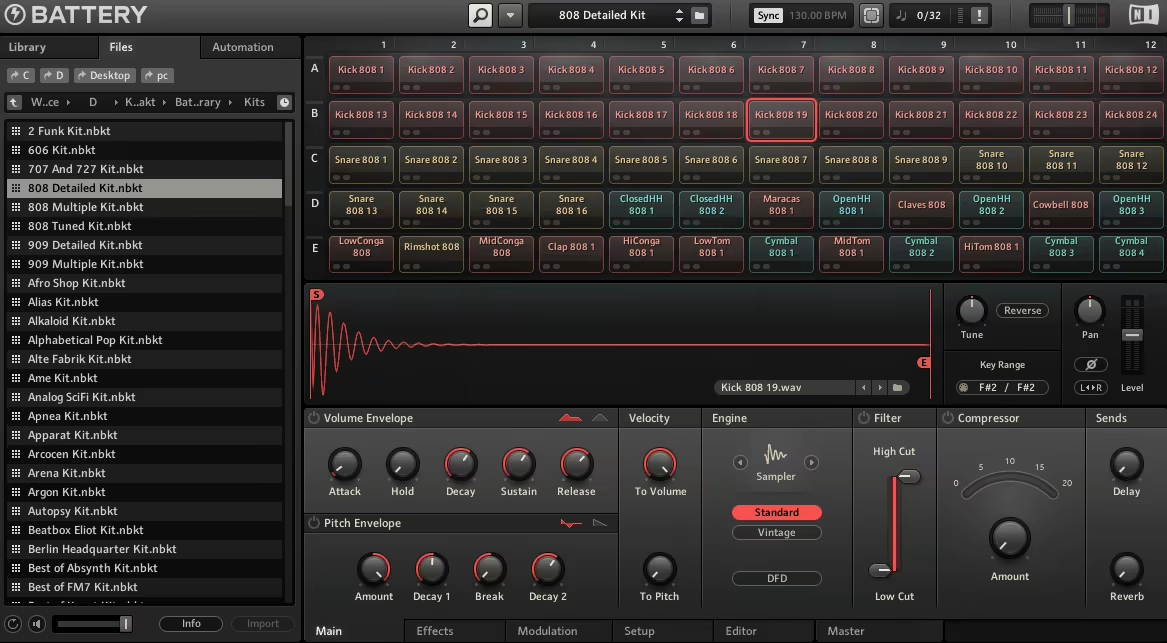
Let me tell you, Battery 4 has completely reshaped how I approach drum sampling and beat production.
What I love most about Battery 4 is its no-nonsense workflow and the grid-based interface, which is clean, colorful, and easy to navigate. Each cell represents a sound, and with a quick drag-and-drop, you can load your own samples, tweak them, and get straight to work.
Moreover, the color-coding system also lets me organize sounds visually, which I love cause it lets me easily find the ideal kick or hi-hat mid-session.
- Included Samples
The included library is seriously impressive. Battery 4 leans heavily into electronic and urban music styles, so whether you’re looking for deep 808s, crisp snares, or experimental textures, it’s all here. And the best part? Everything is appropriately tagged and organized, so you can filter by category, vibe, or sound type, by which you can save hours scrolling through samples.
Of course, loading your own sounds is just as easy. I often drag my custom samples onto the grid, mix them with factory kits, and create something entirely new.
- Unmatched Sound Control
Every sound you load into a cell is completely editable, as the waveform editor is intuitive and packed with tools for shaping, stretching, and editing samples to fit your exact needs. The Time Machine Pro algorithm also deserves a special shoutout. It handles time-stretching with precision, keeping your sounds clean and high-quality even with extreme adjustments.
- Modular Magic
Native Instruments plugin Battery 4 lets you assign sounds to different outputs, group cells for collective processing, and even apply effects to the master channel. You can also drag-and-drop MIDI mapping, which is another standout feature. Assigning samples to pads or keys takes seconds, so you can focus on creating them instead of setting them up.
I also love how you can layer samples within a single cell. For instance, I usually stack three kicks: a low sub, a punchy mid, and a clicky top using this Battery workflow.

Shaurya discovered his passion at the intersection of writing and music. Starting his career as a songwriter and rapper, he gradually picked up FL Studio and soon delved deep into the world of audio engineering and music production. Based in Delhi, India, he has worked with top studios, been featured on Red FM, garnered millions of streams on Spotify, and released music with major labels like Sony and Hitz.