
Today, we’re shining the spotlight on two of Waves’ shining stars for noise reduction: Clarity Vx PRO and Clarity Vx.
If you’ve ever sat there with a noisy vocal recording, such as traffic humming outside, the air conditioner blasting, or that mysterious hiss you can never quite place, these plugins might just be your new best friends.
Waves Clarity Vx is already known for its user-friendly design, but the Clarity Vx Pro version cranks things up a notch with more advanced features. It’s like trading in your trusty old sedan for a brand-new sports car; both get you from A to B, but one’s got a whole lot of extra horsepower under the hood.
We’re gonna dig into the pros and cons of both versions so you can see which tool fits you better. Maybe you need something simple that can clean up a podcast with a couple of clicks. Or maybe you’re after pinpoint control for complex vocal chains in your next hit track.
Either way, we’ll walk through what each plugin does best, where they stumble a bit, and who each one’s really for. Whether you’re a production newbie or a seasoned audio nerd, you’ll walk away with a solid idea of which version might rock your world (and which might just be overkill). Let’s dive in!
| Feature | Clarity Vx | Clarity Vx Pro |
| Real-Time Noise Reduction | Operates in real time with minimal setup | Also real-time, with deeper functionality for more detailed control |
| Core Controls | Single central knob for quick, easy noise reduction | Central knob plus extensive “Advanced” parameters (multiband, gate, reflections, etc.) |
| Neural Networks | – Same Waves Neural Networks as Pro, 2 AI profiles | – Same 2 AI profiles
– “Reset Network” feature for clip-by-clip re-training |
| Multiband Functionality | Not available | Fully adjustable multiband controls for frequency-specific fine-tuning |
| Ambience Gate | Not available | Adjustable gating for background noise between voice segments |
| Reflections Control | Not available | Controls release time to preserve natural reflections in recordings |
| Negative Range | Not supported | Central knob can go negative, adding noise or muting voice for creative or extreme cleanup |
| Mono/Stereo Support | Mono & stereo modes
Width control |
Mono & stereo modes
‘Single’ vs. ‘Double’ channel analysis modes |
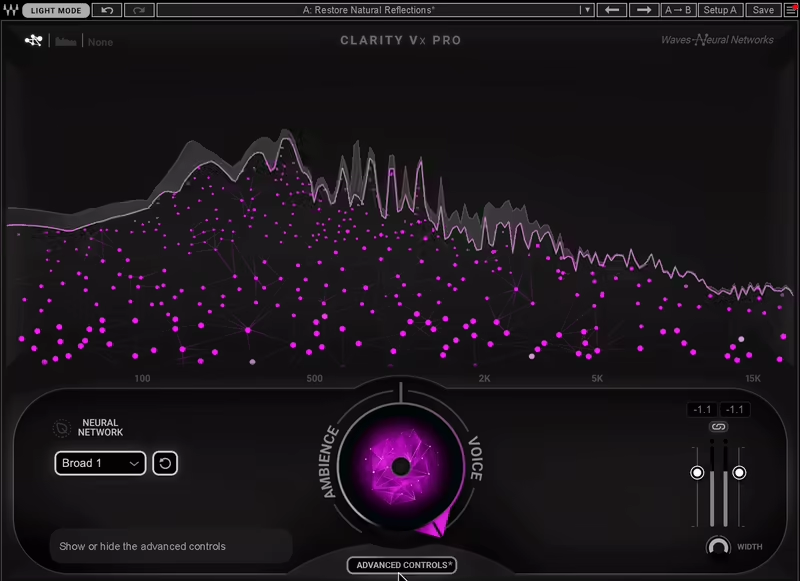
| UI & Skins | Bright, minimal OneKnob-style interface | Light & Dark Mode skins
Extended parameter sections |
| System Resources | Requires moderate CPU | More CPU-intensive with advanced features & multiple instances |
| Workflow | Straightforward: place on track, dial knob, commit/bounce if needed | Advanced: automate multiband/gate, reset network for different clips, then commit/bounce |
| Ideal Use Cases | – Quick, easy cleanup for podcasts/interviews
– Standard vocal tracks needing real-time noise reduction |
– Detailed post-production & tricky dialogue
– Complex vocal editing & mixing with full fine-tuning |
Features
Clarity Vx
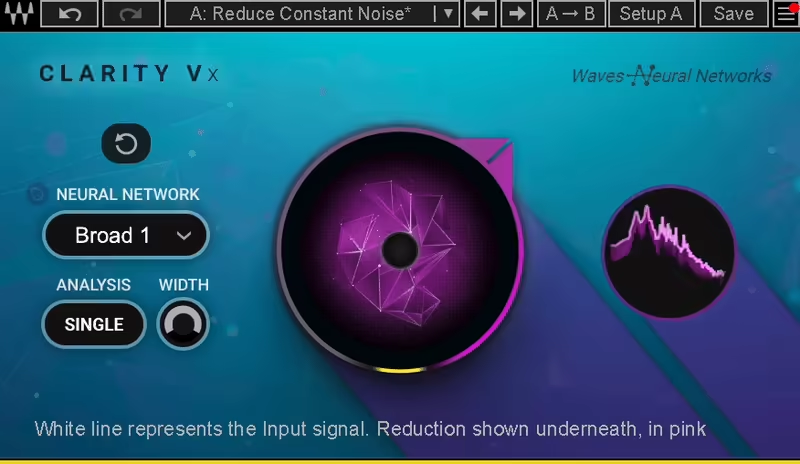
- Real-Time Noise Reduction
When I first used Clarity Vx, I couldn’t believe how simple it was. Just one central knob, turn it up, and the noise disappears like magic. For me, it’s the perfect “set-it-and-forget-it” tool.
You pick one of the Waves Neural Network profiles (there are 2 to choose from), and you’re good to go. I love how easy it is on the CPU, which means I can slap it on multiple tracks without worrying about my computer throwing a tantrum.
- One-Knob Operation
I’m a big fan of Waves’ “OneKnob” approach, and Clarity Vx is no exception. The whole interface revolves around that central knob. Need to clean up vocals? Just crank it up. Want to leave a bit more of the original sound? Dial it back.
I appreciate how quick and fuss-free it is, especially when I’m on a tight deadline or just don’t feel like getting into complex settings.
- Neural Networks
What I love about Clarity Vx is that it uses the same AI engine as the Pro version. When I first learned this, I was like, “Wait, so I’m getting the same sound quality without all the extra tweaking?” Yup!
For me, this makes it perfect for straightforward projects like podcasts or voiceovers, where I just want to clean things up without spending hours fine-tuning.
Clarity Vx Pro
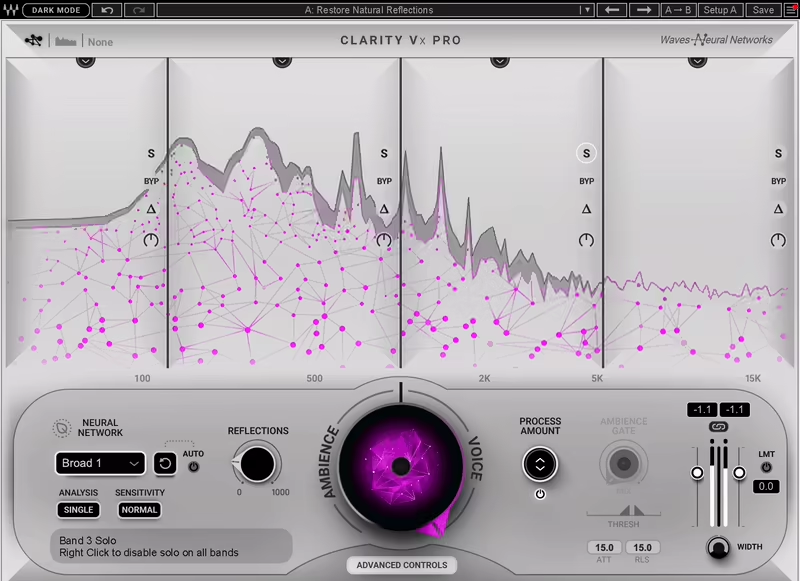
- Advanced “Pro” Controls
Now, let me tell you about Clarity Vx Pro; this is where things get exciting. For me, the multiband controls are a game-changer. They let me target specific frequencies so I can clean up a low-end hum or tame harsh high-end noise without overdoing it.
When I first tried splitting the noise reduction across different bands, I was like, “Okay, this is next-level.” And yes, you can even automate each band, which makes it super flexible for tricky projects.
- Negative Range & Adding Noise
Here’s something I never thought I’d say: I actually like a noise reduction tool that lets me add noise back in. With Vx Pro’s negative range feature, you can reintroduce just enough ambient sound to make the dialogue feel natural, or, if you’re feeling wild, you can mute the dialogue completely.
When I experimented with this, I realized how useful it is for creative mixing and post-production. It’s one of those features I didn’t know I needed until I tried it.
- Reflections & Ambience Gate
I’ve always struggled to balance cleaning up dialogue while keeping it natural, and this is where Vx Pro really shines. The Reflections control lets me preserve just the right amount of room tone, while the Ambience Gate makes those silent gaps feel polished without being too sterile. For me, these features add a level of finesse that’s hard to beat.
- Reset Network Feature
The first time I used the Reset Network button, I didn’t understand why this was not present on other cleaning software. It’s such a simple but powerful feature. If your audio environment changes, like switching from indoor dialogue to outdoor scenes, it lets you retrain the AI without messing up the earlier settings. I love how it adapts to new audio without me having to start from scratch.
Key Differences

- Depth of Control
For me, this is the biggest difference. Clarity Vx is all about simplicity; as you turn the knob, get results. Vx Pro, on the other hand, is for when you want full control. Multiband adjustments, gating, reflections, and even negative range give you the tools to tackle the trickiest audio.
- Workflow & CPU Usage
When I’m working on smaller projects, I appreciate how light Clarity Vx is on the CPU. It’s quick and easy, and I can focus on getting the job done. But for larger, more complex projects, I don’t mind the extra CPU load from Vx Pro because the advanced features are totally worth it.
- Same Core Engine
Here’s what I love: no matter which version you pick, the sound quality is identical. Both use the same Waves Neural Networks engine, so you’re not losing out on clarity or performance. It really comes down to how much tweaking you want to do.
For me, Clarity Vx is my go-to for fast, hassle-free cleanup. But when I’m working on something more challenging, like dialogue with multiple noise profiles, Clarity Vx Pro is the one I trust. Both are fantastic tools; it just depends on what your project needs.
- Presets

Although this is not a plugin in which presets matter that much, there is a difference in the number of presets both versions offer. While the Standard version has only 11 presets, the Pro version comes with double the amount for 6-band and 4-band workflows.

Workflow
Clarity Vx

- Getting Started with the Basics
When I first loaded up Clarity Vx, I couldn’t believe how intuitive it was; it’s almost impossible to mess this up. The plugin greets you with one giant knob in the center, and honestly, that’s all you need most of the time. You turn it to the right to reduce ambiance and voilà; cleaner dialogue. It’s as simple as twisting a volume knob.
For me, the beauty of Clarity Vx is in how quick it is to set up. After choosing one of the two available Neural Network profiles (Broad 1 or Broad 2), I usually experiment with the Analysis Mode: Single or Double.
Single sums the stereo file into one channel, while Double analyzes the left and right channels separately. I’ve found that for most stereo recordings, Double gives a more precise result, especially if the sound moves across the stereo field, like a car driving by.
- Adjusting Width for Stereo Files
I really like the Width control, especially when I’m working on stereo recordings. If I set it to 100%, the plugin keeps the stereo width intact, but sometimes, I like to narrow the stereo field a bit to hide certain artifacts.
Dialing it back to zero makes the track mono, which can be surprisingly handy for dialogue cleanup in noisy environments.
- How I Use It
Here’s my workflow:
- Load the plugin on the dialogue track.
- Select the Neural Network profile that best suits the recording (Broad 1 works great for most situations).
- Adjust the central knob until the ambience is just right.
- Use the Width control if needed to fine-tune the stereo image.
That’s it! It’s super straightforward. For me, this simplicity is what makes Clarity Vx a go-to for quick edits and projects where I need reliable noise reduction without overthinking.
Clarity Vx Pro
- Diving into Advanced Features
Now, if Clarity Vx is like driving an automatic car, Clarity Vx Pro is the manual transmission you didn’t know you needed. When I first opened the Pro version, I was a little intimidated by all the extra controls, but trust me, it’s not as scary as it looks.
The central knob is still your main control, so if you’re used to the basic version, you’ll feel right at home. But the real magic happens with the Advanced Controls.
- Using Multiband Processing
One of my favorite features is the Multiband Control. You get four bands that let you target specific frequency ranges, which is amazing for tackling tricky noise like low-end rumble or high-frequency hiss. Each band has its own set of tools:
- Process Amount: Adjust how much processing happens in that band.
- Delta Mode: Lets you hear exactly what’s being removed so you can fine-tune the settings.
- Gain: Boost or cut the processed signal for each band.
When I’m working on a dialogue track, I like to crank up the processing on the low end to remove any rumble and then go lighter on the mids and highs to keep the voice sounding natural.
- Extracting Ambience and Reflections
Here’s where it gets really fun; turning the central knob to the left doesn’t just reduce ambience; it extracts it. I’ve used this for projects where I needed clean ambience tracks to blend into ADR (Automated Dialogue Replacement) sessions. It’s like a cheat code for creating seamless transitions in post-production.
Another feature I love is the Reflections control. When I’m editing dialogue recorded in a reverberant room, I’ll dial this up to preserve some of the natural reflections, so it doesn’t sound overly dry.
The Ambience Gate is a lifesaver for smoothing out pauses between dialogue. It’s like having an intelligent gate that knows when to work based on the voice content, not just volume levels.
- My Pro Workflow
Using Clarity Vx Pro does take a bit more effort, but the results are so worth it. Here’s how I usually approach it:
- Load the plugin and select a Neural Network profile. The Pro version has an additional profile (Broad 1 HF) for preserving high frequencies, which I love for crisp dialogue.
- Adjust the central knob to set the baseline processing.
- Open the Advanced Controls and tweak the Multiband settings to focus on problematic frequencies.
- Use the Reflections knob to add a bit of natural room tone if needed.
- Enable the Ambience Gate to clean up gaps between speech.
- If there’s a drastic change in audio, I automate the Reset Network button to retrain the AI for the new section.
For me, Clarity Vx Pro is the plugin I pull out when the stakes are high and I need complete control over the final sound. It’s like having a toolbox full of everything I could ever need to make dialogue tracks shine.
Conclusion
For me, both Clarity Vx and Clarity Vx Pro are game-changers in the world of dialogue noise reduction. They share the same brilliant core, Waves’ Neural Networks, but cater to different needs.
Clarity Vx is all about simplicity and speed. When I just need to clean up some noise and move on, its one-knob workflow gets the job done perfectly. It’s reliable, intuitive, and lightweight on CPU, making it ideal for quick edits, podcasts, or straightforward dialogue work.
On the other hand, Clarity Vx Pro is like the ultimate Swiss Army knife for audio pros. I love how it lets me dive deep into multiband controls, extract ambience, and tweak reflections to finesse the perfect balance. It’s my go-to for complex projects or when I need precise control over challenging noise profiles. Yes, it’s a bit more demanding in terms of CPU and workflow, but the results are totally worth it.
Ultimately, whether you choose Clarity Vx or Clarity Vx Pro comes down to how much control you want or need. For me, having both in my toolkit means I’m ready for anything, from quick-and-dirty cleanups to polished, professional-grade dialogue mixes. Both plugins deliver stunning results, and they’ve genuinely changed the way I work with audio.
